Recently I noticed I would occasionally get the dreaded question-mark network icon: “?” I did some digging around and it was related to Ubuntu’s Network Connectivity check. Several posts out there simply say to disable the check by going to Settings -> Privacy and turning Connectivity Checking to “Off.”
But by disabling connectivity checking, I don’t get the automatic prompt to connect through a captive portal (like at my local library). I wanted to actually fix the problem, so I needed to understand what the problem was.
Ubuntu uses the URL http://connectivity-check.ubuntu.com/ by default for connectivity checking. I went to the command line to see if there were any problems using curl while on my wired network:
$ curl -v http://connectivity-check.ubuntu.com/
*   Trying 35.222.85.5...
* TCP_NODELAY set
* connect to 35.222.85.5 port 80 failed: Connection timed out
*   Trying 35.224.99.156...
* TCP_NODELAY set
* Connected to connectivity-check.ubuntu.com (35.224.99.156) port 80 (#0)
> GET / HTTP/1.1
> Host: connectivity-check.ubuntu.com
> User-Agent: curl/7.58.0
> Accept: */*
>
< HTTP/1.1 204 No Content
< Date: Wed, 09 Dec 2020 16:02:34 GMT
< Server: Apache/2.4.18 (Ubuntu)
< X-NetworkManager-Status: online
<
* Connection #0 to host connectivity-check.ubuntu.com left intact
Everything seemed to work out in the end, but you can see that the first request failed so it had to fall back to the secondary address. This whole request took 122 seconds.
The problem is, the default connectivity check interval is 120 seconds. So after the first one times out Network Manager flags the computer as offline. Apps like Spotify recognize the offline network status and stop working – despite being actually connected to the internet.
The Debian default URL is http://network-test.debian.org/nm which has 3 IPs listed (for fall back) and it is much faster. All I had to do was add this file:
sudo vi /etc/NetworkManager/conf.d/11-connectivity.conf
I gave it a little longer interval – 5 minutes instead of 2. It’s probably not necessary as their service responds much faster, but I want to avoid the question-mark-of-no-connectivity as much as possible but still retain features like captive portal detection.
Restart after you’ve saved that file and you should be good to go!
At my work we have a thing about giving tacos (🌮) to people when they help you out, do something great or funny – as a show of support. The tacos can be redeemed for prizes or gift cards – and one of those prizes is a Fitbit. I wanted a model upgrade from the ones our company was offering. In November 2020, Costco had a Fitbit Charge 4 bundle for $90.
I brokered a deal with my wife. I’d redeem a $100 Amazon gift card with my tacos and give it to her, and then buy the model I want from Costco.
The reason I got the Charge 4 is because it has a built-in GPS. I don’t like using my phone to record my activities as it drains the battery very quickly. Also my handheld Garmin eTrex Vista GPS is starting to act weird – it randomly turns off sometimes when I’m riding.
Hooking it up to Strava was simple, I did it through the https://strava.fitbit.com/ website. Here’s an article that goes into detail about connecting the two. When you finish an activity, Fitbit automatically transfers the information via the app (including GPS track) to Strava. As a bonus now my heart rate information is sent for more accurate effort calculation.
Battery Life
Since I considered GPS to be a requirement, this is the 2nd best feature. It would be a folly to call it charge if the battery life sucked. Without GPS use, I can easily go a week before putting it on the charger. With GPS use, I’ve found it takes about 10% of the battery for every hour you’re recording activity. By that marker, I’d guess you could use the GPS for 9+ hours before it conked out.
Sleep Tracking
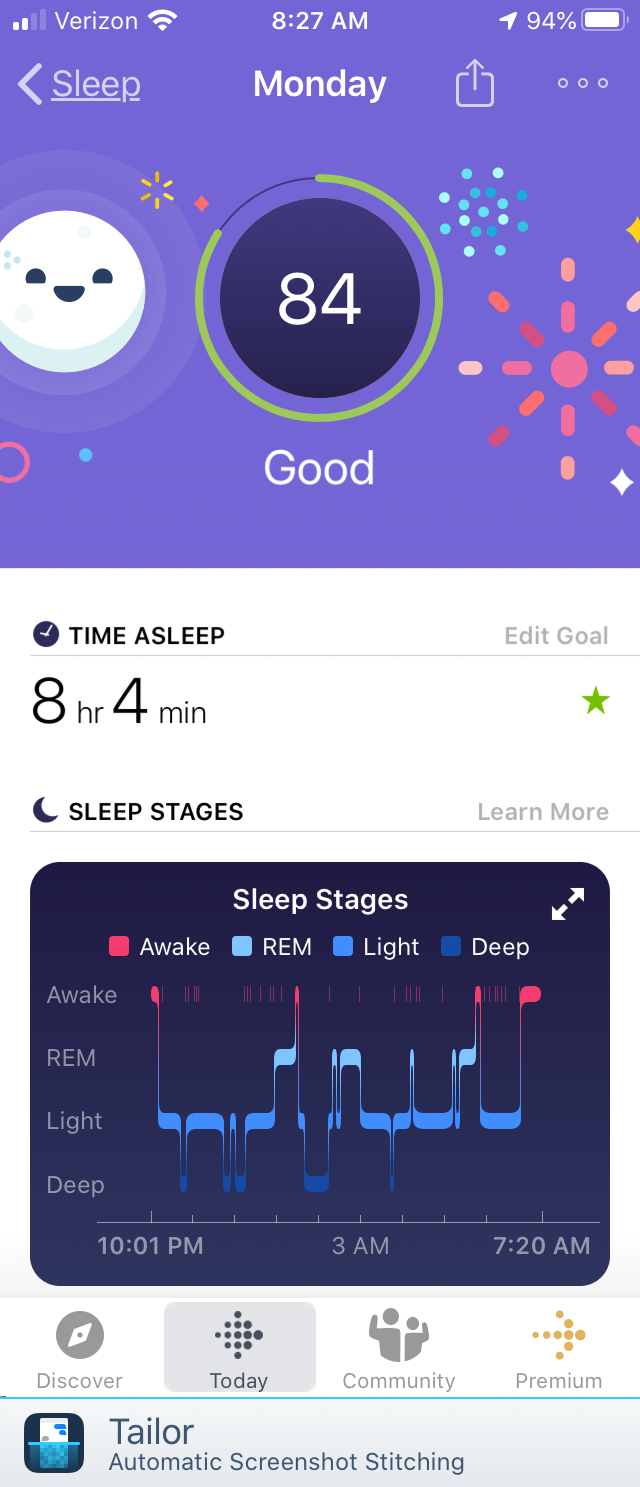
All fitness trackers can track sleep. Along with a great battery life, the Charge 4 charges quickly. Putting it on the charger while I take a shower is enough to keep it topped up. I don’t ever have to take it off for a night to get a full charge.
Water Resistant 50 Meters
I always would put my phone in a ziplock bag while kayaking and still worry that it will make it’s way to the bottom of the lake. Fitbit says you can wear your tracker or smartwatch in the shower, pool and beyond. That should be just fine for kayaking – it will get wet, but it will survive.
Those are the good things, now onto some of the annoyances…
UI Issues
The swipe functions don’t always work as expected, partly because the screen is small, partly because the screen is very tall and skinny.
The most common issue is when I swipe down from the top to get the notification list (to inevitably clear it out). The Charge often thinks I’m swiping to the side because I didn’t swipe perfectly vertical top to bottom.
Another thing I do occasionally is leave the home screen on the weather. It will stay here until you press the watch button – so the next time you wake the screen you can see the weather. You’ll still get notifications on these secondary screens, but once they go away you cannot swipe down to see them again – you must go back to the home screen (clock) and swipe down from there.
Multiple Activities
I realize this is probably an edge case, but I imagine I’m not the only one experiencing this issue. The Charge 4 currently can’t pause one activity and start another. Here’s the scenario: I put studded tires on my bike and rode to the local nature center:
WP Strava ERROR 403 Forbidden - See full error by adding
define( 'WPSTRAVA_DEBUG', true );
to wp-config.php
I brought my snowshoes with me, and when I got to the trail, I walked around the park. On the Charge 4 you can pause and resume your activity. This is great if I bike somewhere like the library, I can pause my ride when I arrive, and resume once I head home – then it records as a single activity.
But you can’t start another GPS activity until you finish the first one. Rather than my activity showing up as three (ride out, hike, ride back) I want them to appear simply as two: bike & snowshoe.
So I used my trusty(?) Garmin for the hike and hoped it didn’t turn off on me while I was out.
WP Strava ERROR 403 Forbidden - See full error by adding
define( 'WPSTRAVA_DEBUG', true );
to wp-config.php
Verdict?
I looked at getting the cheapish Apple Watch for around $150 and also looked at the new Fitbit Versa 3. While they both have built-in GPS, neither of them were going to match the battery life of the Charge. If it goes on sale again for < $100 I would easily recommend it to anyone looking at a fitness watch – especially for tracking bike rides.
Every year, we put some sort of motorized conveyance under the tree. In the past it’s been an HO scale train or slot cars from my childhood. While I like the nostalgia of them, let’s face it – I’m old which means they’re old. So they’re a little finicky to get working well. Still fun, but this year I wanted to try something new.
I’ve always wanted to have an indoor model train layout, but since we don’t have room I turned my thoughts to doing an outdoor layout But that always seemed extremely expensive. Then a couple ideas came together for me: 1) my #1 Christmas gift item is a 1/24 scale crawler – Axial’s SCX24 and 2) I found a G-scale train set for less than $50.
Continue reading →
Most of the configuration follows this Nerdvittles Skyetel post, but I include some specifics and screenshots for my configuration using OpenWrt, IncrediblePBX on Raspberry Pi, and a Linksys RTP-300 analog telephone adapter.
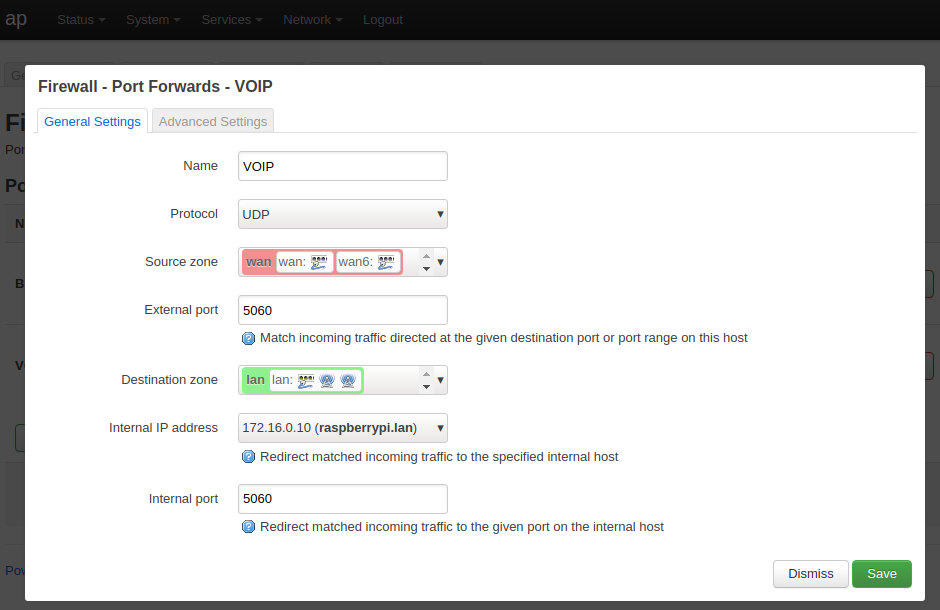
On my OpenWrt router that acts as a gateway, I added a firewall port forward for UDP Port 5060 to my Asterisk server (Raspberry Pi).
I didn’t need to run any of the Skyetel add-ip customizations from the original article. On my Raspberry Pi those settings were already there. You can check to see if the firewall settings for the Skyetel IPs are already present by running:
If you see the ACCEPT all row, then you’re good to go. If you don’t get any output, you’ll need to run the commands from the Nerdvittles Skyetel post.
Trunk Setup
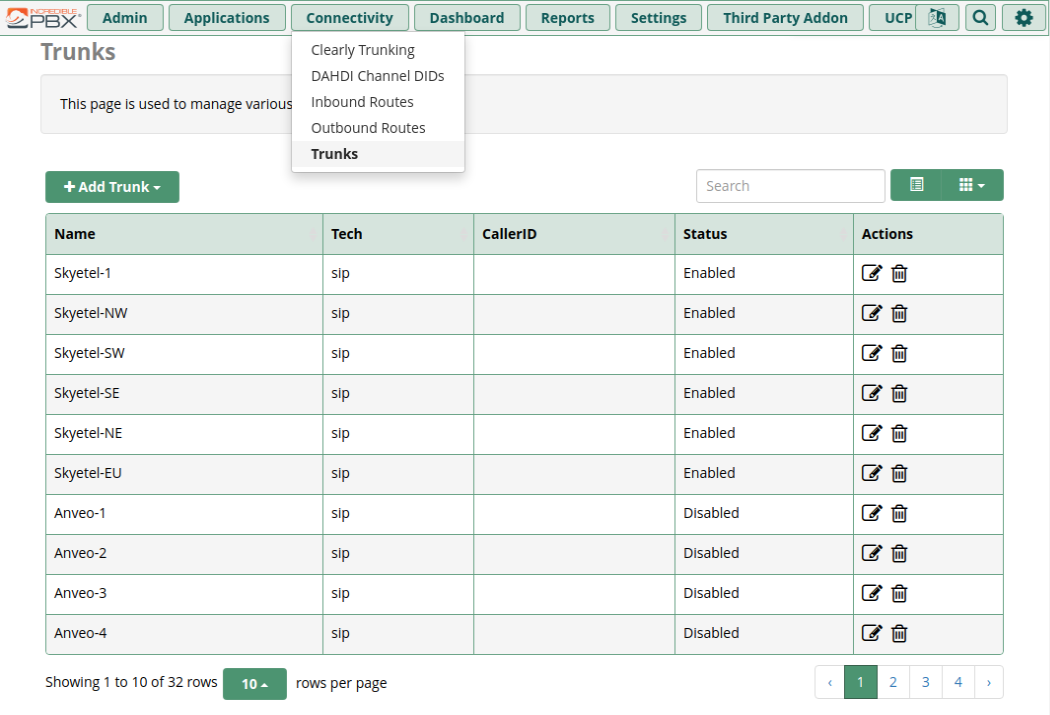
I also didn’t need to run any of the Skytel Trunk Setup scripts, as I already had the six Skyetel trunks configured and enabled.
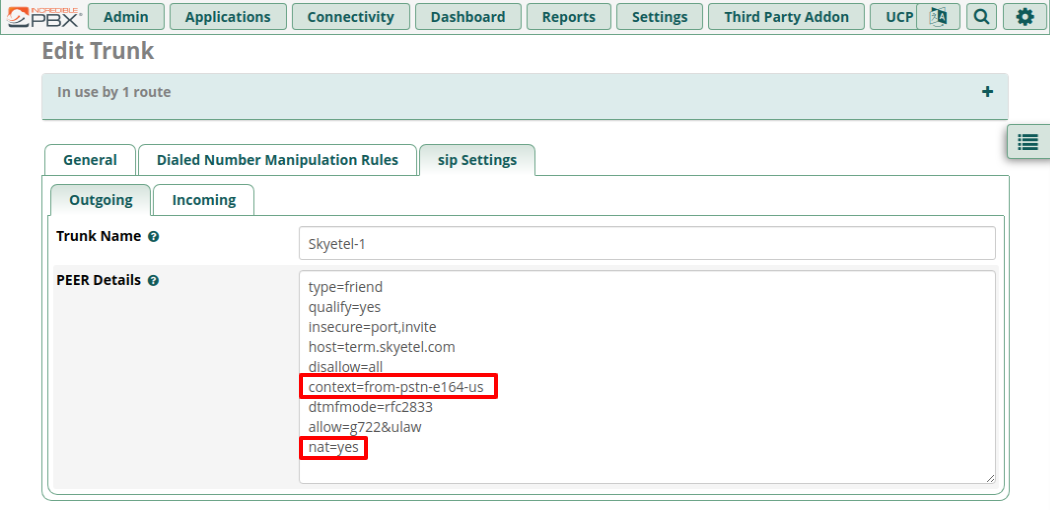
I also didn’t need to change the context configuration from from-trunk to from-pstn-e164-us (for a normal 10-digit US phone setup). It was already there 💪 Also, nat=yes was already set, so no need to add that either.
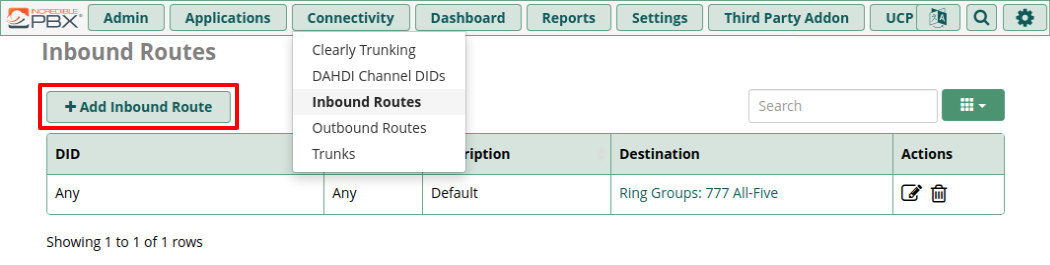
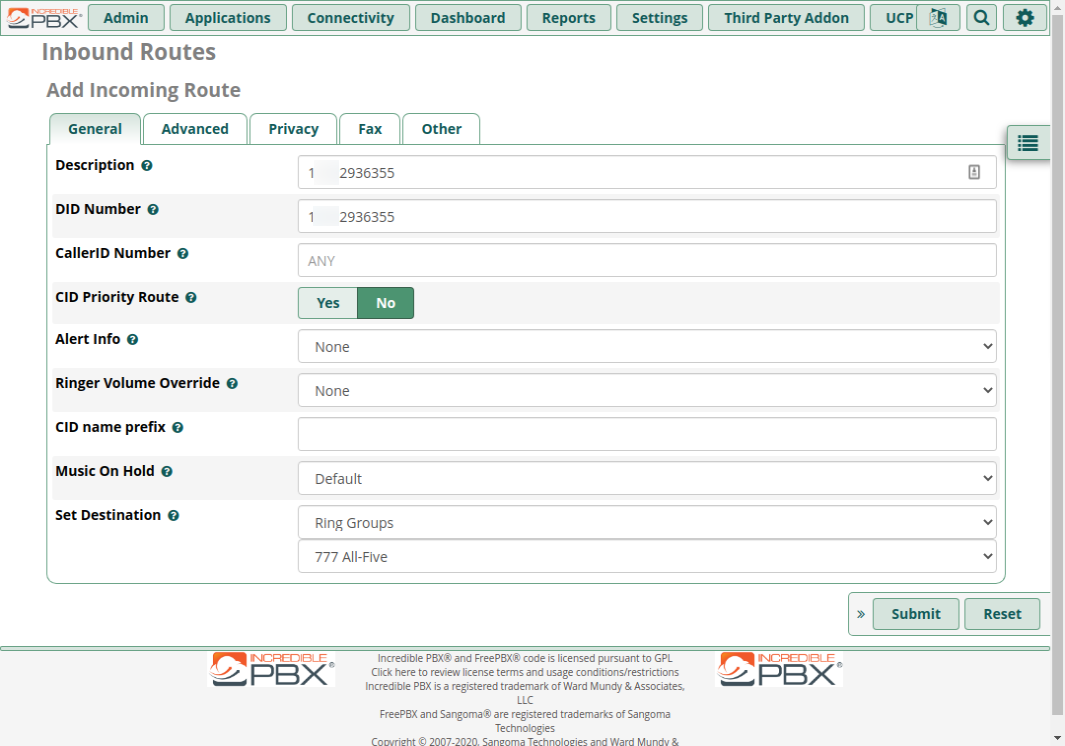
For the DID and Description I added my full 11-digit number: 1 and the other 10-digits. I also set the destination to the “777 All-Five” ring group. It’s a default ring group setup to ring all extensions (701 to 705) all at once.
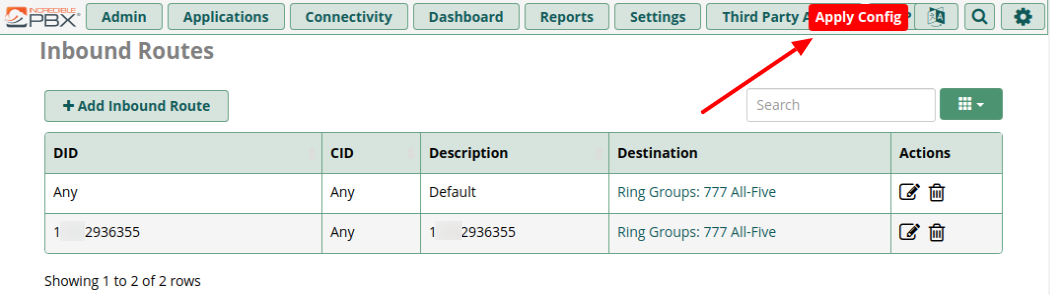
Once you click Submit there will be an “Apply Config” notification.
Click it to apply your new route and reload the dial plan.
Outbound Routes
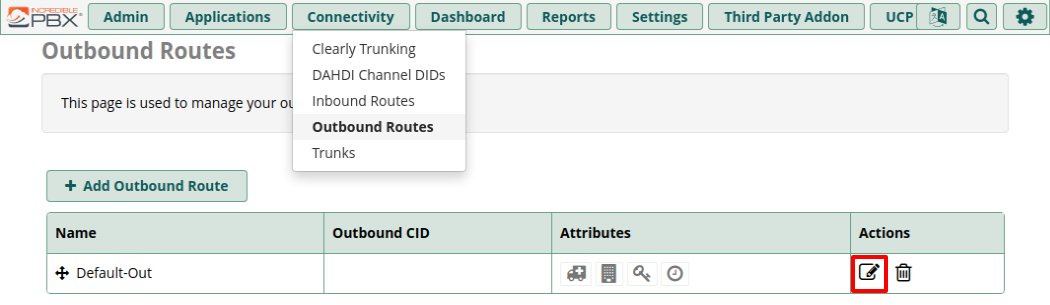
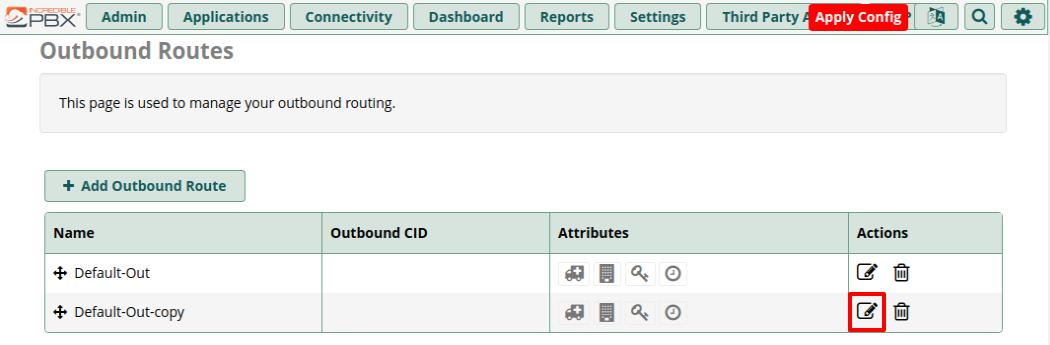
The default Incredible PBX config already had default route. Click edit to view it:
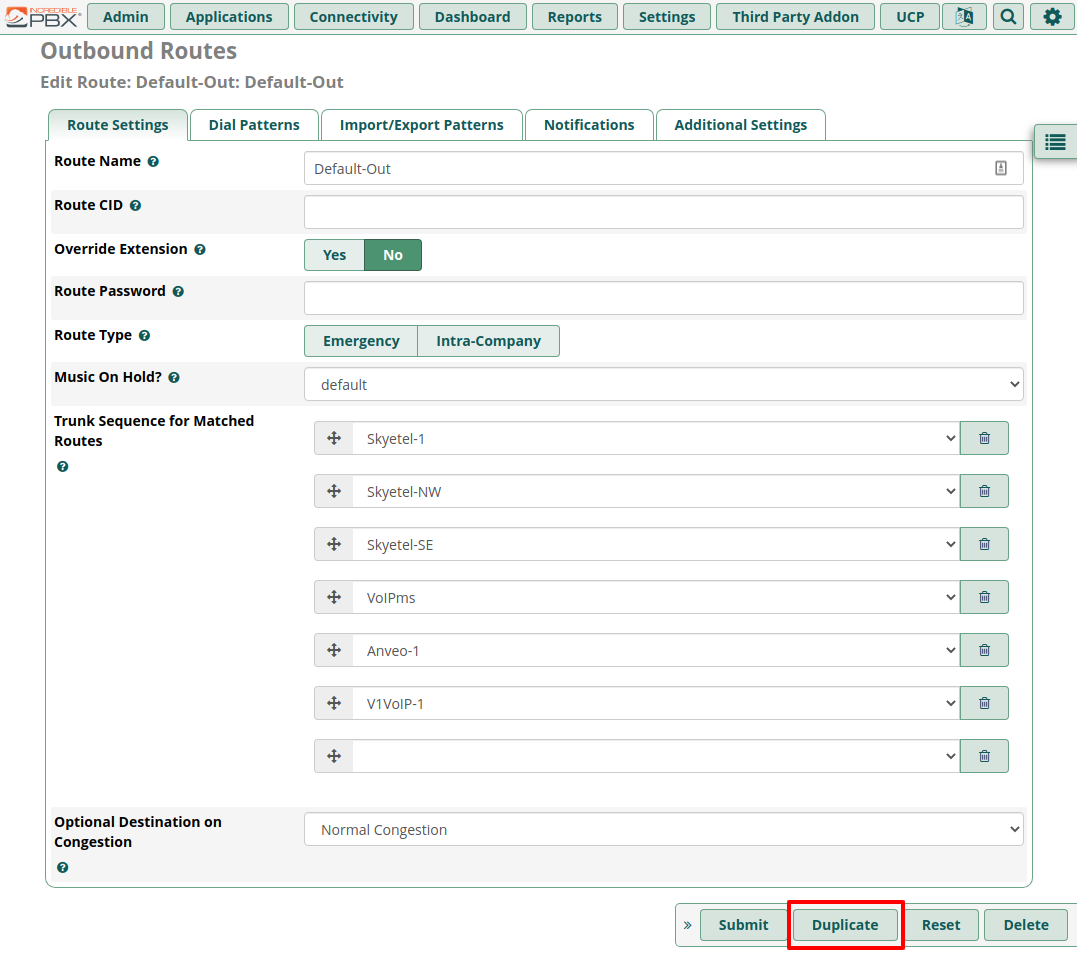
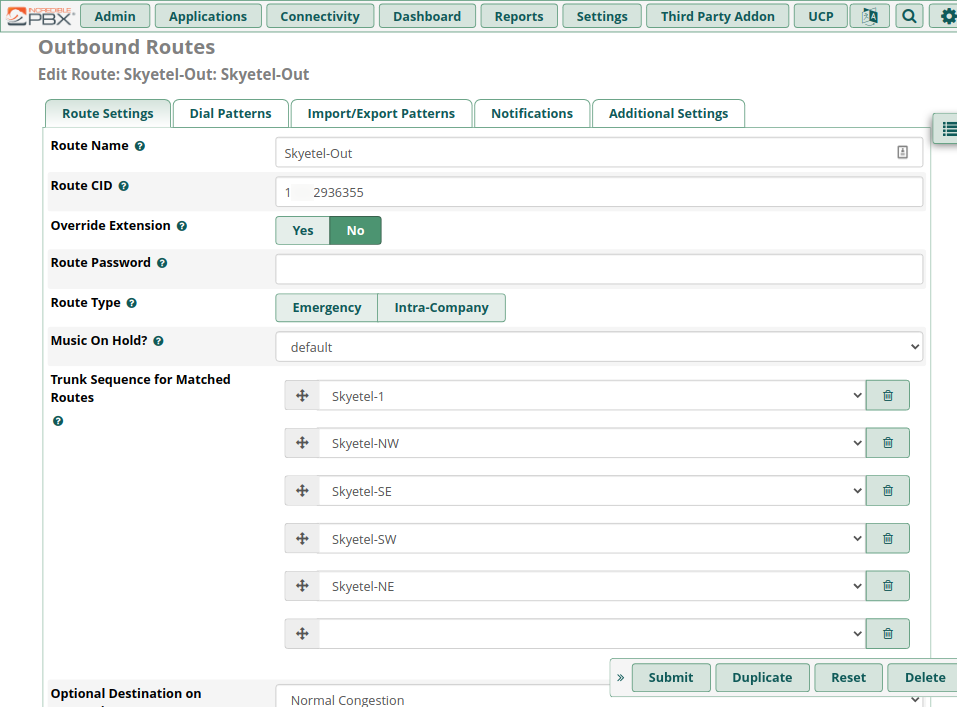
As you can see it already has some Skyetel trunks pre-configured. Go ahead and click Duplicate to make a copy of this route we can change.
This will create a copy that we’ll edit.
Rename the route, add your 11-digit phone number, and add the additional Skyetel trunks, removing any extras.
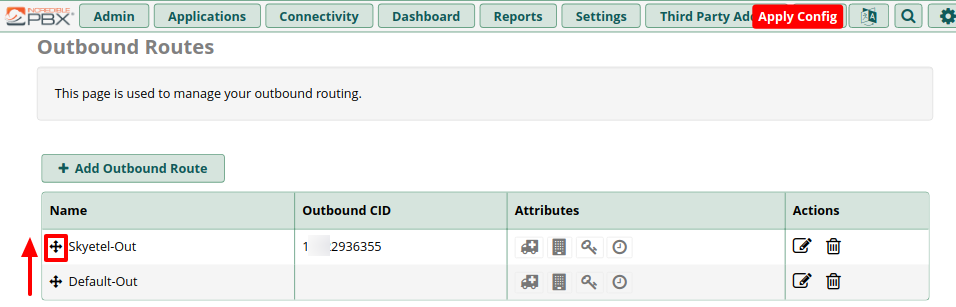
After submitting the new route, use the crosshair icon to move the Skyetel route to the top, then click Apply Config.
I didn’t need to do any configuration of SIP Settings in Asterisk, my defaults all looked good.
Skyetel Configuration
Skyetel configuration is normally pretty simple, but for my configuration I want to combine my Dynamic DNS setup with the inbound SIP IP. But it turns out that Skyetel doesn’t work that way. Instead they support a script that will periodically call out from your asterisk server and update the endpoint IP at Skyetel if it’s changed https://bitbucket.org/skyetel/ip-endpoint-group-update/
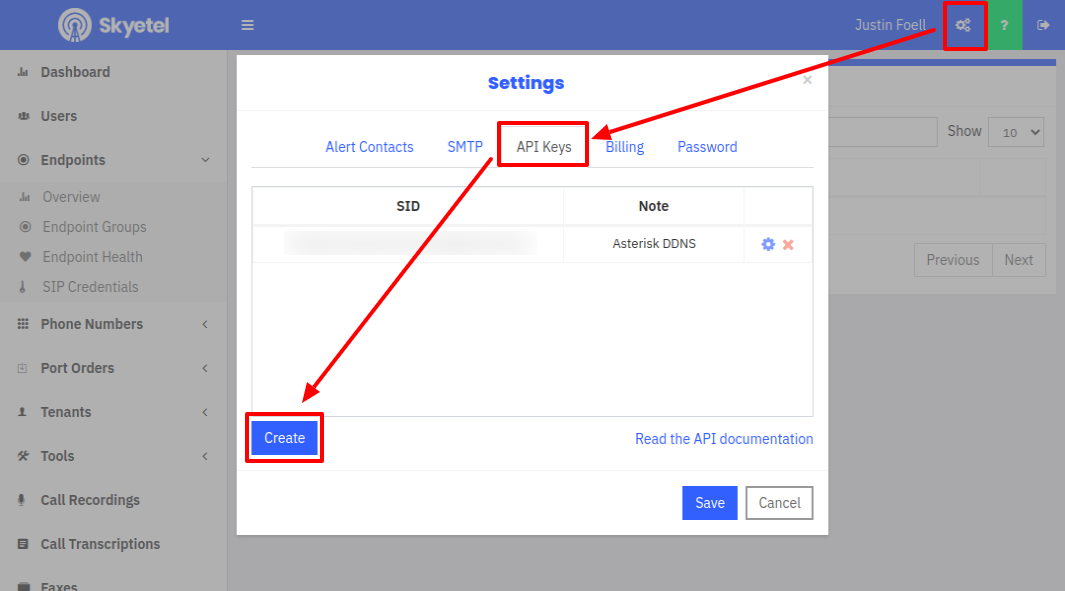
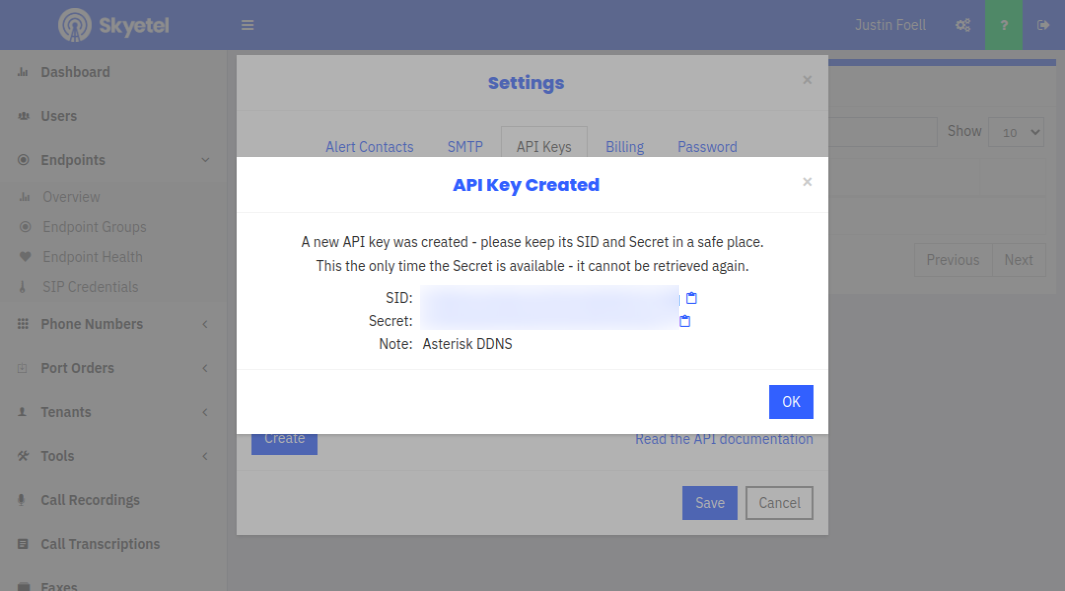
In order to use the script, you must first create a set of API keys on the Skyetel dashboard by clicking the gear icon by your login name.
Go to the API keys tab and click Create. Save the keys somewhere safe, they won’t be displayed a second time.
Then head back to your Raspberry Pi to install the script. You’ll need git to install the script. Additionally, I also needed jq on my Raspberry Pi:
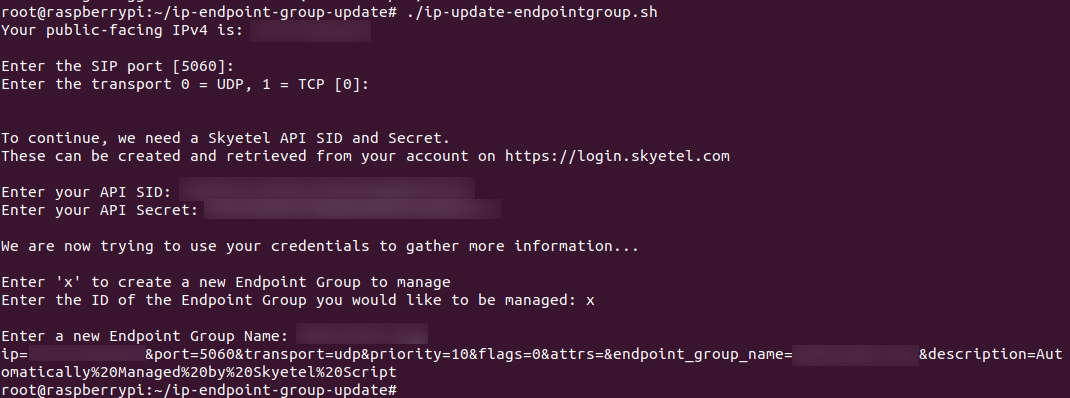
cd into the ip-endpoint-group-update directory, and then run the script. I used the defaults for port and transport by simply pressing <Enter>. Enter your API keys that you created on the Skyetel dashboard. I hadn’t yet set up an Endpoint Group in my Skyetel dash, so I entered “x” to do it from the script.
The script automatically installs itself into /usr/local/bin/ip-update-endpointgroup.sh and creates a cron to run it every twenty minutes at /etc/cron.d/ip-update-endpointgroup.cron
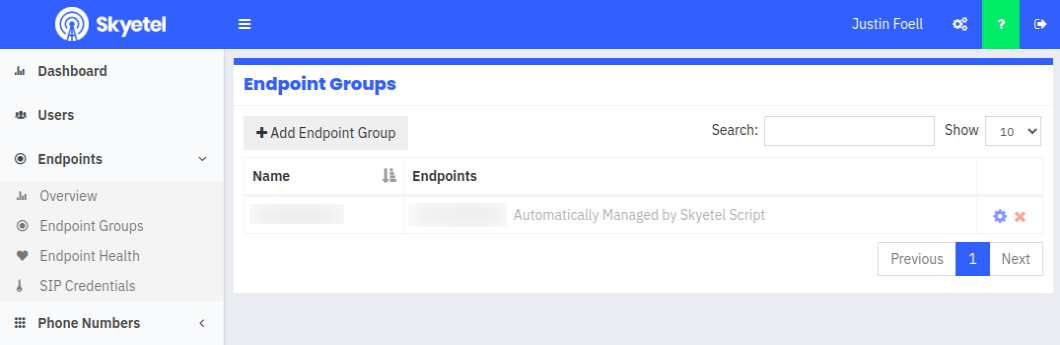
In the Skyetel dash I see there’s an endpoint group that was automatically created:
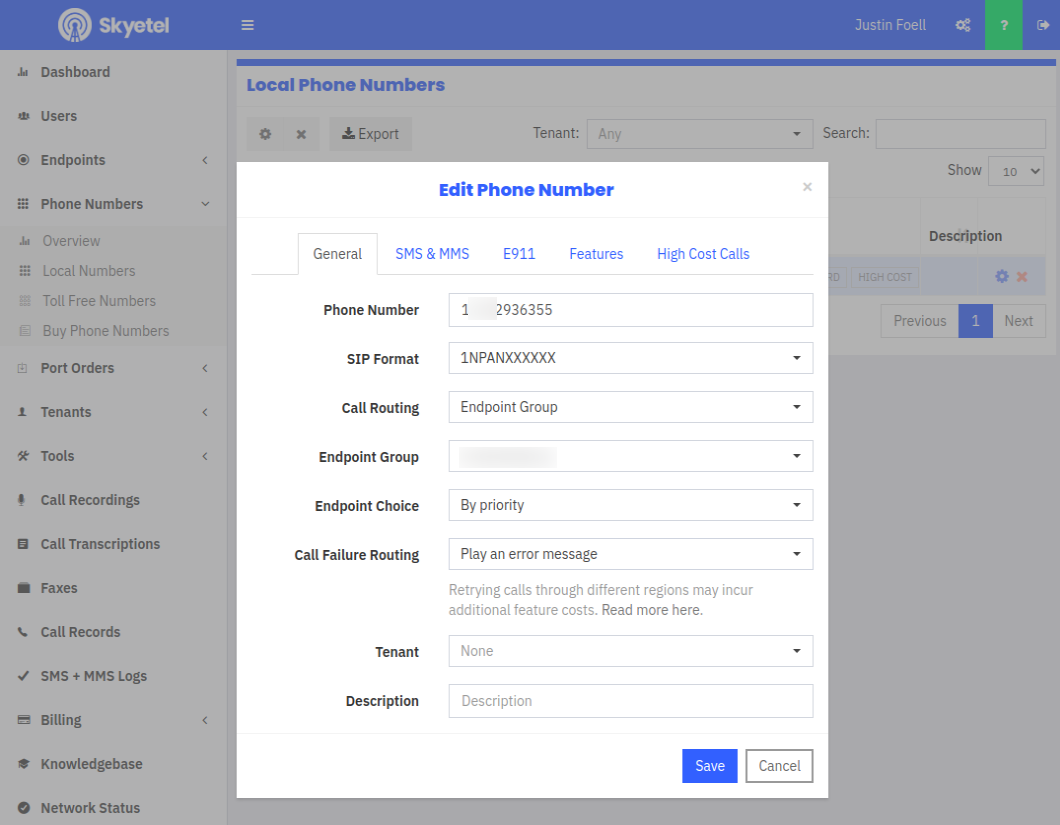
Click Save, then give it a few minutes and try calling your number from your cell phone – it should ring and connect. If audio is good, you’re good to go!
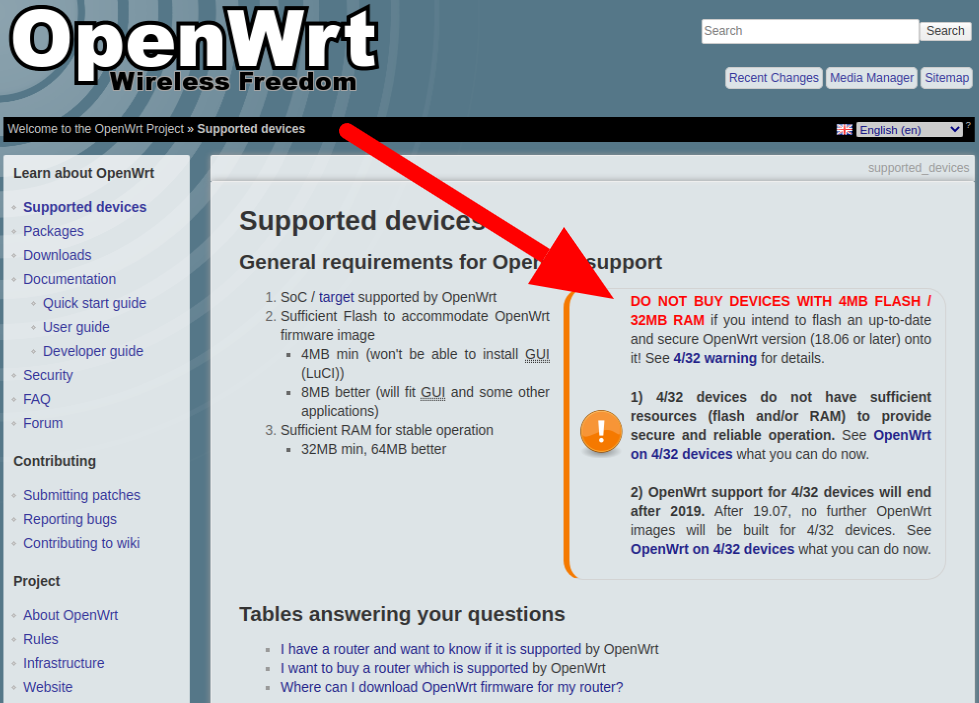
Before I began, I thought I should see if there’s a newer OpenWrt version my router can run. I always start on the Supported Devices page of the wiki, but on this visit I was treated to a warning:
If you read the 4/32 warning, the crux of the matter is that there may not be enough RAM to run OpenWrt without crashing. And the small flash area means possibly not having enough room to install LuCI, the web interface, and the packages to access LuCI via HTTPS. Also, there’s this:
Previous versions of OpenWrt (such as earlier versions of 17.01.x, 15.05.x “Chaos Calmer” and prior) contain now-known security vulnerabilities in the kernel, wireless implementation, and/or application code. […] In many cases, these known vulnerabilities are being actively targeted, potentially including by advanced, likely state-sponsored or state-affiliated actor or actors.
Ugh, I was using one of those older versions, and now I’m paranoid (as I should be) that my router could be used as a tool by nation-states to do their bidding. Nicely, there’s a link on the supported devices page titled “I want to buy a router which is supported by OpenWrt.” It links to their supported hardware table, pre-filtered by units that can run the latest stable version of OpenWrt – 19.07.4 at time of writing.
I spent some time browsing this list compared to what was available at my local Micro Center. I tried to find one that had the best OpenWrt support with the fewest known issues, and landed on the TP-Link C7 AC1750 for $70. If I like this one after a month or so, I’m going to buy another for better coverage.
OpenWrt ddns-scripts install
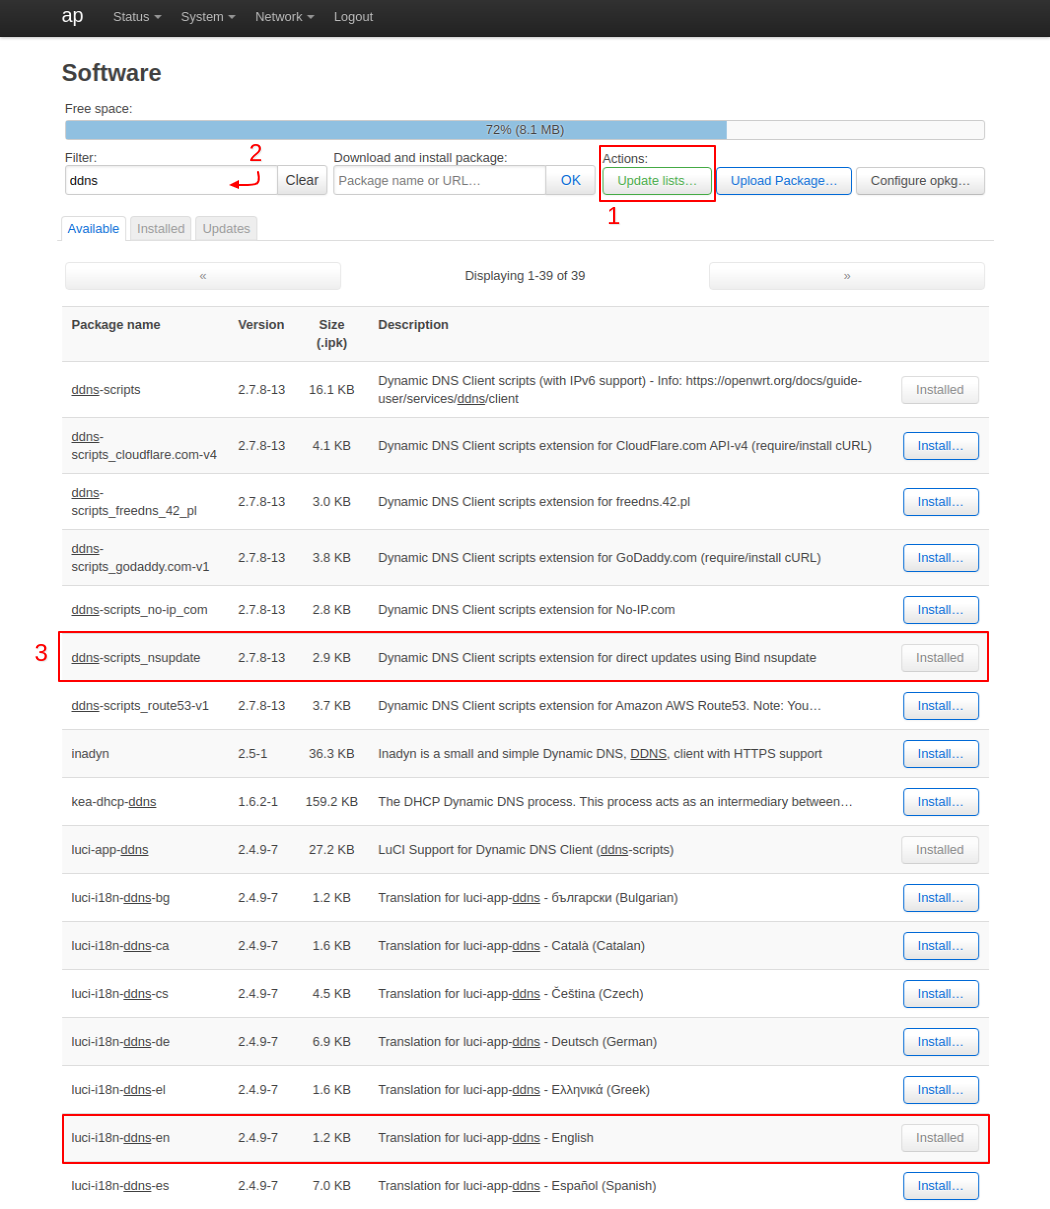
With the hardware choice out of the way, I installed OpenWrt 19.07.4. Then I needed to add support for Dynamic DNS. Go to System -> Software in the Web UI (LuCI). Click Update lists…, then type ddns in the filter input and press <Enter> to filter the list. The packages to install to use nsupdate.info are ddns-scripts_nsupdate and luci-i18n-ddns-en (or whatever language package you need):
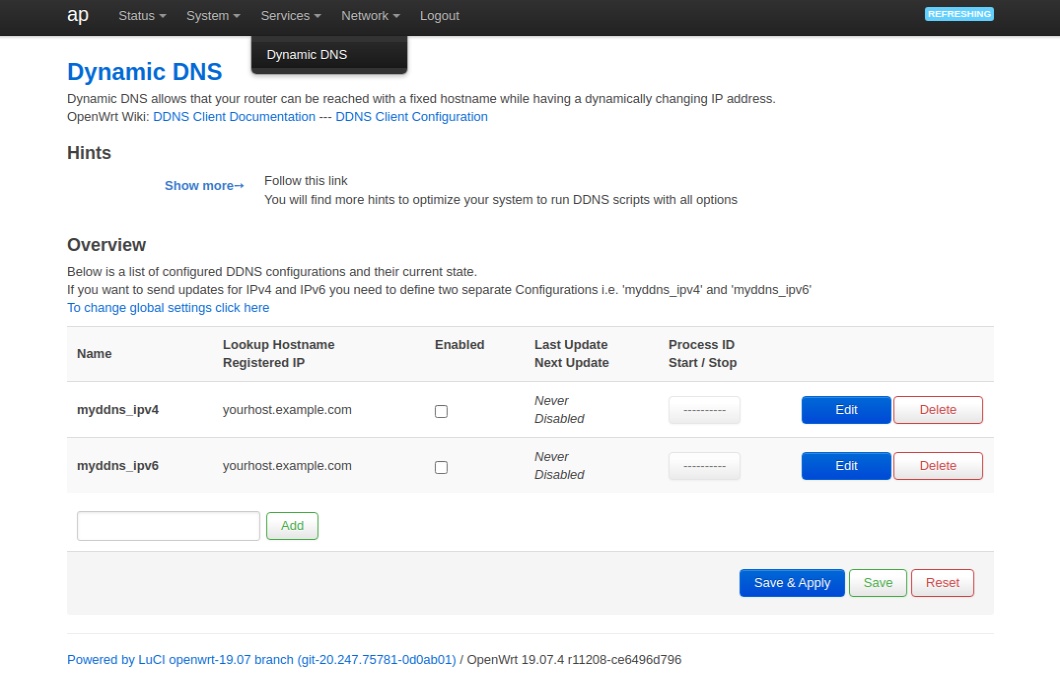
Installing those will also install their dependencies, such as the base ddns-scripts and luci-app-ddns. Once they’re installed, reboot your router and you’ll have a Services -> Dynamic DNS menu.
You might see the menu before rebooting, but you’ll likely get this error if you try to visit it:
/usr/lib/lua/luci/controller/ddns.lua:116: attempt to index field '?' (a nil value)
Following it will lead you to a hints page and let you know you need to install a couple more packages: curl and bind-host. Follow the same installation process as above. After they’re installed, the Hints section will go away.
DNS Configuration
The only configuration you have to do at your DNS provider is add a CNAME record for the domain you want to use:
your.domain.com CNAME yourdomain.nsupdate.info
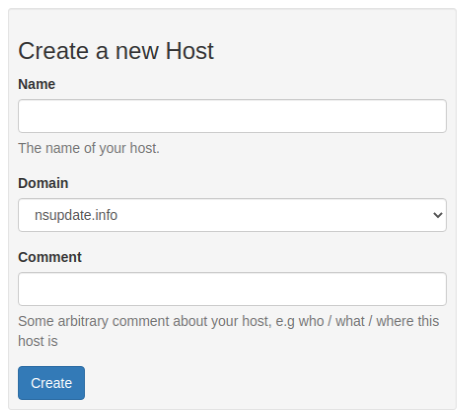
Then when you go to nsupdate.info, on the Overview page click Add Host and put in the subdomain (example: yourdomain from above) in the Name field, then select nsupdate.info under Domain:
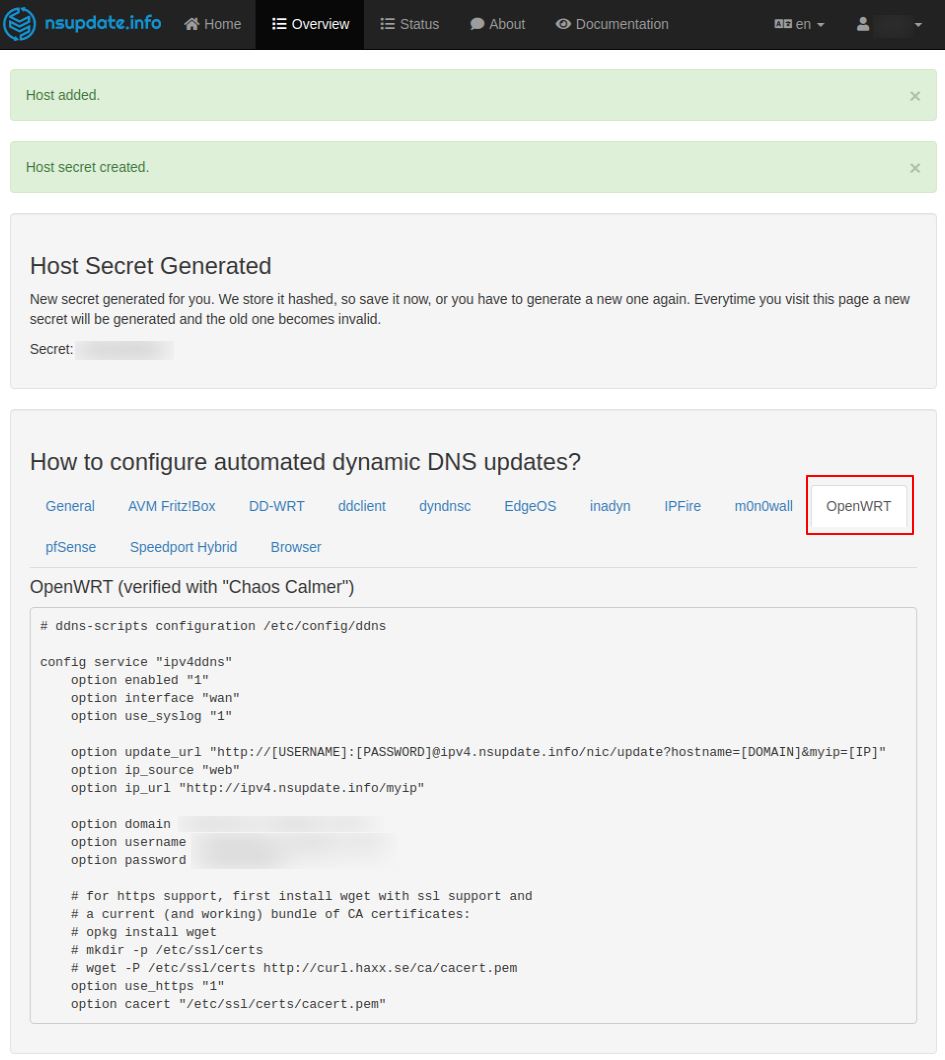
Conveniently, after creating your new host entry, nsupdate.info will print your update secret and include specific configuration parameters for OpenWrt:
OpenWrt Configuration
You can use the configuration info from nsupdate.info, but it’s just as easy to paste the info into the LuCI panel. It’s worth noting that you only need to generate one host and host secret at nsupdate.info, but you’ll have two separate configurations in OpenWrt for IPv4 and IPv6.
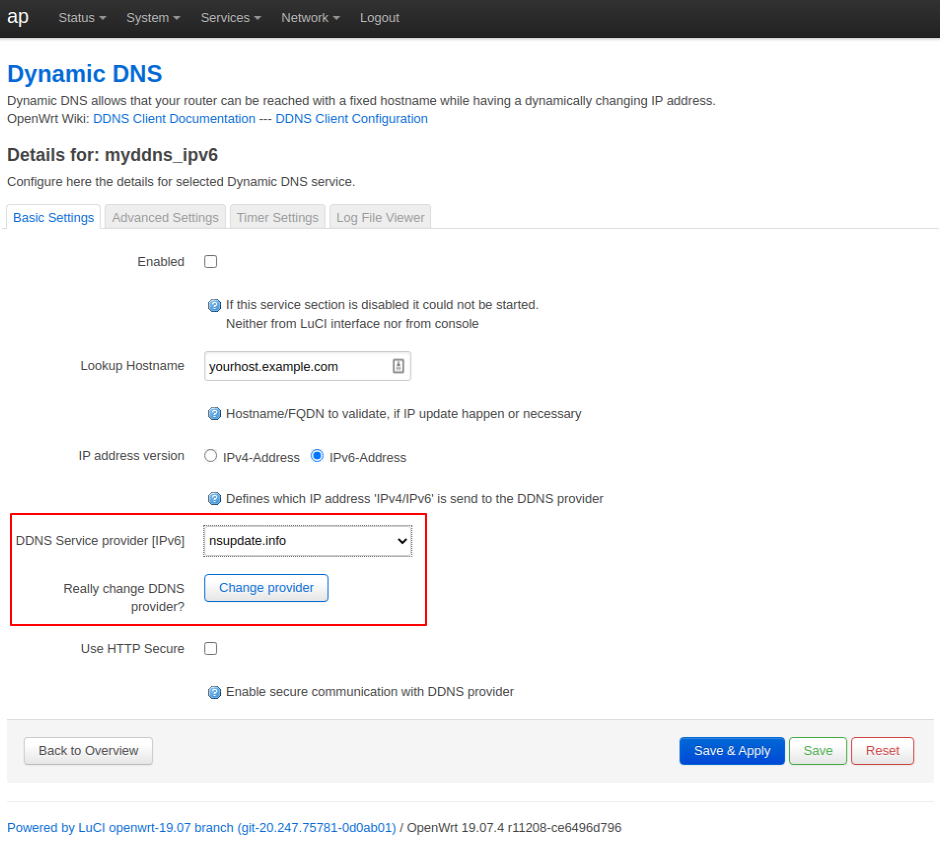
In OpenWrt’s Dynamic DNS page, click Edit on the myddns_ipv4 row. The first thing you’ll want to do is update the DDNS Service provider to nsupdate.info and click Change provider:
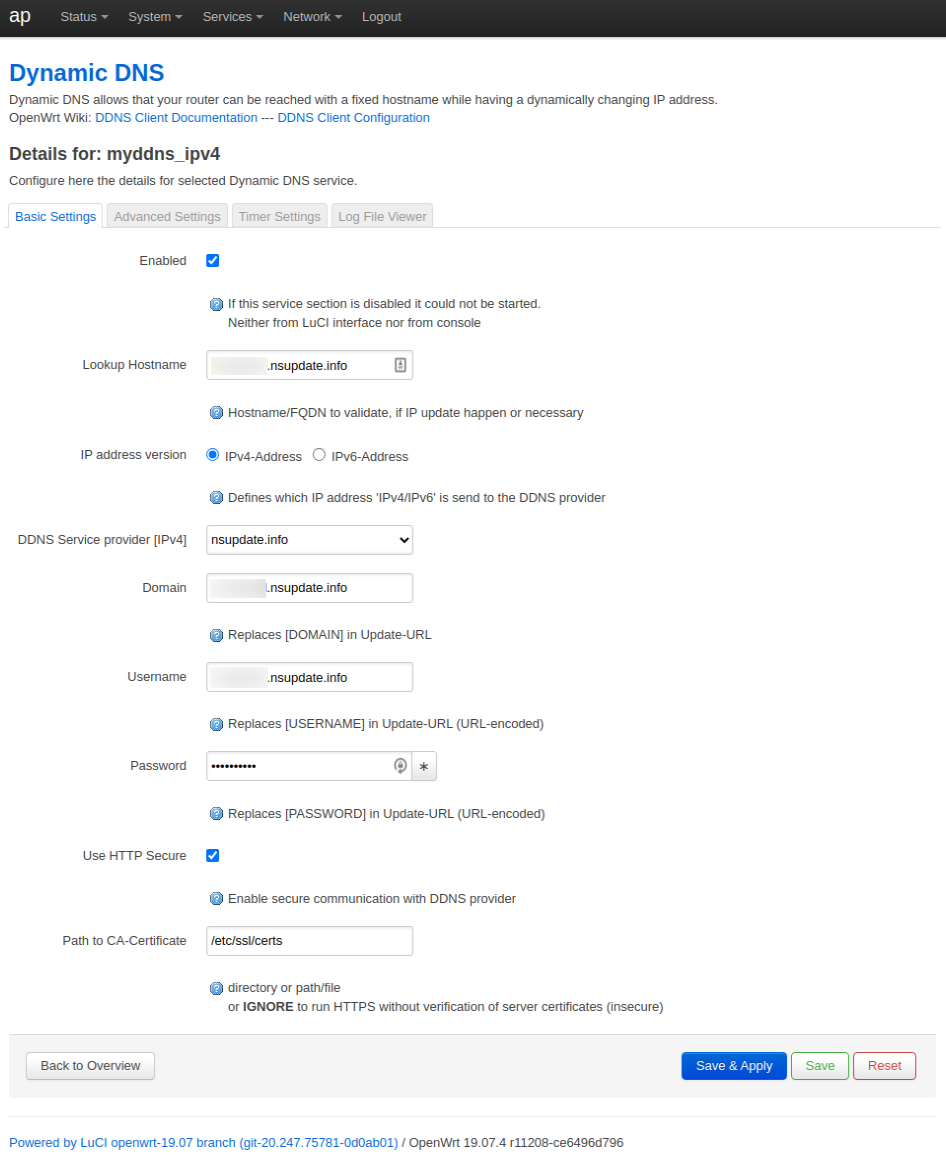
Only then can you enter all of the information from nsupdate.info:
Enter your nsupdate.info FQDN in all of these fields:
Lookup Hostname
Domain
Username
Then put your secret in the Password field. Check both Enabled and Use HTTP Secure, then add /etc/ssl/certs to Path to CA-Certificate. Click Save & Apply, then repeat the same process with the same info for the other myddns_ipv6 entry.
From the Dynamic DNS overview page in OpenWrt, click the Start buttons for each row under Process ID Start / Stop. This only needs to be done once when you’re done configuring Dynamic DNS.
Test
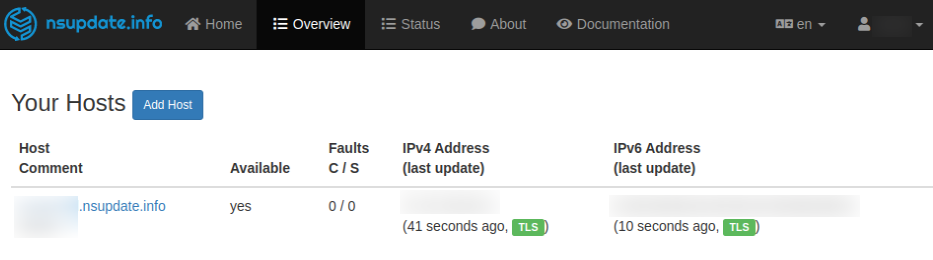
Starting the Dynamic DNS process in OpenWrt should trigger your first update at nsupdate.info. You can see it easily on the Overview page:
If it all worked, your IPv4 and IPv6 address should be updated, hopefully with a green TLS indicator noting that it was done securely. If there are any problems, the numbers under Faults will increase – C for Client, S for Server.
If there are problems, you can see API messages on nsupdate.info by clicking on your hostname to get further details. You can also view detailed logs in OpenWrt by clicking Edit on the myddns_ipv4 or myddns_ipv6 rows. Then click the Log File Viewer tab and click the Read / Reread Log File button.
I was able to configure this in under an hour, hopefully you find it useful. Let me know if you have any troubles getting things to work.
 But that always seemed extremely expensive. Then a couple ideas came together for me: 1) my #1 Christmas gift item is a 1/24 scale crawler – Axial’s SCX24 and 2) I found a G-scale train set for less than $50.