Before you install Duplicati, there’s one question you need to ask:
Does this computer have multiple user logins (that you want to back-up), or is it primarily used by one user?
This is important because you can install Duplicati in one of two ways: to run as a single-user, or to run as a system service that is available to all users. By default Duplicati is installed for a single user, but if there is more than one user on the computer you want to be able to back-up, you’ll want to install it as a service.
If you don’t install it as a service, when Duplicati tries to read files that belong to the other users, it will get a permission denied error and won’t be able to back those files up. You don’t want to find out that your files weren’t backed up when it’s too late.
I’ve provided some MacOS specific configurations in that section for setting it up as a service.
RaspberryPi
Install Duplicati on a RasperryPi
To get Duplicati successfully installed on a RaspberryPi running Raspbian, you’ll likely have to also install some of the mono dependencies to avoid installation errors.
Once that’s done you can (re)install Duplicati, hopefully without errors.
MacOS
For my MacOS installation I needed to install it as a service. It’s my wife’s Macbook. I also use it for Fusion360, and I like my scroll settings different than she does. So it has two user accounts, both with files we want to back-up. Installing Duplicati as a service in this case is a must.
Both of the plist configuration files can be installed as any user as they’ll be going in a system-wide location which will run Duplicati as a system service.
Service LaunchDaemon
$ sudo vi /Library/LaunchDaemons/com.duplicati.server.plist
Once those two files are in place, the next time you reboot and log in, any and all users should have a Duplicati icon in the system tray. You can then configure a backup job to read all users’ files without issue.
Useful Duplicati Options (all platforms)
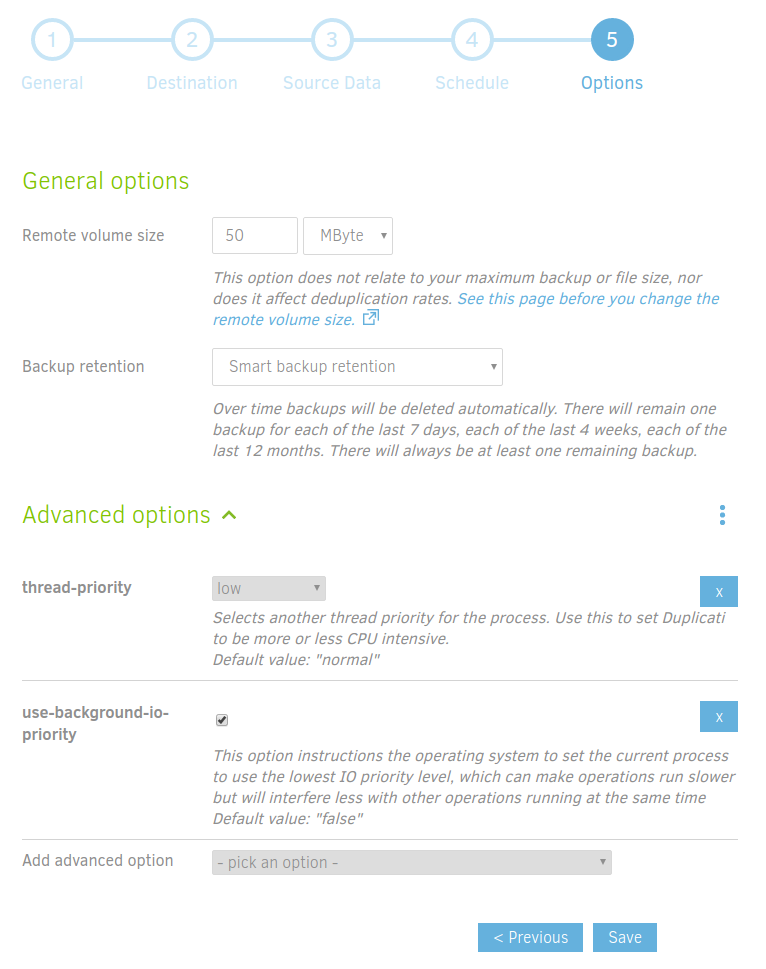
There are two settings to reduce Duplicati’s resource usage:
use-background-io-priority
thread-priority
On my brand-new 2019 XPS13 developer system Duplicati was using 280% CPU.
In other words, three of the 8 available cores were dedicated to Duplicati, plus disk I/O. I recommend setting use-background-io-priority to true and thread-priority to something below “normal” to adjust the CPU usage to an acceptable level. You can find these under “Advanced options” on the last page of the Add/Edit Configuration page of a backup.
Test
As always, test your configuration. I like to do a daily backup with “Smart backup retention” so my backup cloud disk usage doesn’t grow indeterminately.
Make sure your RaspberryPi backups are completing. It will take a while if you have a lot of data. For a 1TB backup from my RaspberryPi, it took a full week to complete because it is s-l-o-w. Once a full backup is made, the incremental updates shouldn’t take as long, but they may still take longer than a day to complete.
For phones I have a Linksys RTP300 analog telephone adapter (ATA) that I purchased at a local thrift store. It’s a discontinued product, but they’re easy to find for cheap on eBay.
Since I did this years ago, some of the instructions and firmware files are getting hard to find, but if you need instructions – let me know in the comments and I’ll try to help as best I can.
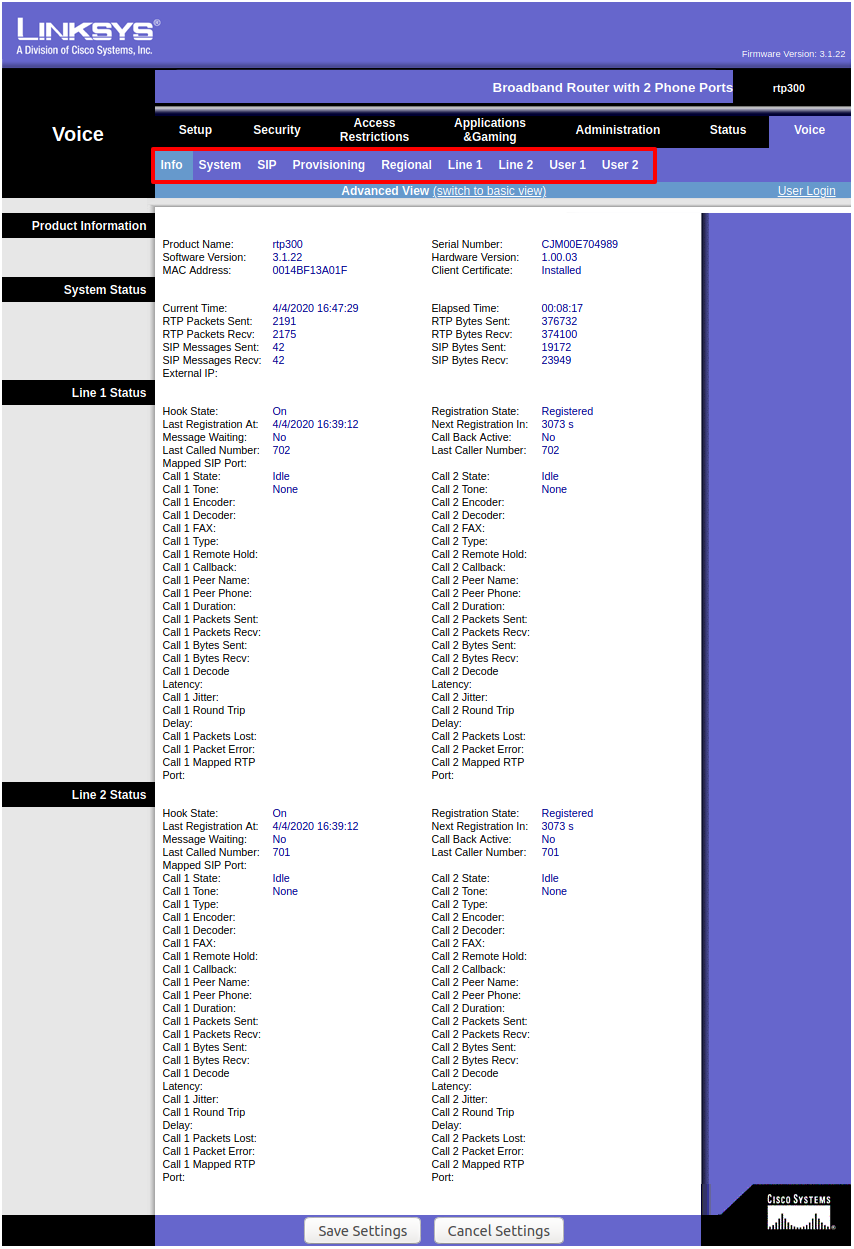
Getting into the RTP-300 admin panel
It had been at least a year since I’ve logged into the admin interface on my RTP-300. Luckily, there are some fun things you can do to help figure out how to get in. If you have a phone hooked up to it and it’s powered on, you can use the Interactive Voice Response (IVR) to get information. This article from Cisco (who purchased Linksys) has many of the available codes.
Pick up the phone and dial #### to get into the IVR menu. Then press 110# and the nice lady will read back to you the IP of your ATA.
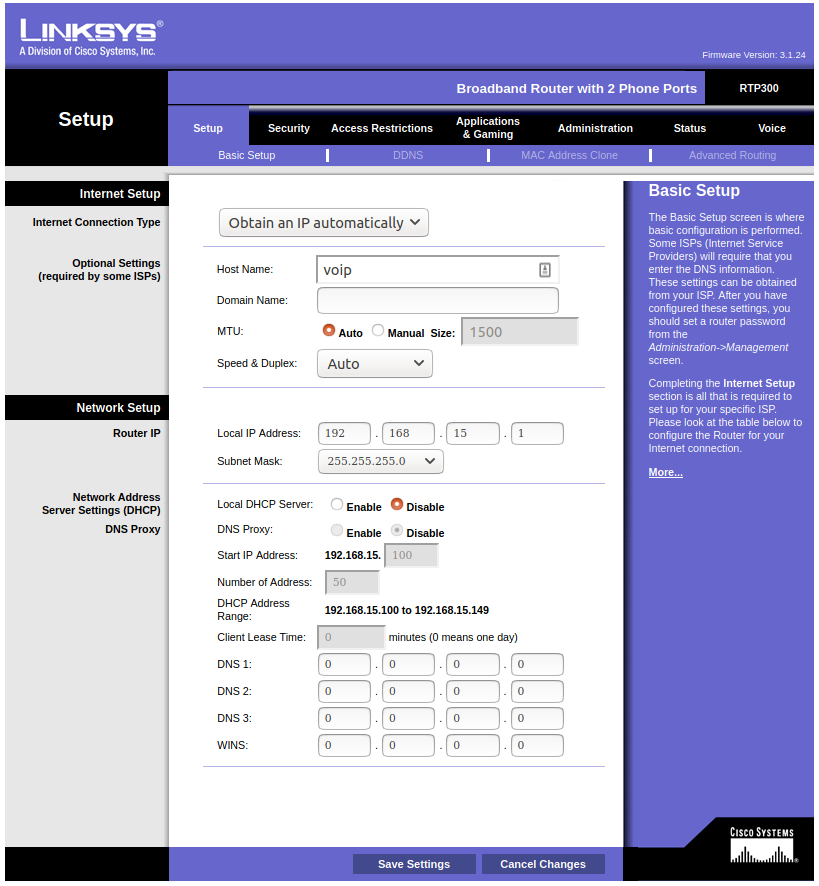
Good info, but it wasn’t running the web interface on port 80, so I had to figure that out. The IVR option for port wasn’t working, so I did an nmap scan of all ports 1-65535 from the command line – you could use the raspberry pi or any other computer on the same network as your RTP-300:
$ nmap 172.16.0.11 -Pn
Starting Nmap 7.60 ( https://nmap.org ) at 2020-04-04 18:02 CDT
Nmap scan report for voip.lan (172.16.0.11)
Host is up (0.0048s latency).
Not shown: 999 filtered ports
PORT STATE SERVICE
8080/tcp open http-proxy
There it is, port 8080. I made sure to add the address (with port) in my password manager. Then I had to use Firefox to finally connect to the ATA admin because Chrome wouldn’t complete the connection – likely because the RTP300 doesn’t have support for HTTPS. ¯_(ツ)_/¯
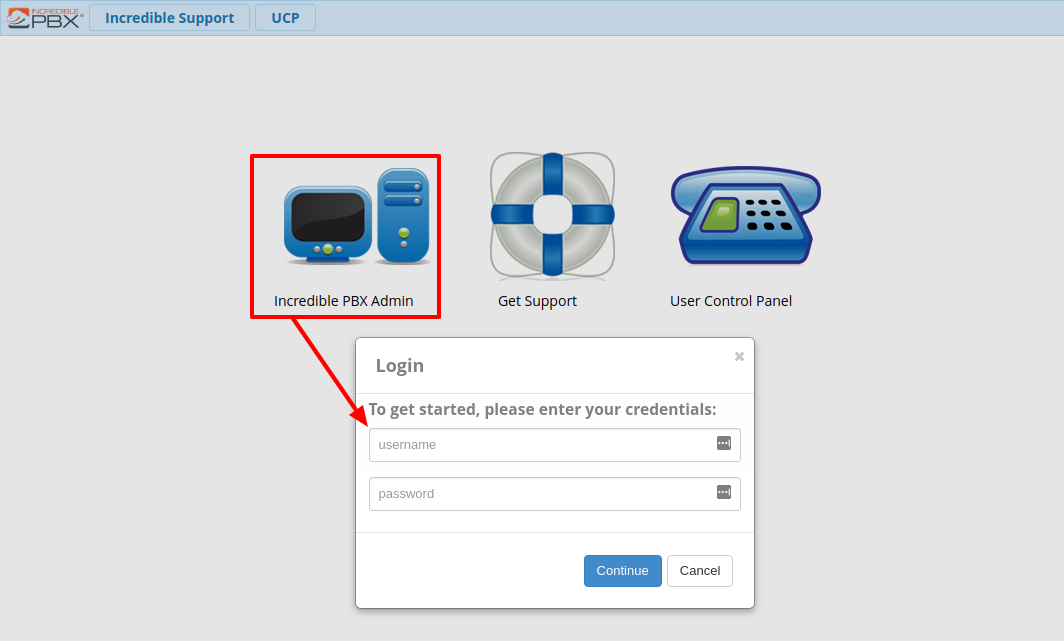
But we’re in! We’ll first do some configuration in Asterisk and then come back to the RTP300 configuration.
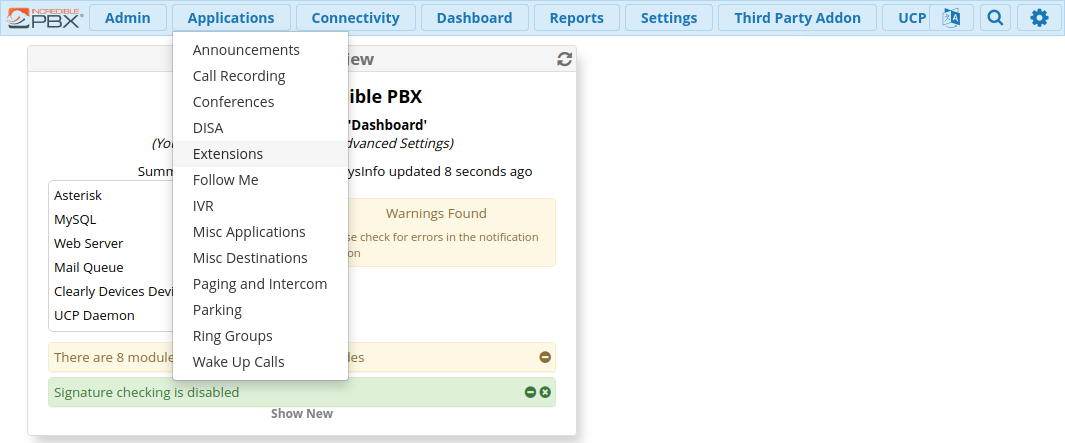
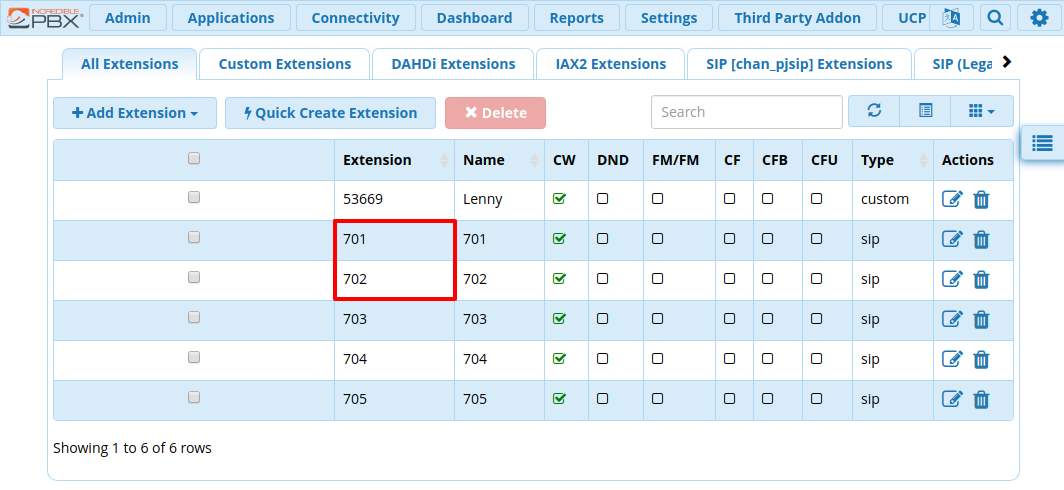
Once you’re logged in to the IncrediblePBX/Asterisk web admin, navigate to Extensions (under Applications).
There you can see there are a few extensions pre-configured for you, including 701 & 702, which will work great with the RTP-300.
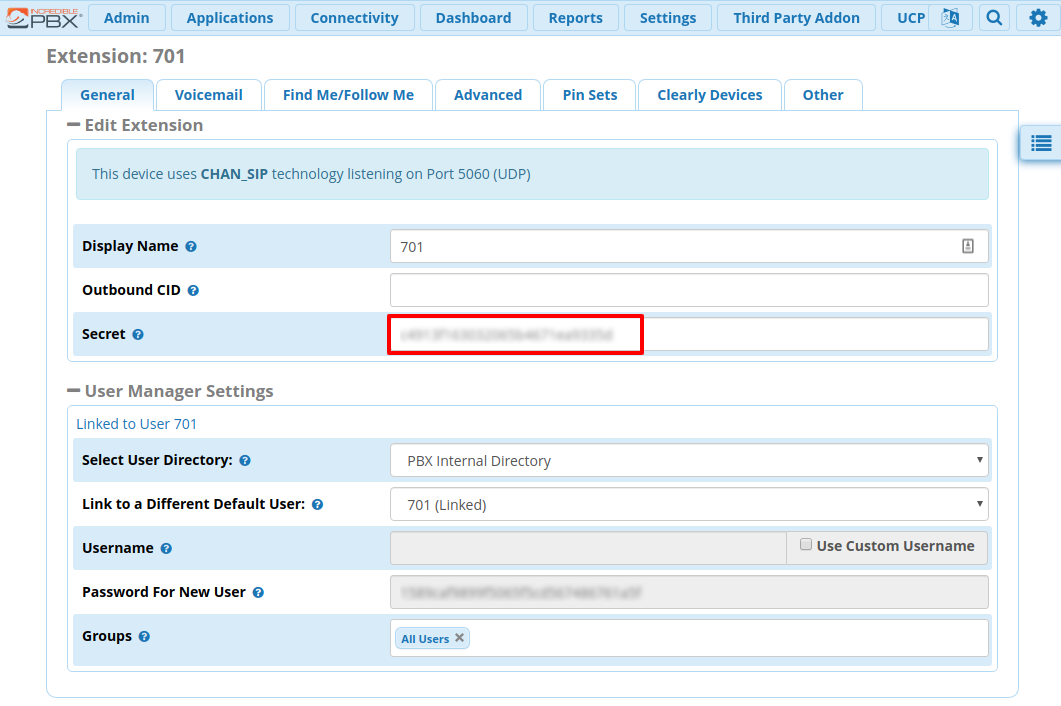
Click the Edit button to the right (paper/pencil icon) to edit and view more information about that extension. You’ll need to do two things in here. First, copy the “Secret” key for each extension.
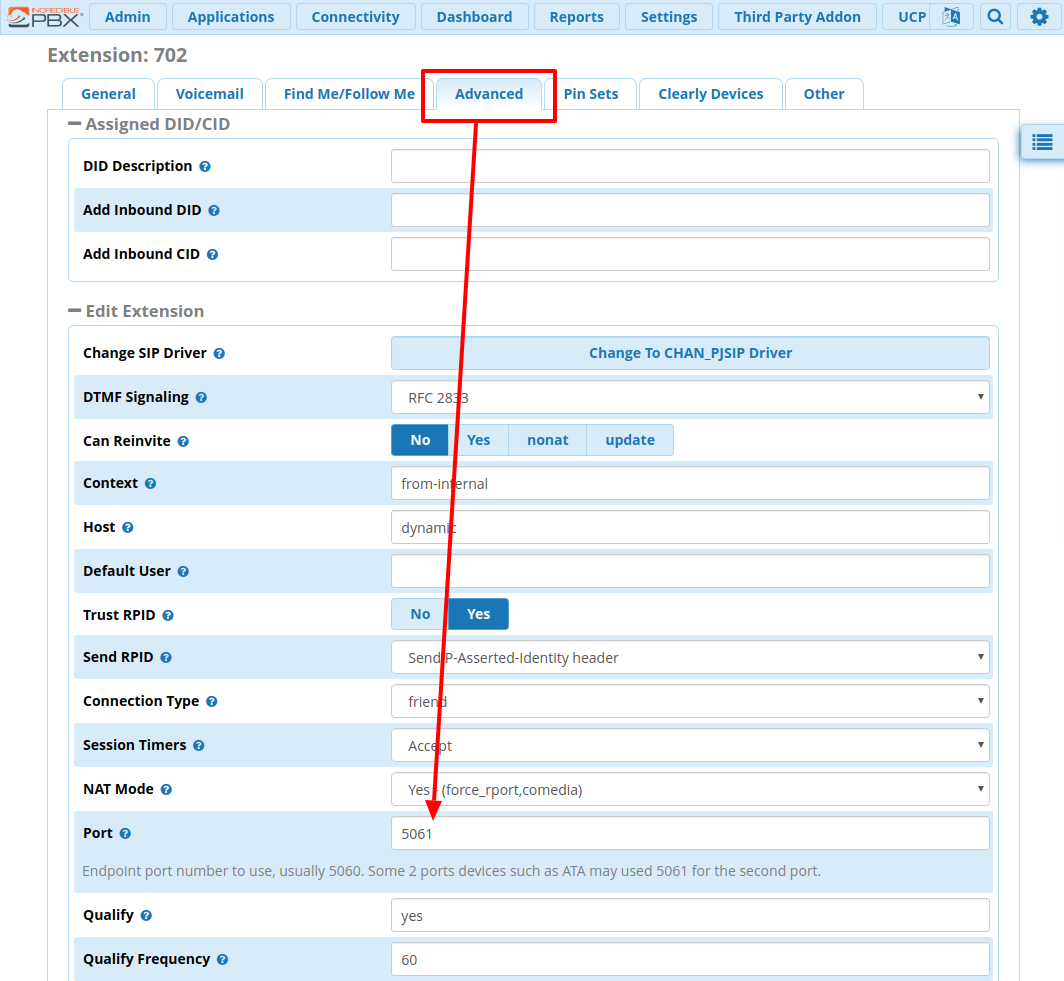
Second, for extension 702, also change the SIP port to 5061. There’s a note in there about how 5061 is sometimes used for “Line 2” on ATAs – and that’s exactly the case for the RTP-300.
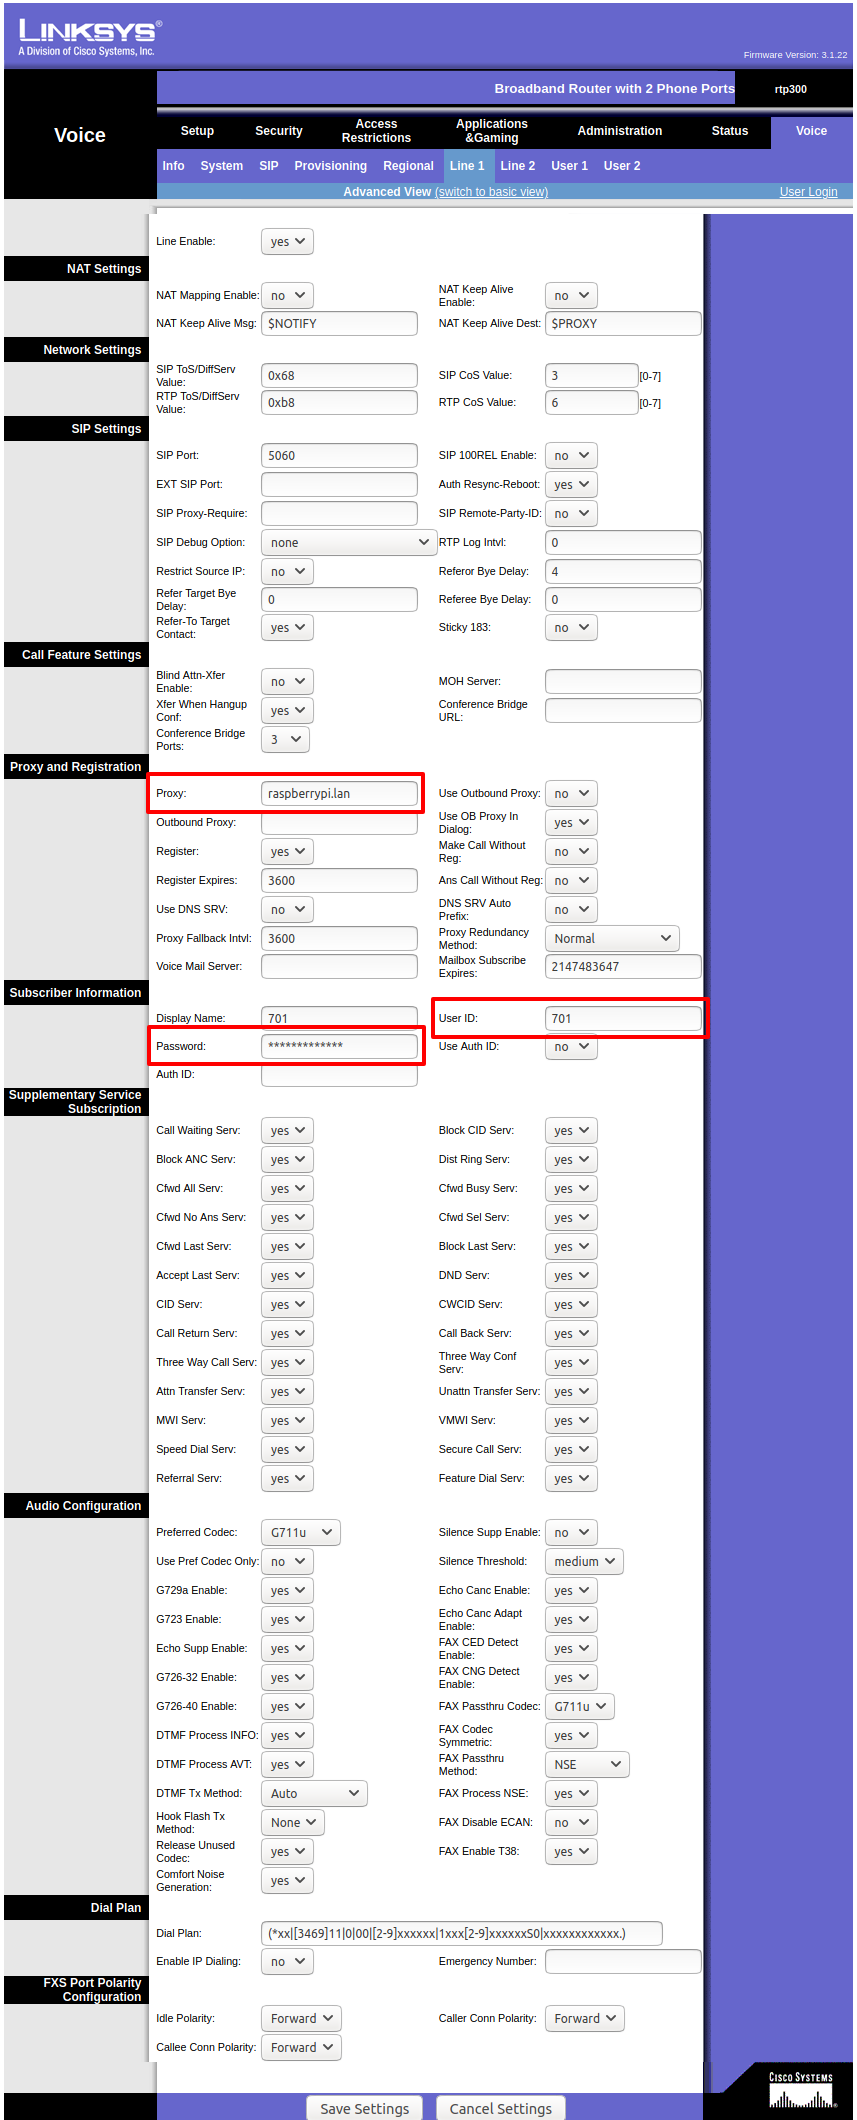
RTP-300 Admin Navigation
The RTP-300 admin interface is little weird. Once you’re logged in you’ll want to navigate to the voice menu item on the far right.
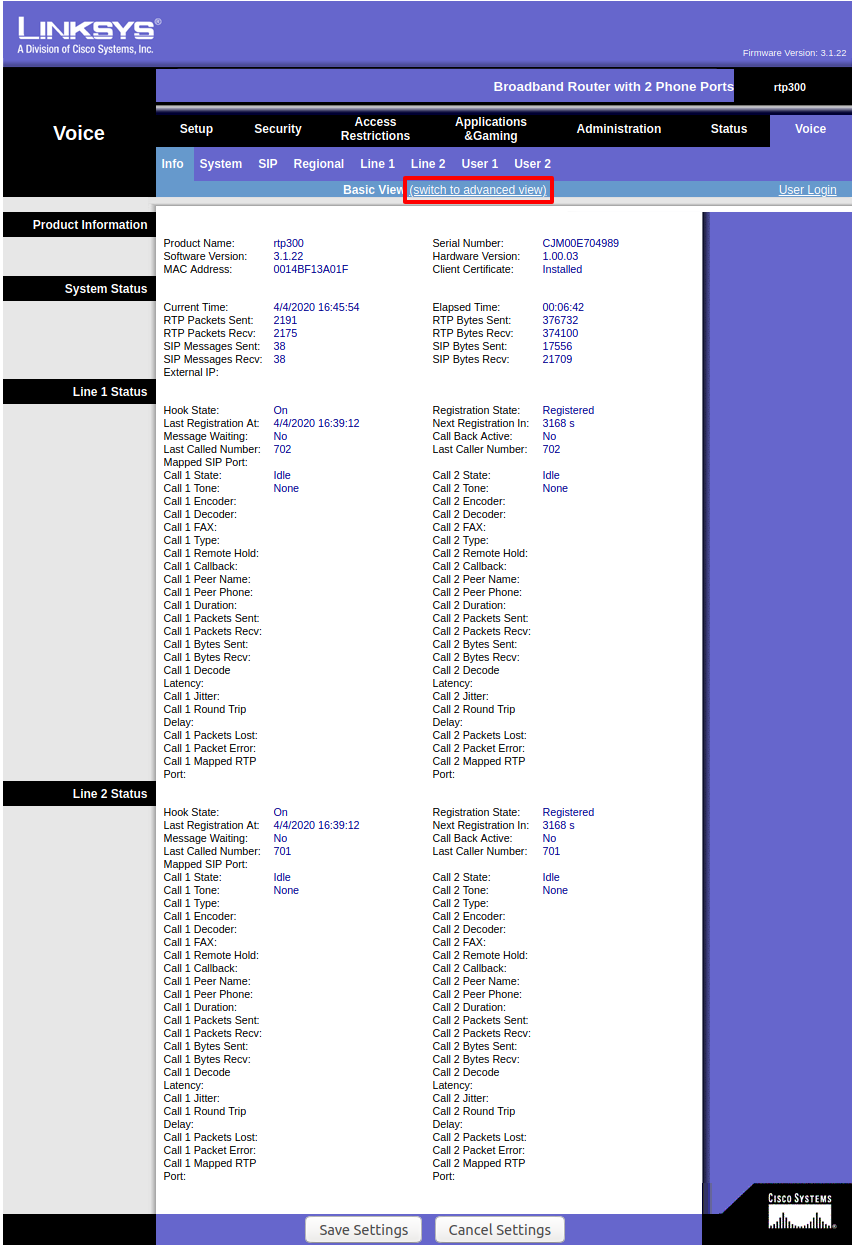
Click the “Admin Login” link to switch from an informational view to one where we can actually make changes. Then click “switch to advanced view”.
Advanced view will show all of the extensions and settings.
RTP-300 Extension Configuration for IncrediblePBX
Configuring phone lines 1 & 2 is fairly simple despite the overwhelming number of settings fields on the admin. We just need to enter three values:
The IP address or domain name of our IncrediblePBX server as the SIP “Proxy” This is the SIP server the ATA is going to register this line with.
The Incredible PBX extension number as the “User ID”
The extension secret as the “Password”
Test!
Once you have these settings saved, the ATA should now register itself with Asterisk on your IncrediblePBX system. The best way to know if it worked is to pick up the receiver one of your lines – you should hear a dial tone 📞
If you’ve got a dial-tone and a phone on each port, you should be able to dial each extension with 701# or 702#. The # isn’t strictly necessary, it just instructs the ATA that you’re done dialing so it can stop waiting for further input. If you’re feeling fancy you could add a 70X entry to the dialplan on the line configuration of the ATA.
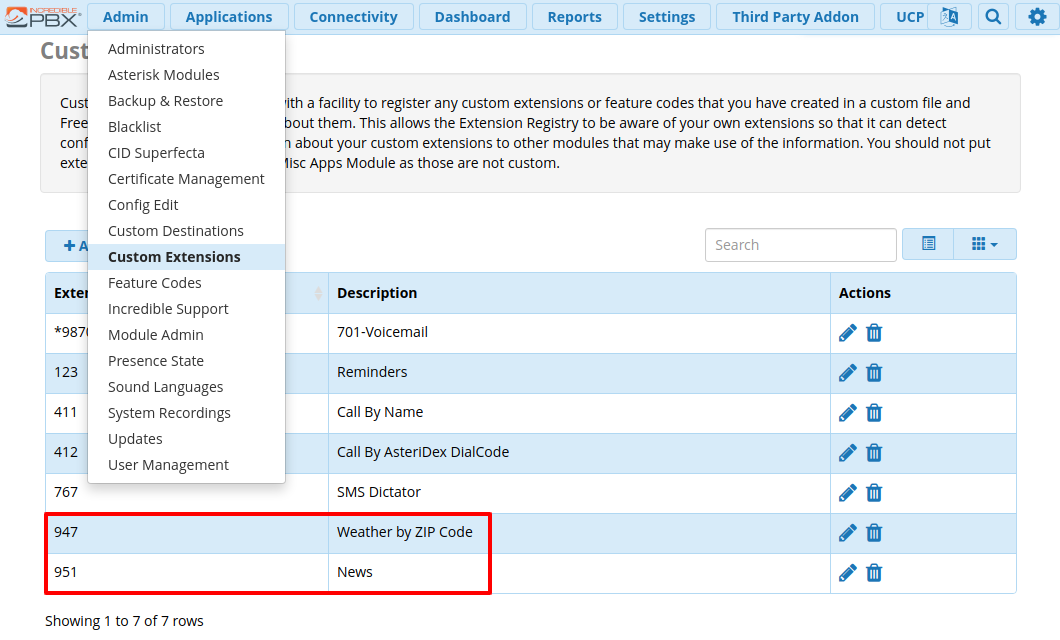
If that’s working, try one of the pre-configured Nerdvittles custom extensions. You can see them in the IncrediblePBX/Asterisk web admin by going to “Admin” and “Custom Extensions.”
Try 947# for weather by zip code ⛈️ or 951# for the latest news 📰
This write-up covers installation of IncrediblePBX 2020.3 on a RaspberryPi 3. The latest instructions are always available on NerdVittles and incrediblepbx.com, but I wanted to document my experience here for posterity. This article will cover installing X Windows for a GUI, and Samba & SSHFS for cross-platform file sharing on your home network.
Eject the SD card and put it into your Raspberry Pi and boot it up.
Initial Setup
Follow the on-screen instructions carefully. I like to connect my RaspberryPi to the network, then ssh into it and run most of the configuration commands from a terminal on my main computer because:
I can select/copy/paste any instructions from the terminal into a document for later reference.
I don’t have to stand next to the cat’s litter box (where my Pi is located in the laundry room) 🤧
Because the IncrediblePBX installation is geared specifically towards having a turn-key phone system, it lacks some of the pre-installed stuff you normally get in a vanilla Raspbian installation, but that’s why were here (and we’ll fix it).
Caveats
You’ll inevitably use raspi-config to change the settings for your Pi. For IncrediblePBX, don’t enable predictable names on network interfaces unless you know what you’re doing. Some of the IncrediblePBX scripts are looking for good ol’ eth0.
For some reason IncrediblePBX didn’t include ntp so I installed it with:
# apt install ntp ntpdate
Both of those are needed before running /root/timezone-setup (specified by the on-screen instructions).
X Windows
Before setting up your PBX-equipped Pi to run X, you should add a “regular” user as having the system automatically log into X as root is a categorically bad idea. All of my examples in this article use the username as justin, but you should replace every instance with your own name 😀
# adduser justin
Follow the prompts for adduser, then add that user to the sudo group so you can still do useful stuff as a privileged user.
# usermod –aG sudo justin
Then log out and log in as your user, and run sudo raspi-config. Under “Boot Options” and set the “Desktop / CLI” option to “Desktop GUI, automatically logged in as ‘justin’ user.” raspi-config will prompt you to install X (follow those instructions). It will also ask you to reboot after changing that setting.
X Windows “Black Screen” Issue
When I went to log into X, I saw a black screen with the pointer mouse cursor and then it would log me out and show the login manager (LightDM). 🤔
After getting some clues about the error from my ~/.xsession-errors file, I found that I needed to remove this file out of /etc/profile.d in order to be able to log in to X:
I use samba to share files read-only across the network. This is especially useful for watching videos via VLC on devices like AppleTV and Amazon FireTV. Install samba by running:
$ sudo apt install samba
The Pi3, when set to boot up and log into the UI, will automatically mount any USB-attached drives under /media/justin, so I share my media folder read-only to the network.
$ sudo vi /etc/samba/smb.conf
To the bottom of the smb.conf file add:
[media]
  comment = Media
  path = /media/justin
  browseable = yes
  guest ok = yes
  read only = yes
  force user = justin
  force group = justin
SSHFS for Read-Write Access
For read-write access to any of the drives on the Raspberry Pi, I use SSHFS.
Linux (Ubuntu)
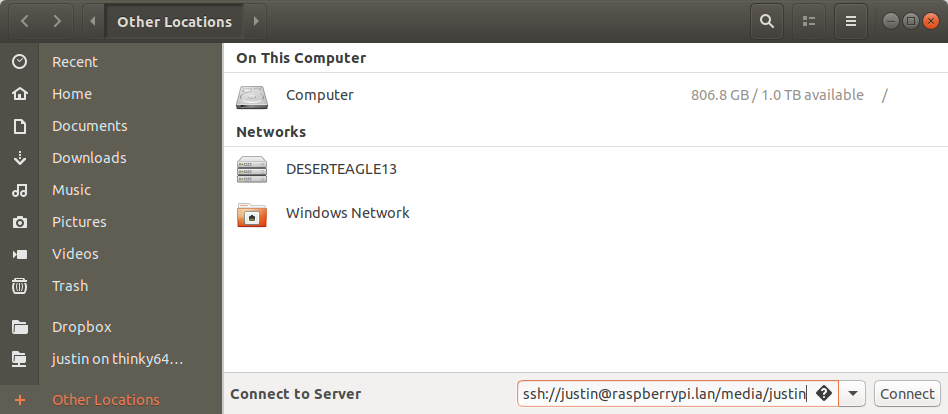
In Ubuntu 18.04 you can connect to a sshfs URL in Nautilus by going to “Other Locations” and typing in the location in the “Connect to Server” box in the status bar at the bottom of this screen. Everything on my home network gets a .lan DNS name care of OpenWRT, so I connect to raspberrypi.lan – you can substitute your IP address. Your URL might look something like: sshfs://yourusername@X.X.X.X/media/yourusername
MacOS
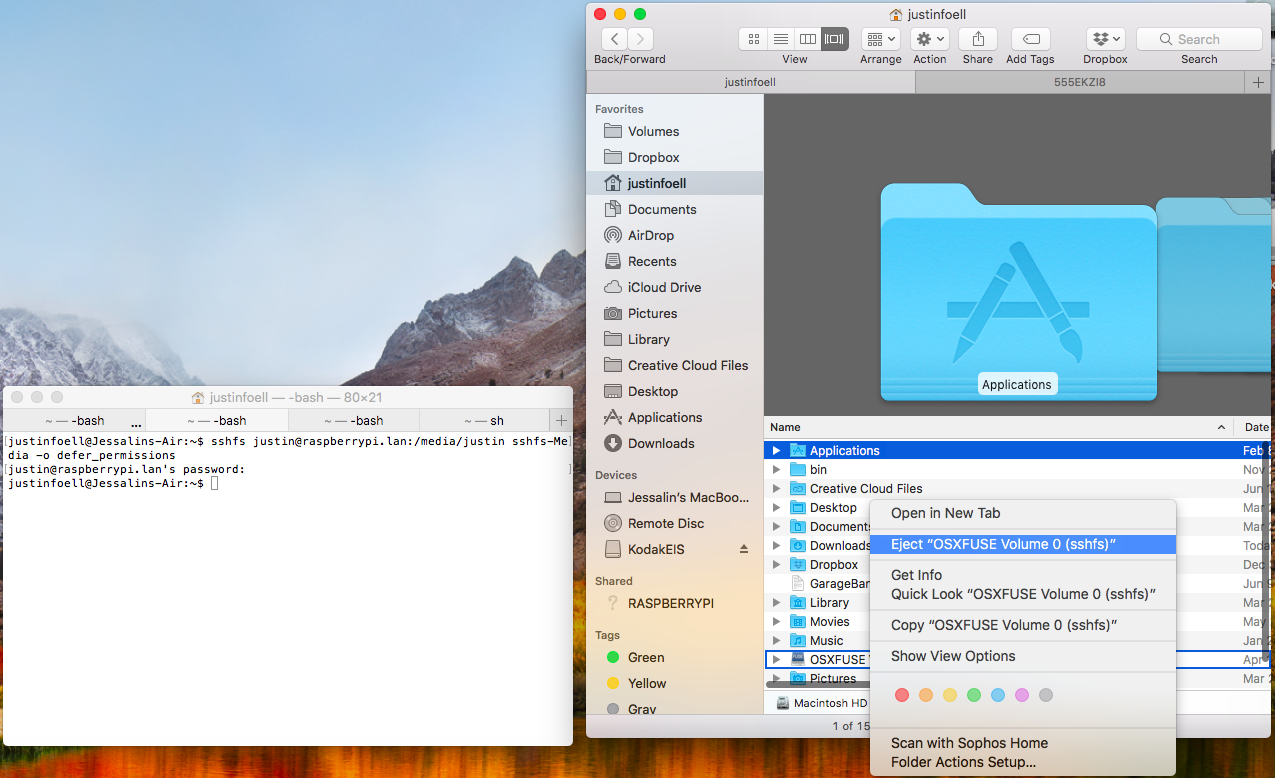
For MacOS you’ll need to install FUSE for MacOS / OSXFuse and their SSHFS extension. Unfortunately the options for connecting through a GUI aren’t supported in recent versions of MacOS.
To connect you must “mount” the remote location. Make a folder in your home directory that will serve as the mount point. I created a folder called sshfs-Media.
$ mkdir ~/sshfs-Media
It doesn’t matter what it’s named, you just need to use it for the sshfs command. You’ll see that once it’s mounted, OSXFUSE will give it a different name in the Finder.
The remote location will show up as “OSXFUSE Volume X” in the Finder under your home directory and under “Volumes.” You can”Eject” (un-mount) the remote location if you wish to disconnect.
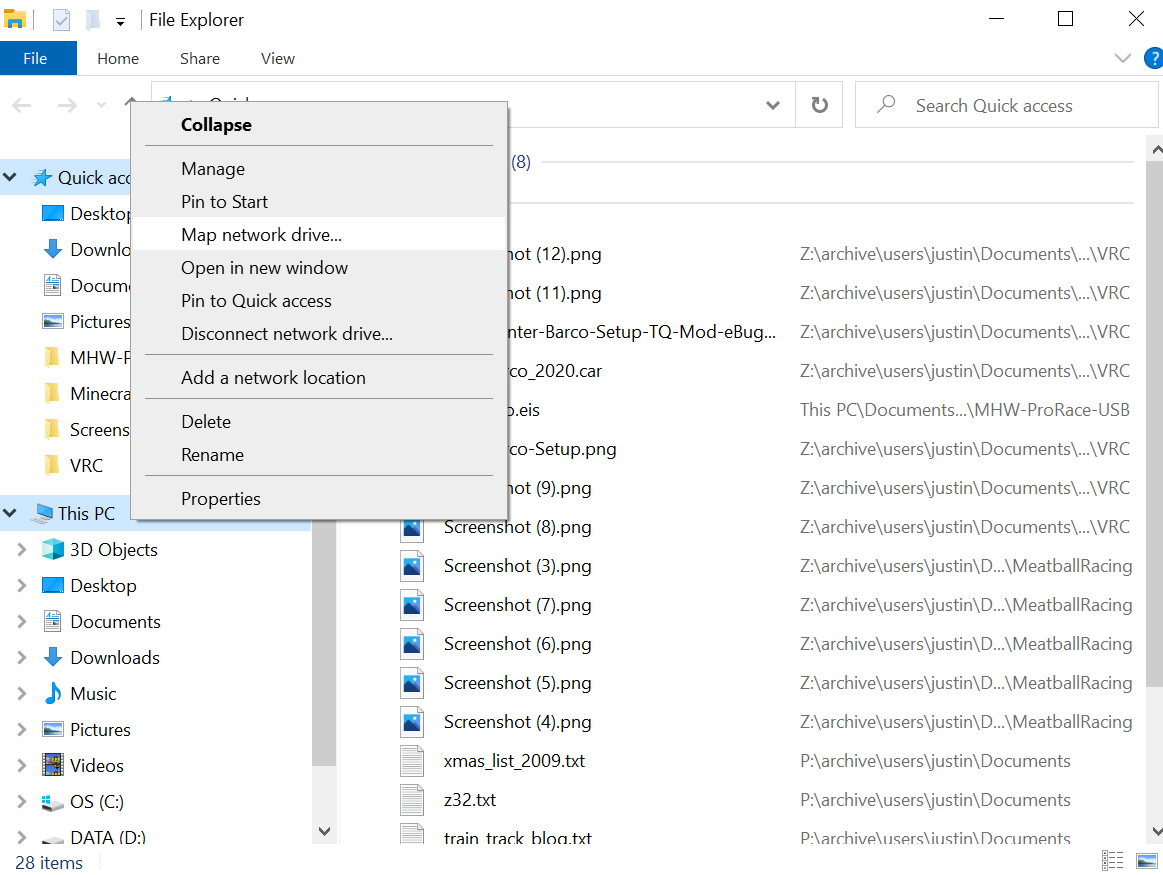
Windows 10
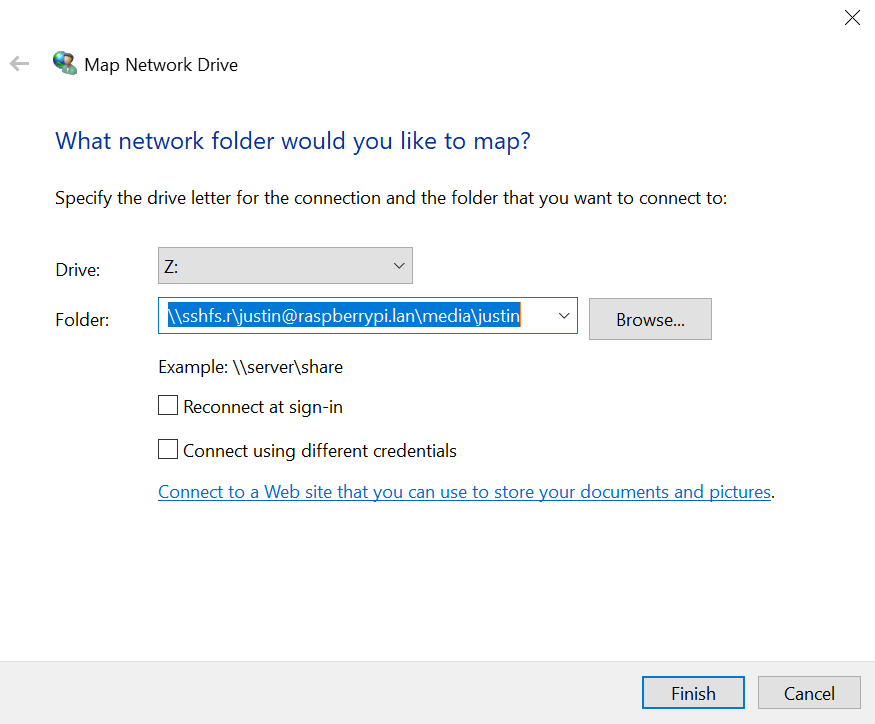
For access in windows I installed sshfs-win. Once it’s installed you can map a network drive over the SSHFS protocol. Right click “This PC” and select “Map network drive…”
That will bring up a dialog where you can enter the drive letter you want it to show up as, and the path information. sshfs-win has a protocol shortcut called sshfs.r if you want to map a path that is outside of your home directory (/home/justin) on the remote system. In my case I want to mount /media/justin. Remember to use backslashes for paths in Windows!
Test
At this point you should have a RaspberryPi on your network that boots into a UI, automatically mounts external USB drives, and shares them read-only on your network. You should also be able to connect read-write using your Pi username and password for authentication from any computer.
We haven’t even touched the fully blown PBX that is already installed – we’ll get into that next! Stay tuned.
Suddenly I find myself trapped in my own home due to COVID-19. It’s not really a big deal because I work from home normally. But it has changed my weekend plans drastically. So it’s time to start tackling one of my 2020 goals:
Organizing all of our digital files and having a consistent back-up strategy.
At our house important files mostly fall into two realms: Photos and Music. Many people have at one point decided to keep all of their photos or music with a 3rd party service like Flickr or iTunes. That’s fine, but you just have to be prepared to commit to them like a marriage – except they decide all of the terms – it’s not a mutual agreement. Personally, no matter if I upload my photos to a 3rd party service, I always keep the originals on a disk in my home so I can own my own content.
But this becomes an issue when everyone in your family isn’t on the same page. I have some photos on a USB drive and on my computer, and my wife has done the same on a different USB drive and computer. We need a way to have photos accessible in a consistent place, and make sure they’re getting backed-up.
When it comes to shopping for a big hard drive to store all of this stuff, I try to find whatever is the best space-per-cost within my budget. At one point I had devised a “2×100” rule: I get the biggest drive I can for $100 and consider buying two of them (for redundancy). As disk sizes increase, once a drive is available that is 2x the size of my current one for $100, I replace them. Currently you can get up to 4TB drives for $100.
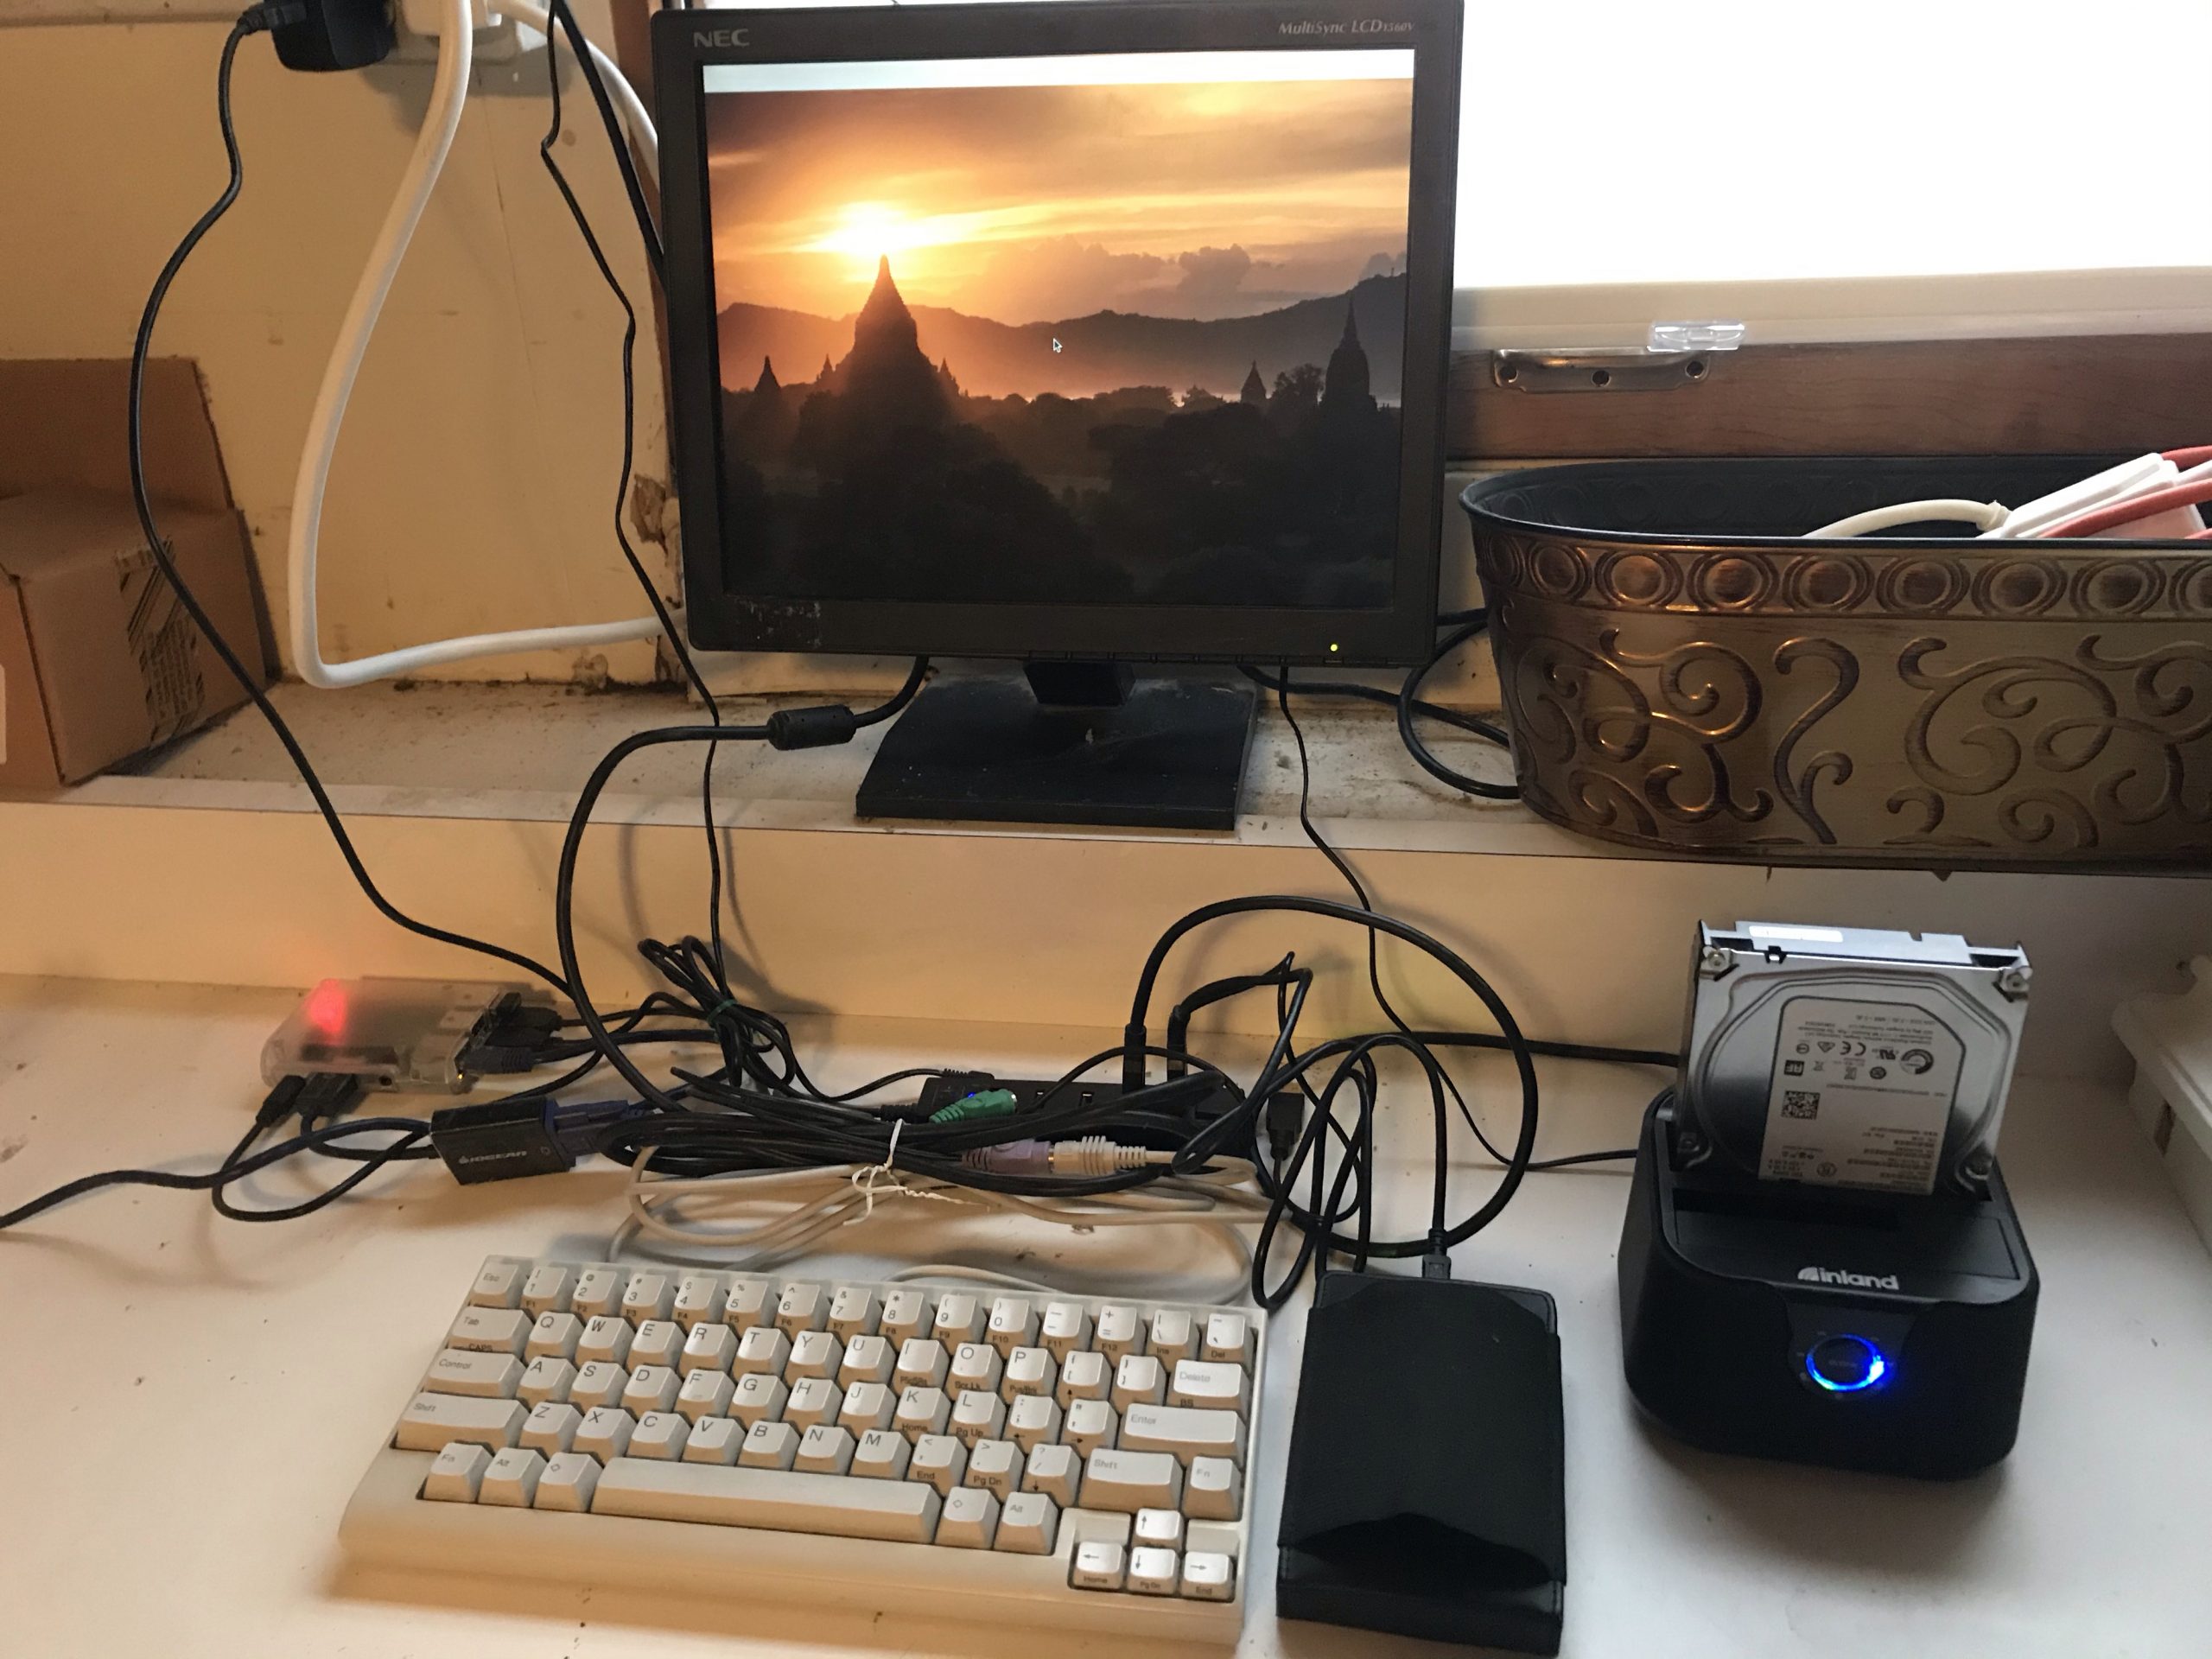
I bought a 4TB drive to use as network attached storage to act as our central storage place. I attached it to a Raspberry Pi using a USB/SATA hard drive dock and share it read-only over the network using Samba. It shows up as a Windows-style network share on all computers and other devices like AppleTV & FireTV (using VLC). For read-write access, I use SSHFS so authenticated peeps can write to the disk and move files around.
We’re still working on how to consistently name our photo albums, but having them in one place that gets backed up off-site is a big win.
Backups
I used to be an amateur network administrator. In my back-office (laundry room) I had a tower server that had 6 disk drives. A 3-disk RAID5 for backups, a 2-disk RAID0 for temporary storage (for MythTV recordings), all in swappable drive trays. Then there was one more disk hard-mounted for operating system boot-up. It worked for a while, but when I was going to have to replace the 1000-Watt power supply for the second time, I thought maybe there’s a better way. One thing I hadn’t considered before is: the more disk drives you have, the higher chance of having a drive fail – an increased chance of the click of death was always in the back of my mind. Using one big disk with a Raspberry Pi is much simpler, smaller, and uses much less power.
With all disks on-site, there is still the chance of everything getting destroyed by fire. To handle off-site backup I had used CrashPlan, but that didn’t pan out – time to look for something different. Since we have quite the collection of different computers here – Linux, MacOS & Windows, I looked for a consistent backup solution that is operating system agnostic. I wound up going with Duplicati using Backblaze’s B2 for off-site storage.
All of our computers use Duplicati independently to backup to B2. The Raspberry Pi does as well to backup our photos and music.
The Setup
I’m still working out (and documenting) the details of our setup, but I’ll list the specifics of our setup here as I get to them:
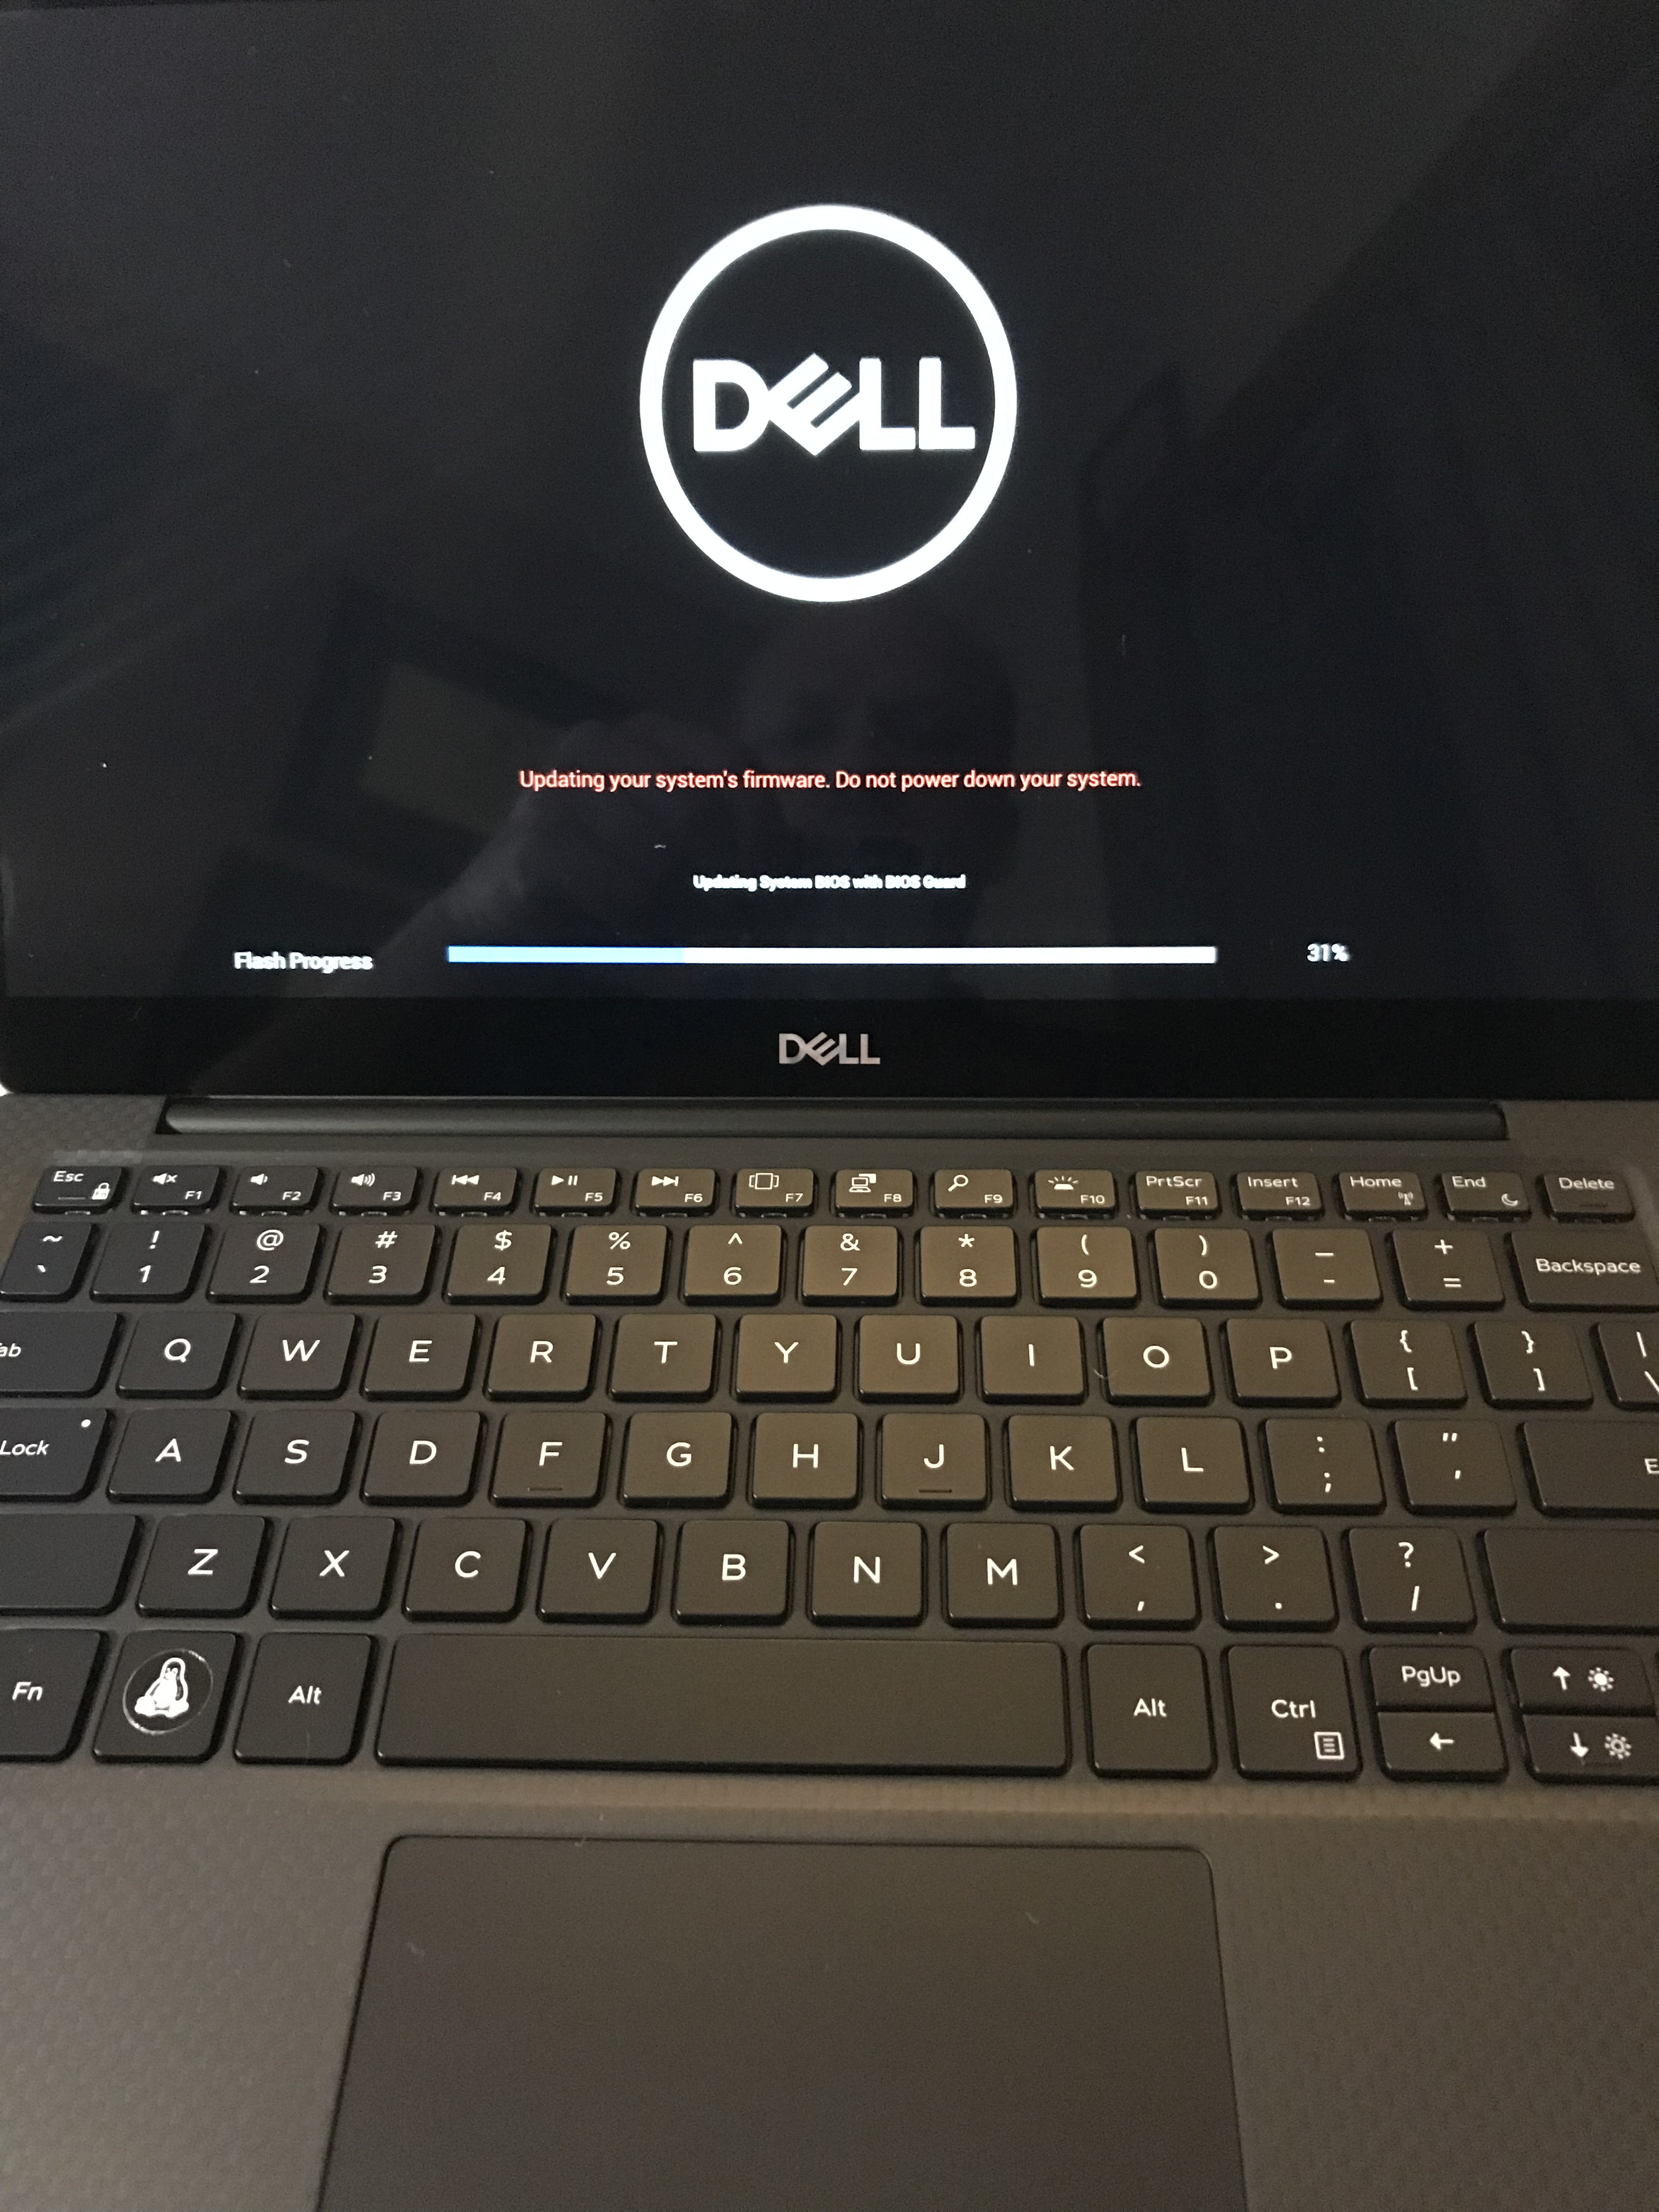
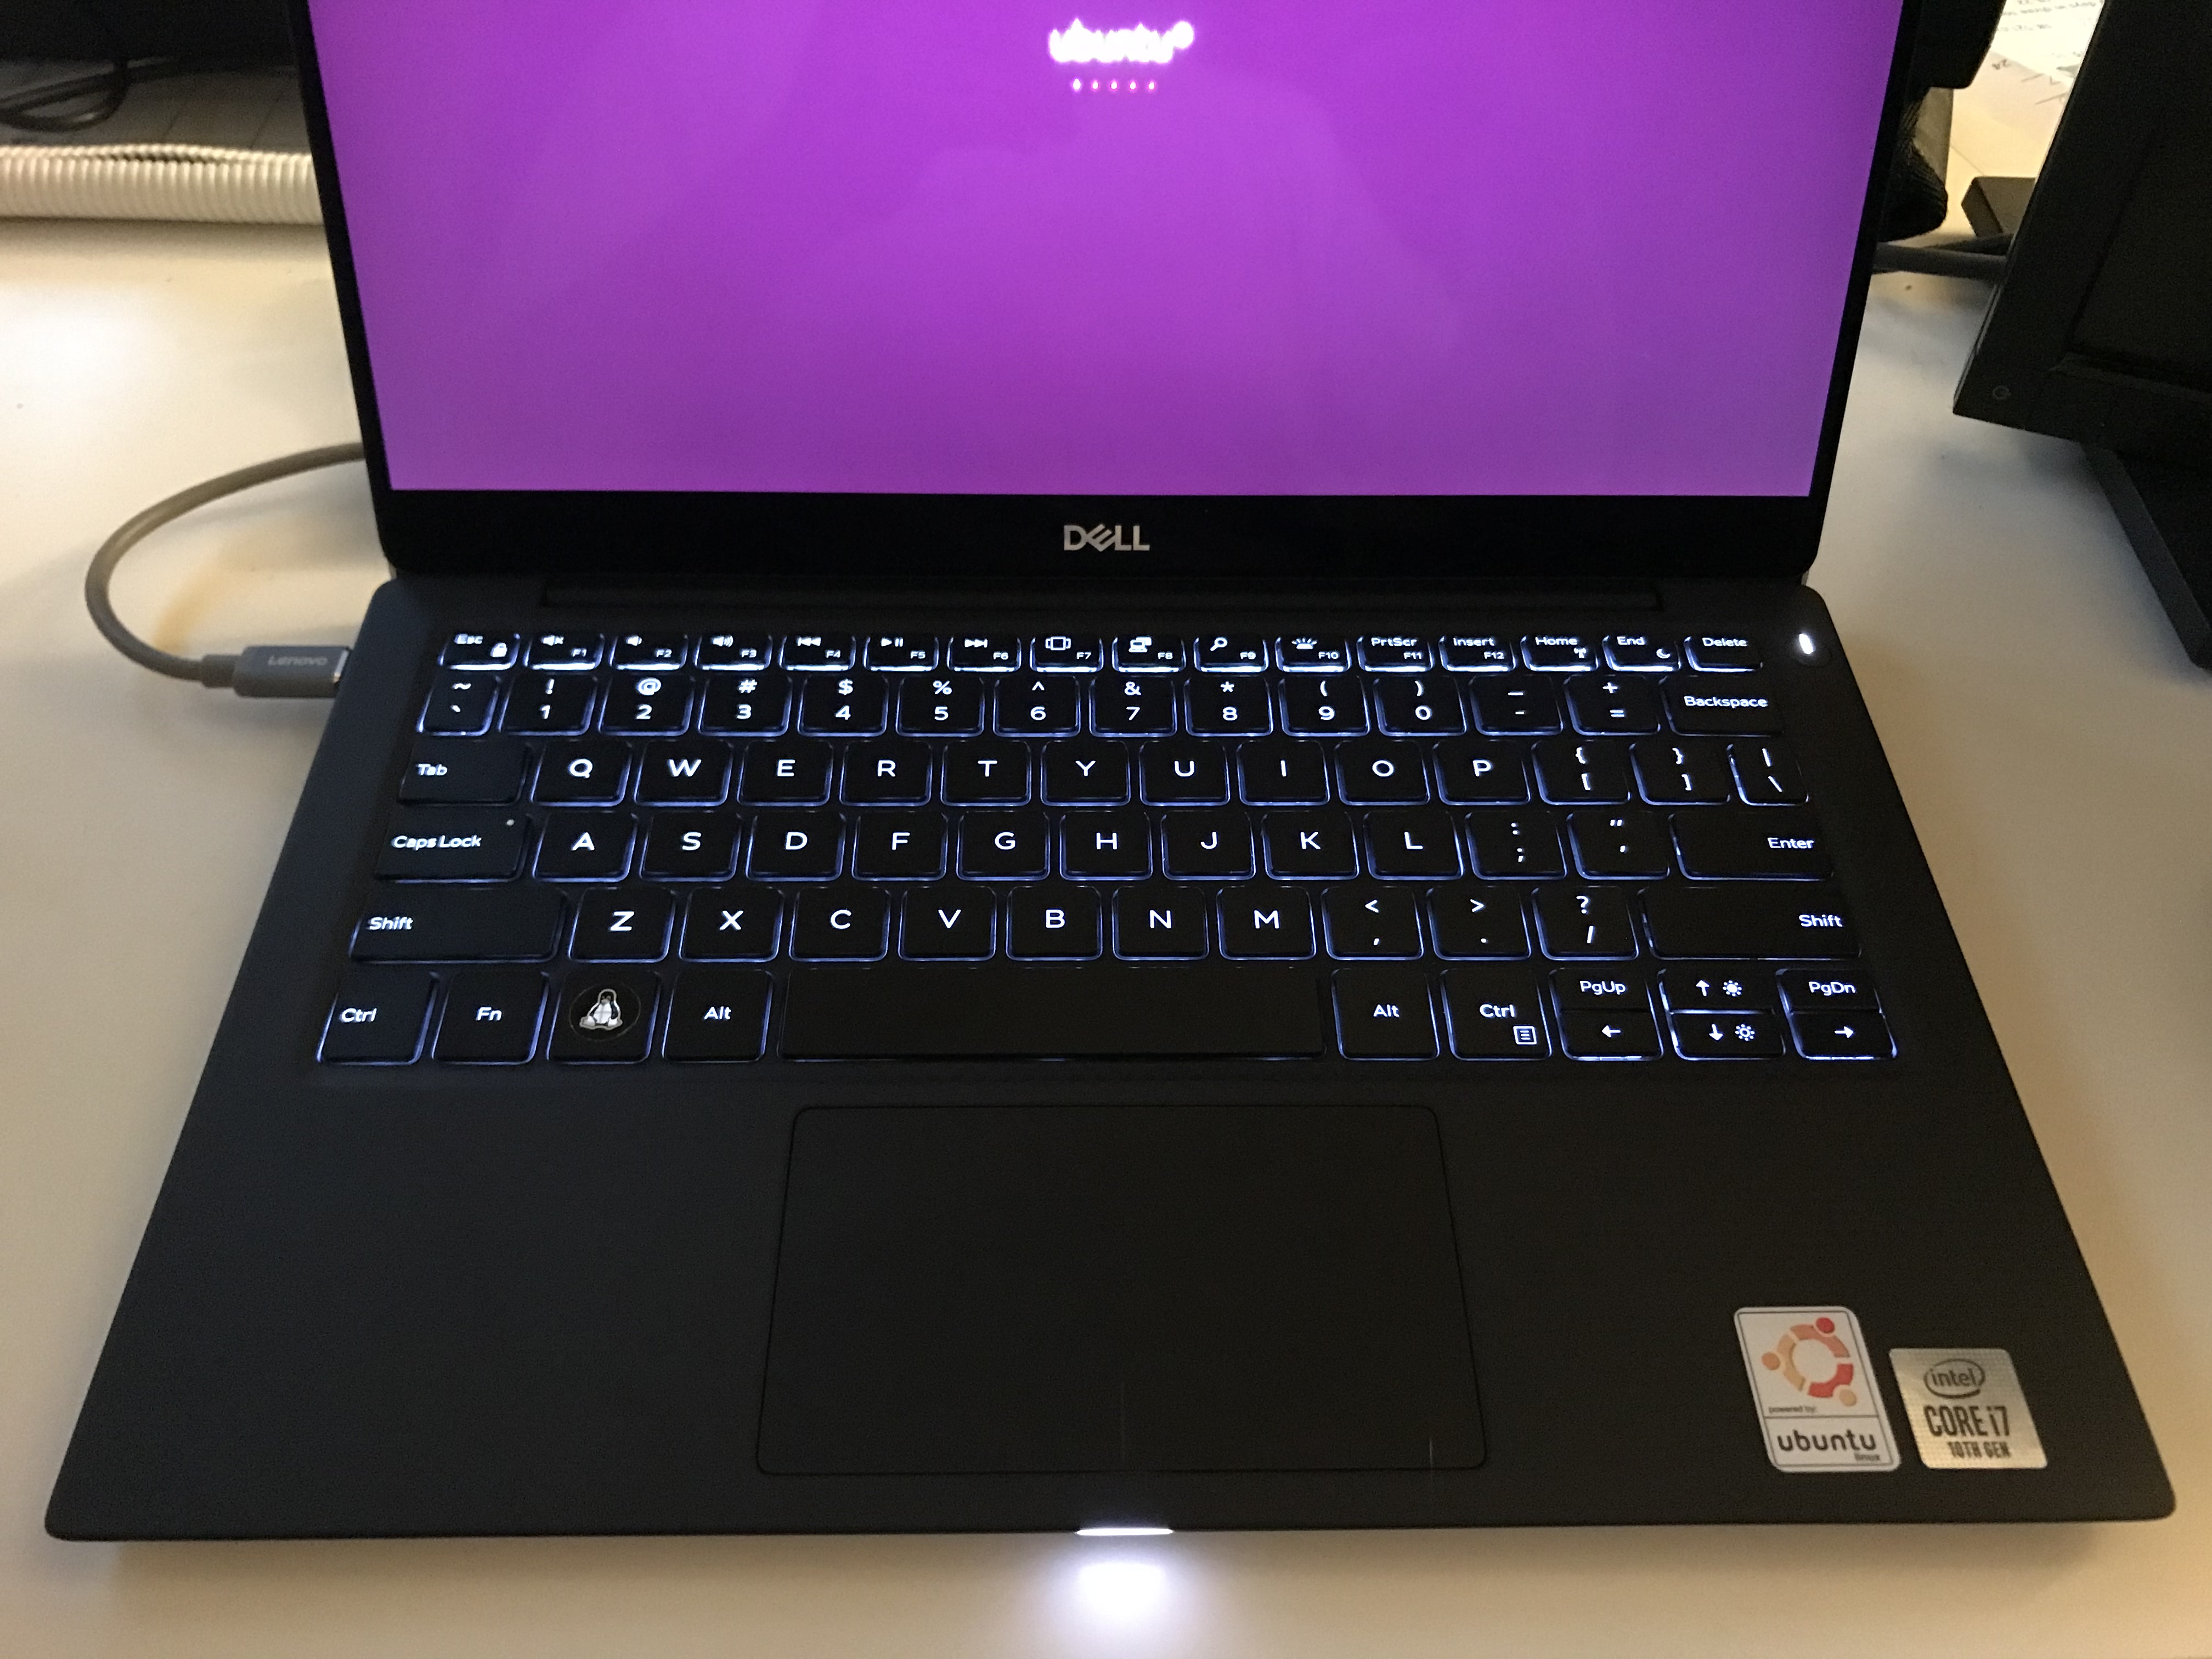
Here are the other miscellaneous settings I’ve done with my new XPS13 Developer Edition. It doesn’t cover all the settings I like, just the ones that seem to be particular to this laptop.
My favorite feature by far is the built-in firmware update functionality:
The light at the bottom/front of the case isn’t well explained. It turns solid white during charging. It blinks white occasionally and what that means still remains a mystery ¯\_(ツ)_/¯
It for sure goes amber when there’s 10% or less battery life remaining.
Settings Reference
Here are other settings in detail that I did in other posts:
Update: I had to add the “normal” localhost addresses for lo as well. Without them in Ubuntu 20.04 when I would resume after suspend/sleep lo would come back online with only 10.254.254.254. Then DNS wouldn’t work because connections to 127.0.x.xfor resolved & dnsmasq would not work.
Then I applied the change with sudo netplan apply. Boot time went from over two minutes to under 20 seconds.
It’s not immediately apparent that the loopback alias is available from looking at ifconfig. Instead use ip address to confirm it’s there:
1: lo: <LOOPBACK,UP,LOWER_UP> mtu 65536 qdisc noqueue state UNKNOWN group default qlen 1000
    link/loopback 00:00:00:00:00:00 brd 00:00:00:00:00:00
    inet 127.0.0.1/8 scope host lo
       valid_lft forever preferred_lft forever
    inet 10.254.254.254/32 scope global lo
       valid_lft forever preferred_lft forever
    inet6 ::1/128 scope host
       valid_lft forever preferred_lft forever
X Applications that Require Root (sudo)
Because I’m running Wayland, apps that you can normally start with sudo (like synaptic) will give this response on the command line:
Unable to init server: Could not connect: Connection refused

(synaptic:29383): Gtk-WARNING **: 13:31:07.736: cannot open display: :0
Here’s one solution, but I instead put the file in ~/.config/autostart/xhost.desktop.
I’ve always been envious of MacBook owners being able to close the lid of their laptop and come back to it days later without losing any charge. I made these changes to better the battery savings, but I still manage about 8% charge loss per day that it’s not fully off.
Are there any configuration changes I missed? This thing is still pretty new, so I’m also still getting used to it. Let me know in the comments if you have any other tip/tricks.