I had an opportunity to acquire a canoe from my parents. All I had to do was pick it up. Everyone else owns a boat in Minnesota, right? Why shouldn’t I?
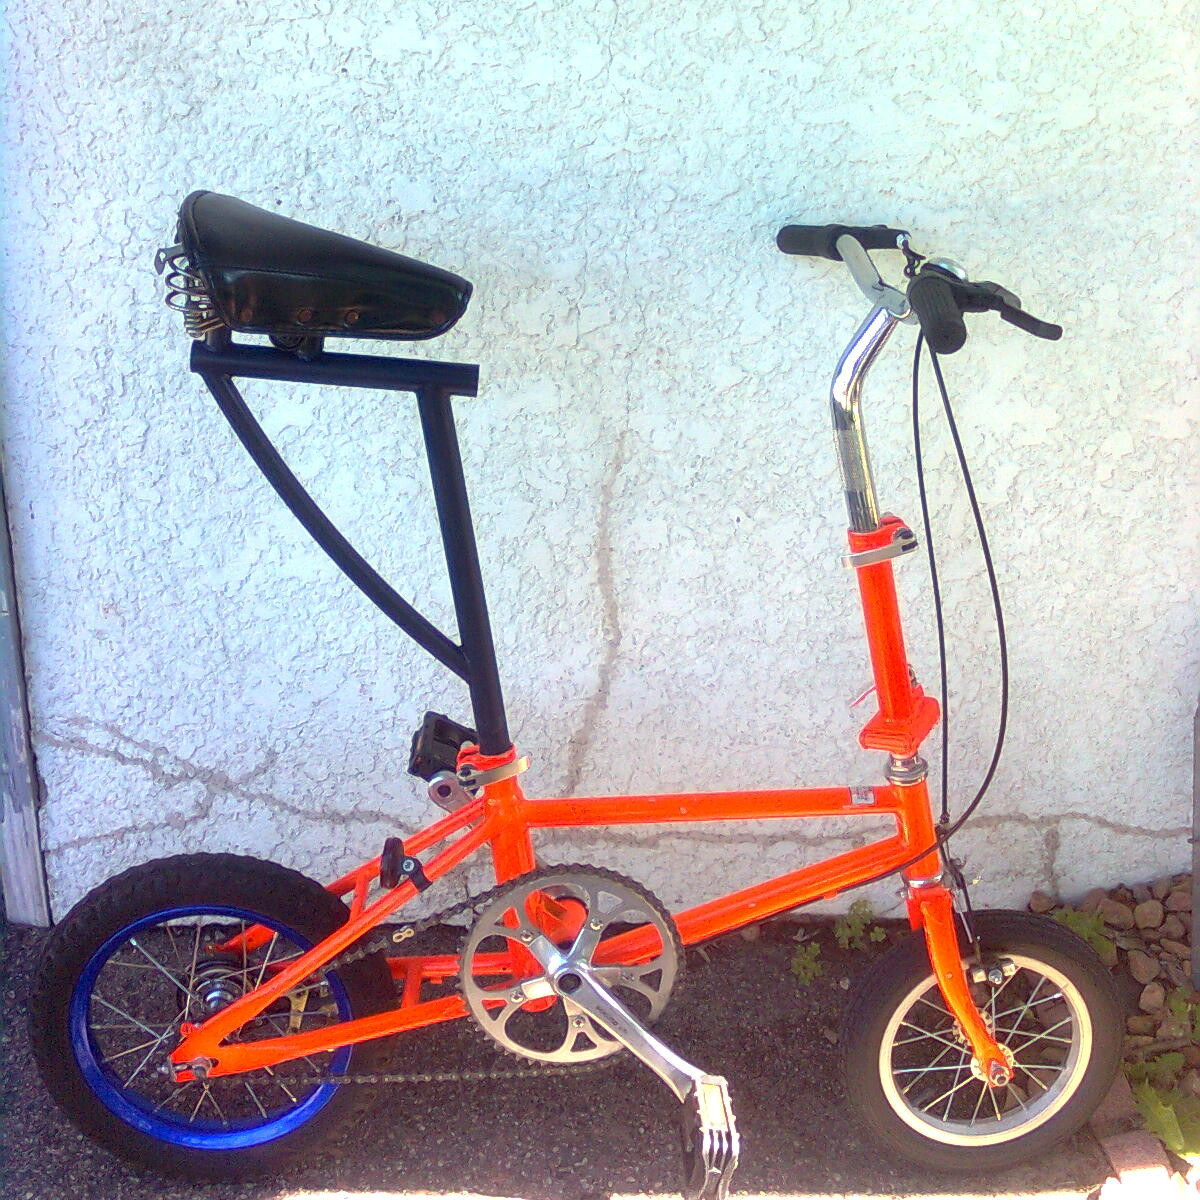
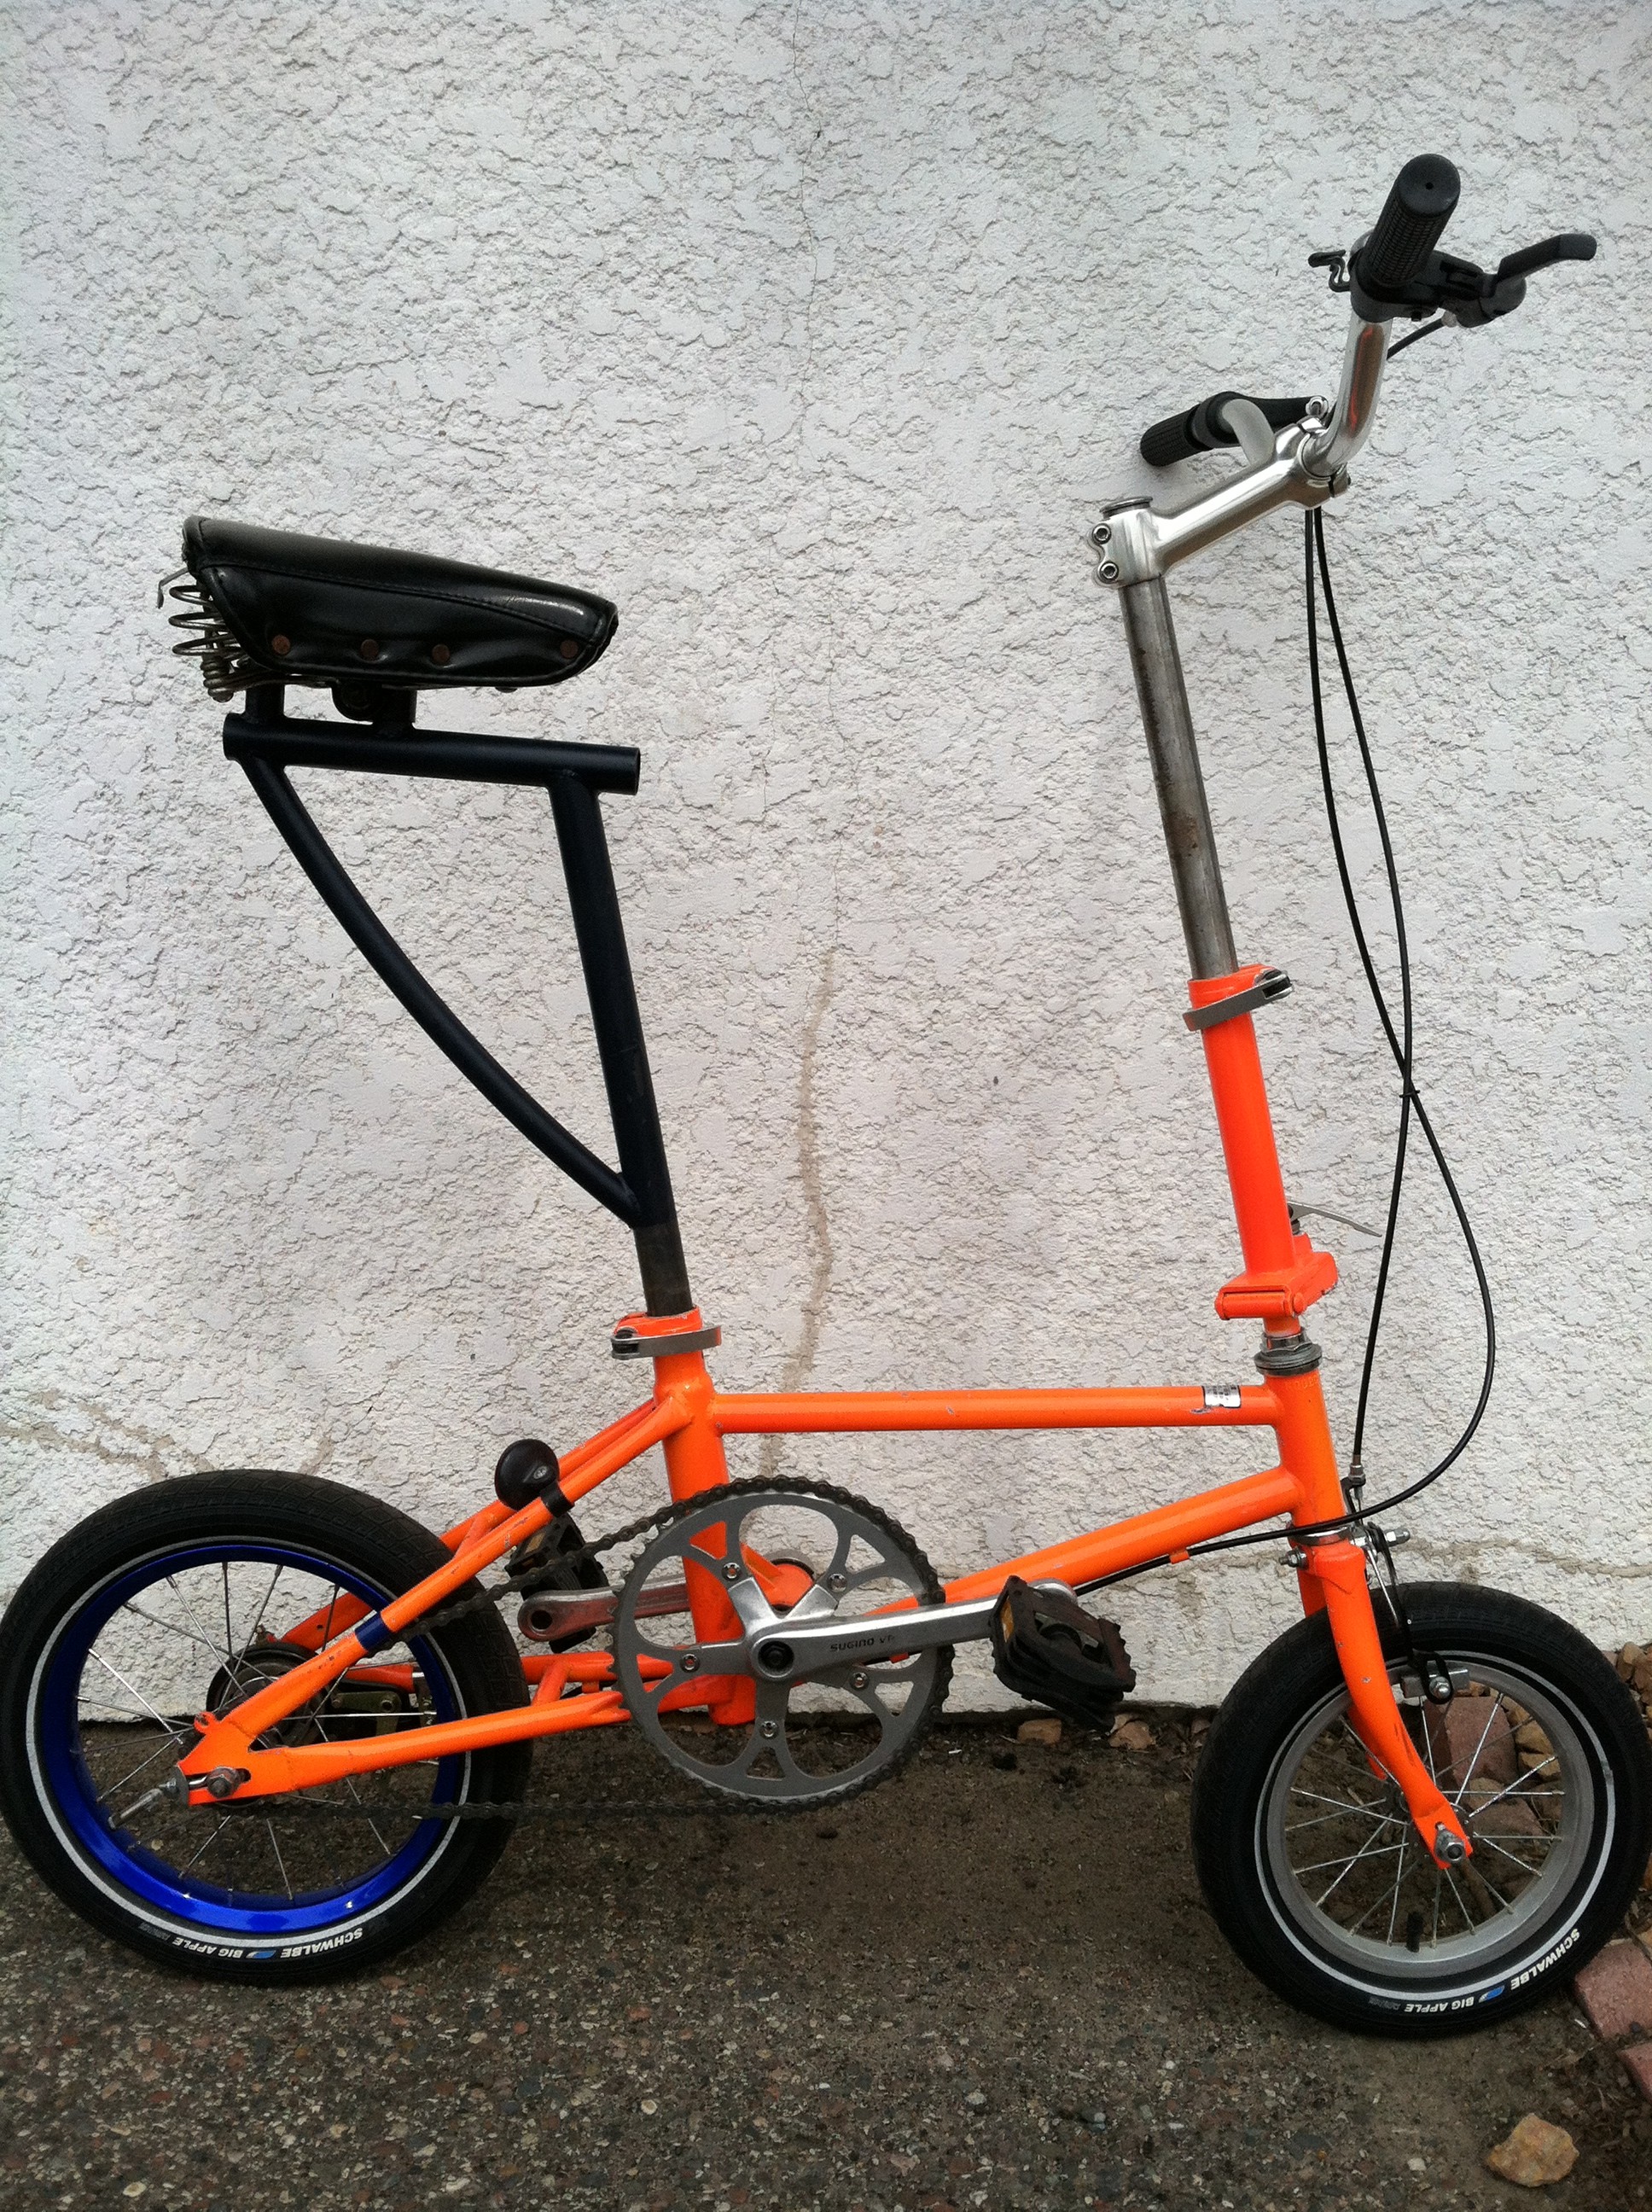
A friend insisted that if I have (1) an opportunity to purchase a quality canoe for a song, and have (2) easy access to water, that I must seize the opportunity. She also suggested that since this is Minnesota, I should give it the “when in Rome” treatment and portage it via bicycle. And the trailer she recommended is the Wike brand, “woody wagon” bike canoe trailer. Not sure why it’s called “woody,” it’s made of aluminum (like my canoe), not wood.
For anyone interested in canoeing and/or bicycling, here’s what I’ve learned…
Hull – The main structure of the canoe.
Gunwale (pronounced “Gunnel”) – Rails at the top edge of the canoe.
Yoke – Strong crossbar in the middle of the canoe, usually curved (for portaging).
Thwart – Crossbars in the canoe. Not to be confused with the yoke in the middle.
Keel – Projection on the center bottom of the hull. Helps the boat go straight.
Fore – Towards the front.
Aft – Towards the rear.
Bow – Front.
Stern – Rear.
Stem – Edge at the bow/stern of the canoe. Follows the keel line up the bow/stern.
Starboard – Right.
Port – Left.
You don’t strictly need to know these terms, but I find it’s better to know what other people are talking about. That way, when someone (or some instructions) asks you to strap something to the aft thwart, you’ll know WTF they mean. The Hull Identification Number (HIN), which I needed to register the canoe, was found on the starboard side of the stern, bolted right to the starboard side of the stem.
Navigating on Land
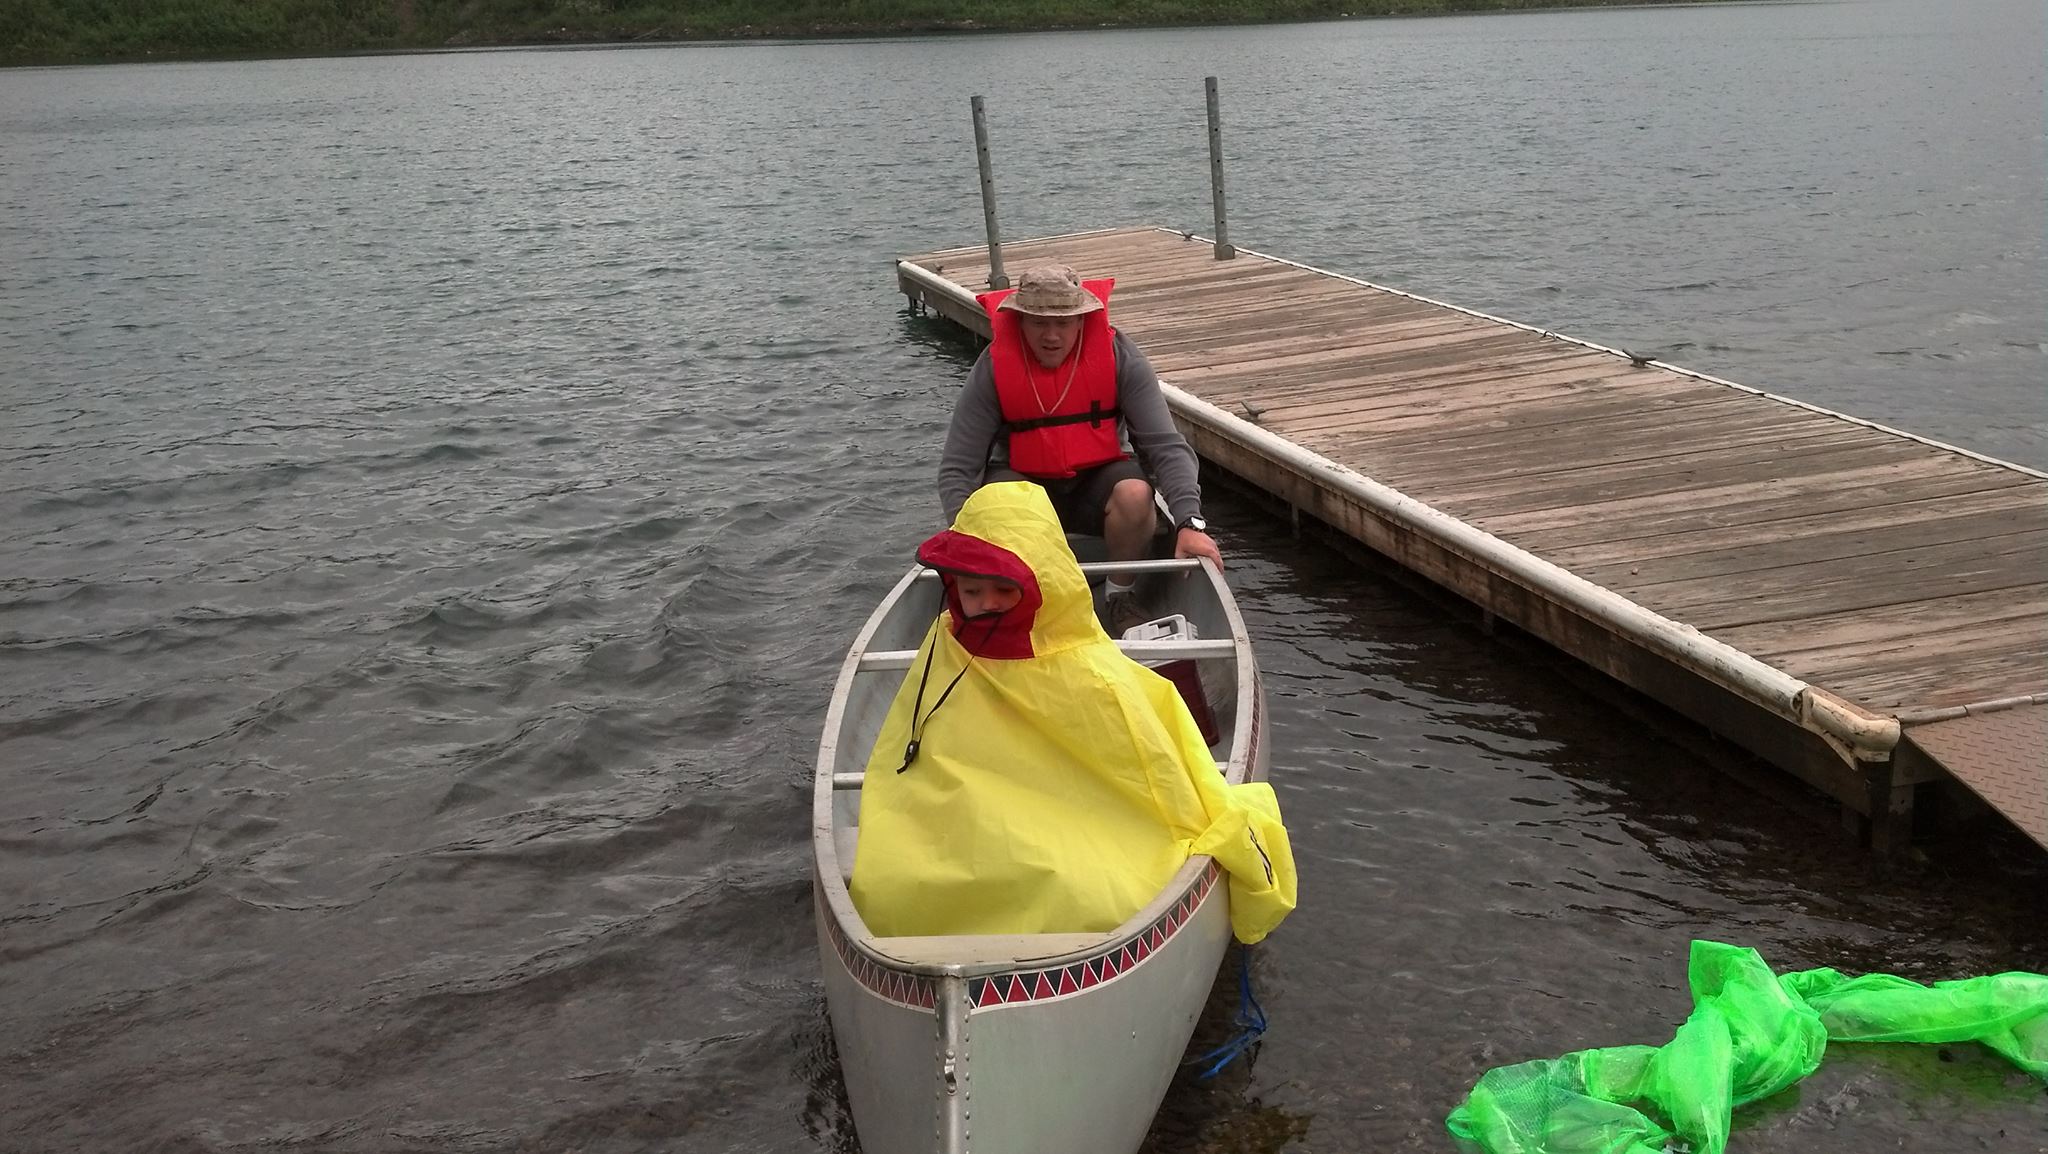
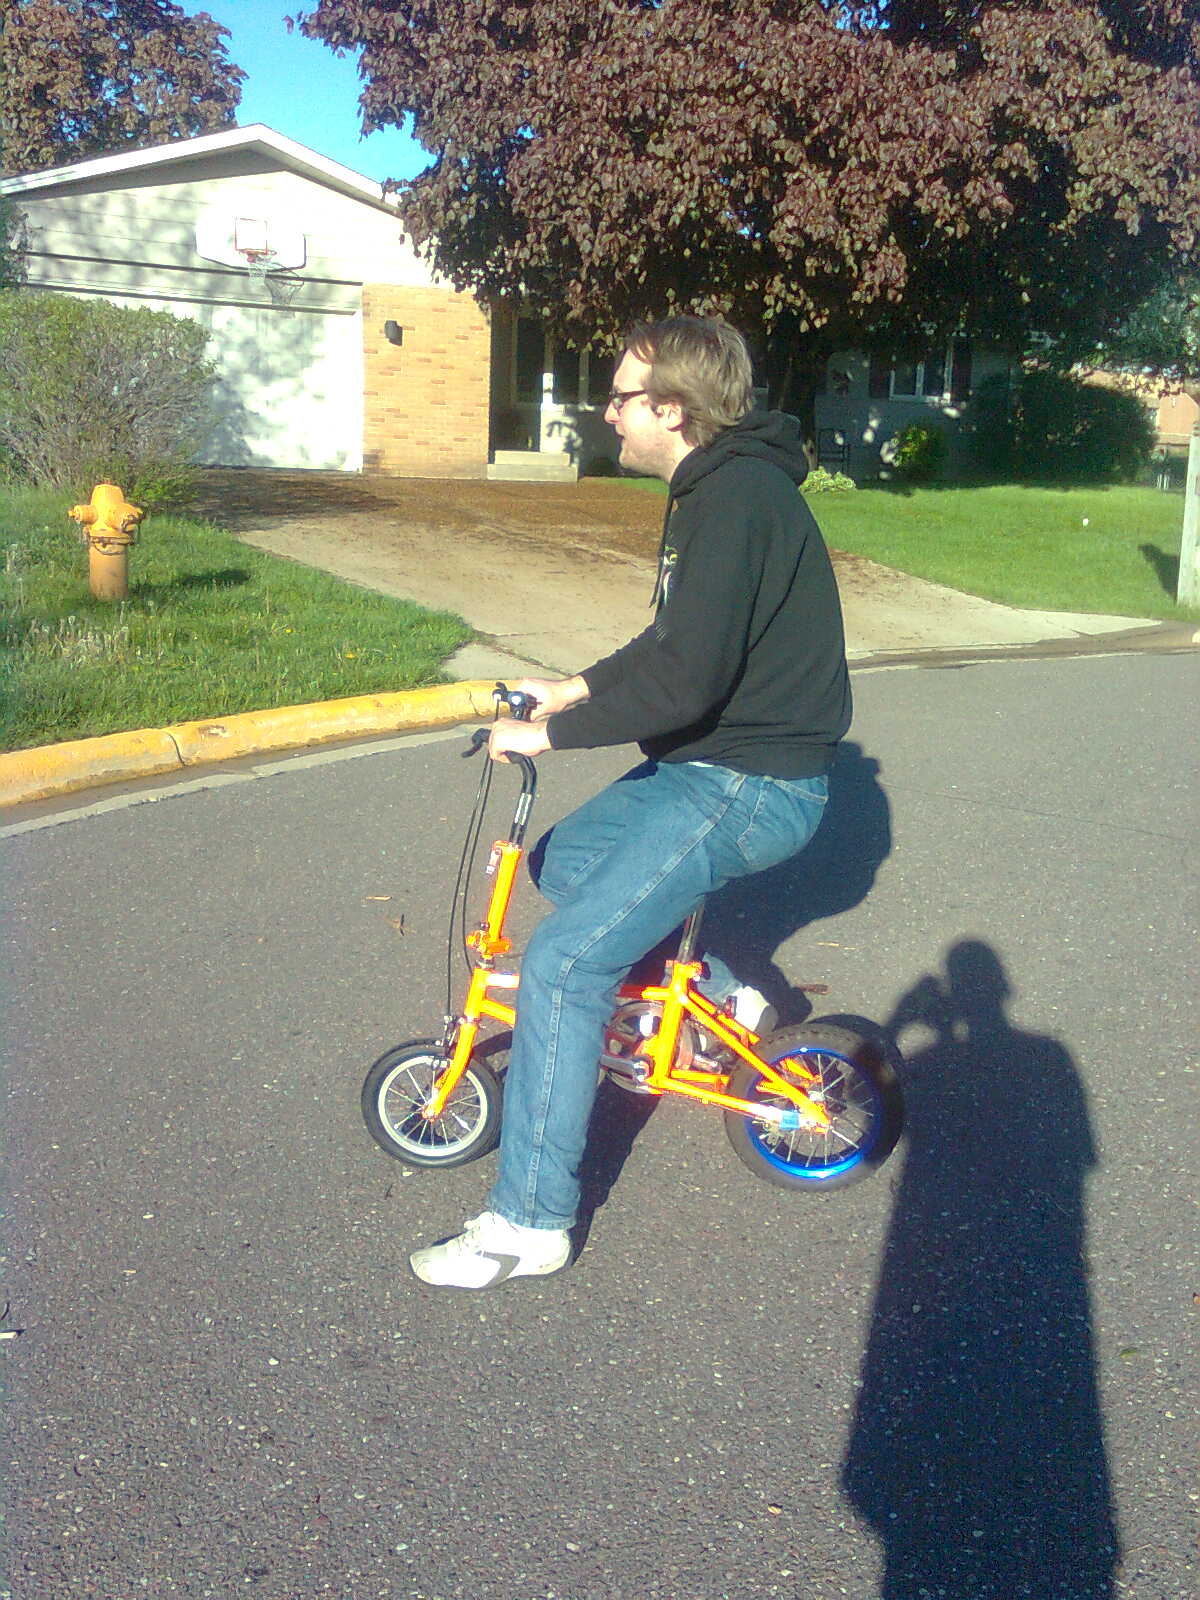
I’ve got quite a few years experience riding my bike with trailers attached. I’m pretty good about judging what sort of turning radius is required. Riding with a canoe is totally different. My canoe is 17 feet long. It’s like biking while towing something that is longer than a car. You will hit things, especially on your first trip. Go slow. Use a mirror if you have one, if you don’t, go slower. With up to 100 pounds of extra weight, you shouldn’t (and probably won’t) be going fast anyway.
Here is me taking delivery of the canoe, with my son riding in it. Portaging kids-in-boat is probably not recommended, but we made the 2 mile trek with (almost) no issues.
Remember the “almost” part of my first canoe trailer experience? Well, there was some pothole construction on one of the roads on our way home. It was an a corner, and half of the road was blocked by some safety cones. I thought I turned wide enough to clear them all, but I hadn’t. A cone got lodged between the trailer wheel and the hull and brought our first journey to a screeching halt. I had to unhook the trailer from the bike, re-align the wheels, make sure my son was ok, etc. etc. It was all in the spirit of adventure, but the point was quickly made: this is not a normal trailer turning situation.
Car + Bike + Canoe + Trailer
Our family truckster has a roof rack, to which I added a Yakima Canoe Carrier to bring the canoe to far-away waters. The vehicle has two spots where the one tow-hook provided can screw into the frame at the front. I spent $30 at my local dealer to buy an extra tow hook so I could strap the front of the canoe down on both sides of the car.
The Wike canoe trailer packs pretty small once everything is apart. If you’re driving somewhere with your bike and canoe, I recommend bringing the trailer. Even without a bike you can use the wheel cart to portage the canoe around rather than dragging it or enlisting help. Then you can use your bike to bypass any long lines at the boat launch.
Paddling with kids
Here’s another lesson I learned. While the canoe holds two (or more) people, it works best if the weight is spread evenly. I put my son at the front and I sat in the back.
He’s less than 1/3 of my weight. The canoe traveled like it was doing a wheelie. Besides looking silly, it was sort of non functional. The keel was only partly in the water, so the canoe wanted to turn much more than normal. On a windy day it made paddling extra unpleasant. As soon as the bow of the canoe came out from behind an outcrop, it would easily get blown in another direction.
Talking to a relative, he suggested a better alternative. Use a flotation cushion and kneel in the center of the boat while paddling so it sits evenly in the water. I’ll definitely be doing this on my next kid-canoe outing 🙂
The June 5th ride was postponed due to impending weather. It never really manifested itself as bad as it looked on radar, but the ride had already been postponed.
Date: Thursday, July 17, 2014
Tour Time: 5:10-6:30PM (leave at approximately 5:15PM)
Information Tent Open: 4-6PM
Start/End: Fridley Northstar Station west side – East River Rd. & 61st Way NE
Route: 6 miles or more if the group would like More Information in the Official Flyer (please note incorrect date)
Our first tour was mostly of the Mississippi River Trail, but I think we’ll additionally explore Rice Creek West as it is a secluded trail running alongside the creek, mostly avoiding highways and busy roads. At the creek bottom the woods can be so thick in some spots that you’ll forget you’re just 8½ miles from downtown.
We’re almost guaranteed to see wildlife, and fully guaranteed to have fun. It will be a family-friendly leisurely ride, as I may have both of my kids in tow.
There will be a tent set up on the west side of the Fridley Northstar station care of our friends at the City of Fridley and Anoka County Commute Solutions. It will be there from 4-6PM on June 5th if you want to stop by for some bicycling and transit information.
If it’s more convenient for you to arrive on the east side by University Ave. & 61st Ave., don’t fret! There’s a convenient underground pedestrian tunnel that goes under the railroad tracks between the east and west parking lots.
Riders should meet at the tent on the west side around 5:10PM so we can leave around 5:15PM. Coming from downtown? The northbound Northstar conveniently stops at the Fridley station at 5:10PM. Coincidence? I think not. We’ll wait for the train to come and go before our tour gets underway.
Update
After an incredibly strange snafu of events, the 2nd annual Fridley bike tour was rescheduled once to June 24th due to a mis-communication between myself and a city official – we never spoke of the month, only the 24th. It was supposed to be on July 24th, but I did meet another Fridley resident interested in biking and walking issues in Fridley on June 24th, so it was still a win.
Our route took us north of the Northstar station on the Mississippi River Trail and then east on the Rice Creek Trail. We were treated to a deer sighting and the young fellow even walked the trail with us for a while.
After emerging from Rice Creek West near Stinson Blvd., we went south to grab a bite to eat at Viet Noodles in New Brighton. It’s one of New Brighton’s gems, if I don’t say so myself!
While July is a great month for long bike rides in Minnesota, I find myself dedicated to much more “couch time” than usual. My July obsession: Le Tour, the Tour de France, the big old race around France (or whatever you’d like to call it). While I consider myself the very opposite of the lycra clad, weight obsessed (both in body and machine), Skittle-colored hard-core roadie – I find the tour fascinating. The team dynamic, the strategies, and the torturous rides, climbs and descents. And then there’s the gloomy overshadow of drug use, hushed amongst the announcers, hoping they won’t alienate their audience. Drama, speed, egos, color. So how do follow it?
My first rule goes against the grain of a true fan: I never watch the tour in real-time, except maybe for the last stage, which is really more of a victory ride than anything. I follow this rule for several reasons. I don’t need to be on the couch any more than I am. I’m also not going to pay for my cable provider’s sports package to get poor live coverage of an event that happens once a year. The US broadcasters will needlessly focus on any Americans in the race who (spoiler alert) aren’t going to win. Plus, cycling is an obscure sport, so there’s little risk of actual race spoilers – you can temporarily unfollow your bike race friends on twitter for complete isolation.
Instead I recommend downloading the one hour race highlights the day after. The best coverage I’ve found is the British ITV highlights show. They boil a full day of racing down to one hour of coverage (45 minutes without commercials) which only includes the most exciting parts. Plus they have great segments with great music. Yes, they have a little bit of a British slant, but it’s been well served the last few years with Bradley Wiggins and Chris Froome on the podium. Moreover, I think they simply understand cycling more.
TdF coverage comparison
On most English speaking broadcasts, you get Phil Liggett and Paul Sherwen. Some people take pleasure from (or get annoyed by) these guys for being cliché and/or tripping over their words, but they’re the ones blabbing all day, trying to keep the dull parts exciting. I give them a pass due to their experience, but then again I also liked John Madden as a football commentator.
It’s the visual “enhancements” the US broadcasters add that irk me. When Versus picked up coverage a few years ago, it was especially bad. They had this hideous ticker constantly scrolling at the bottom. What is this, NASCAR or Fox News?
I have no idea what’s going on here, especially as the jerseys are concerned.
ITV uses the host broadcast (French) feed and doesn’t muddle it up any further. It’s clear what’s going on. They have little icons for the jerseys so you know what group they’re in if there’s been a breakaway. And they’ll tell you how much time is between the group(s).
Much simpler.
The French know how to cover the race. They’ve been doing it for over 100 years. From the upper left of this screen I know that the leader is 31km from the finish of the stage. The wearer of the yellow jersey is in the main group of riders, called the peloton, which is 2nd to the breakaway group (or rider) in front. The peloton is 1 minute 10 seconds back from the group out front.
From the lower left I know that on screen is the peloton (again the 2nd group). If we were watching the front group it would say “1 – Tete de la course” (head of the course). I promise you won’t need your French/English dictionary. Very little gets lost in translation.
The Jerseys
Yellow Jersey
Overall race leader. The winner of the first stage will be the first to wear the yellow jersey or maillot jaune. But every stage time gets added together as the race continues. The big factor here is the gap. If riders cross the finish line as a group (with wheels overlapping), they all get the same time. So even if the main group is stretched out a quarter mile long, they all get the same time as the first front wheel to cross the finish line. Once there is a gap in riders, time gets added.
Green Jersey
The sprinters jersey, also referred to as the points jersey. This jersey is worn by the rider accumulating the most points awarded by winning intermediate sprints (checkpoints that occur mid-stage, usually in a flat section) and at the finish line if it’s in a flat section. I’m not exactly sure why they call it the points classification as the polka dot jersey also uses points.
Polka Dot Jersey
The polka dot jersey is also know as the King Of The Mountains (KOM) jersey. Like the green jersey, points are awarded to riders arriving first at the summit of a mid-stage climb, or a finish line that ends at a mountain peak. The polka-dot color, introduced in 1975 came from chocolate maker and then sponsor Chocolat Poulain (their chocolate bars were adorned in a polka-dot wrapper).
White Jersey
The white jersey is for the best young rider. It’s really like the yellow jersey for riders age 25 and under – based on their total time.
Rainbow Jersey
The rainbow jersey (really a white jersey with rainbow stripes around the middle), is worn by the World Champion in road racing. While not directly part of the Tour de France points or time competition, the reigning World Champion is required to wear it at all races, or else pay a penalty enforced by the International Cycling Union (UCI). Since there are several categories within the road race categories (Road Race, Time Trial, Team Time Trial) the wearer of the rainbow jersey on a normal stage may be different than on a time trial stage.
What if a rider is winning in two categories?
The above jerseys are listed in order of their prestigious-ness. If a single rider actually lays claim to more than one jersey, he will wear the more prestigious one during the race, and the “abandoned” jersey will go to the 2nd place rider in that category.
Where do I start?
You can download shows via BitTorrent, there are several good clients out there like Transmission or μTorrent. Devices like WDTV Live or Roku work great for playing the downloads on your TV. The supreme omnipotent index for all shows cycling lives at Cycling Torrents. If it all seems to complicated, just come on over with a couple of beers (one for me please) and we can enjoy the abridged glory of Le Tour in style, plus we’ll still have time for a ride.
Remember how I said I wouldn’t buy a Chariot bike trailer because they were too expensive? I take it back. Well, sort of. My friend who owns one recently got his 2nd child riding solo so I took the opportunity to purchase his in excellent used condition at half the cost.
My friend is right, Chariots are finely built. Even though Chariot was recently purchased by Thule, I believe they are still made in Canada. This probably contributes to both the high cost and quality of construction. If you have some extra disposable income, I highly recommend buying one. If you don’t, find one second hand, you won’t be disappointed.
Affixing the Chariot to my wife’s bike with quick-release skewer on the back wheel was easy. Adding it to my single speed was going to take some research.
Normally, you can just take off one wheel nut, add the hitch, and put the nut back on. I however, didn’t have enough axle threads to simply do this. I was left with two choices:
Buy a wider axle
Use an adapter
Axle
Getting a wider axle is (mostly) straightforward. I recommend visiting your favorite local bike shop to inquire about one. My Redline 29er’s hubs have sealed bearings and an odd axle, so something like this would have to be special ordered, but it does exist. Chances are your local bike shop will have a suitable axle in stock if your single speed doesn’t use any out-of-the-ordinary bearing system.
Adapter
Then there’s the adapter route. Chariot sells adapters for adding the hitch to an internally geared hub (IGH), where lengthening the axle isn’t an option. Unfortunately, Chariot doesn’t provide any information on what the thread size and pitch are for these adapters, they just offer two types: Shimano and SRAM.
After some sleuthing I found this post (comment #3) on a bike forum that indicated Shimano internally geared hubs use the old English Sturmey Archer axle size of 3/8″.
Chariot’s SRAM adapter indicated it’s for the InMotion9 hub which apparently has standard 10mm axles while the other SRAM IGHs don’t. I wound up going this route in order to put the thread pitch mystery to bed. The SRAM adapter indeed fits standard 10mm axles, so it worked fine on my normal-guy bike with a solid rear axle.
John said he didn’t have a bike, but another one of our yo-yoing compatriots led on that he does in fact have a bike that he bought in Japan. My curiosity was peaked, so I kept pressing John about it. He said it isn’t very useful because it’s a folding bike, and it’s very small. My crazy modder/engineer mind now demanded to see the bike because I knew we could turn it from a novelty into (slightly more) useful transportation. This bike has some neat quirks including a drum-brake that everyone I’ve spoken to claim will last the lifetime of the bicycle (or rider). It also has the front and back brake levers reversed from what I expect… a trait that John insists keeping because it’s part of the bike’s character.
So I helped him to make it rideable again. Below is the only photo I have of it nearest to it’s stock form. John bought it in Japan while visiting for a yo-yo contest (he’s a sponsored yo-yo player). In Japan, they take one pedal off of the bikes so they don’t get stolen. After purchasing the bike, John didn’t receive a matching pedal. So we first set off to a local bike shop (CARS in this case) and got a matching set of folding pedals. Also we replaced the seat with an extra I had lying around.
With it now usable, the issue we first wanted to tackle was the gear/gain ratio: how far the bike traveled with a turn of the pedals. There was a lot of wheel space in the back, so we stepped up from a 12″ wheel to a 14″ wheel. This involved me custom building a 14″ wheel using one from a salvaged kids bike. 14″ wheels (and their accompanying tires & tubes) are not common. To go with the 14″ kids bike rim, I disassembled the original 12″ rear wheel to reuse the hub, which included the drum brake.
After my first wheel building class at The Hub, John was the proud owner of a new 14″ rear wheel, which helped him achieve the “reverse penny-farthing” look he wanted. He also picked up a used seat at Recovery Bike Shop to replace the stiff & small one I had supplied.
In an effort to further increase gear/gain ratio, we decided to up-size the chain-ring and crank arms. Also at Recovery we found a used 52-tooth chain-ring and 170mm crank arms to go along with it. You can see it installed here as well as the bike folded down.
Next we needed to get the rider’s saddle up to make for (more) efficient pedaling. JohnBot is 6 feet tall – and while I gathered this bike was possibly made for a child, I was still determined to help him make it rideable. It looks somewhat like a clown bike when he’s riding it, but that’s what makes it so great. So many comments from passers by just make you want to work on it more…
JohnBot pre-seatpost
By just raising the seat-post, John’s knees would go right into the handlebars. I reminisced about the 80s “lay-back” BMX seat-posts and wondered if we could use something like that. Apparently, they’re no longer around because once you bend the tube so much, it inevitably is going to bend more at that point and ultimately fail (break). Instead, we enlisted Erik Noren of Peacock Groove to construct a lay-back style post that was also structurally sound.
It took Erik a while to get it done, but it was totally worth it. Usually when we’d stop by Peacock Groove to check the progress, Erik could be found riding the little orange bike around the shop like a circus bear on a tiny bicycle. But finally Erik delivered a seat-post that would not only support a full-sized rider, it could be used as a weapon.
The last part was to get the handlebars up and forward because it was still a close call with knees at any steering angle that wasn’t straight-ahead. It turns out the included handlebar post is 1 1/8″ in diameter – the same as a standard thread-less bicycle fork. So we bought a length of 1 1/8″ fork tubing from Erik at Peacock Groove and reconfigured the handlebars. At Recovery, John found a thread-less stem and handlebars which would push the bars out in-front enough to allow easy pedaling and steering even at slow speeds.
We finished it off with a set of matching 12″ and 14″ Schwalbe Big Apple tires from Hiawatha Cyclery. With the seat far back, it makes wheelies very easy:
People seem to instantly fall in love with this strange contraption. Erik was constantly riding it around the shop. People always give shout-outs to JohnBot when he’s riding it in the streets. My friend Jason said he had dreams of doing wheelies on it. Long live oddball bikes.