Last week I noticed it started acting up again 😔 so I revisited the problem. My previous settings had apparently been wiped out with my upgrade to Ubuntu 20.04. But in my search I found some other settings that might help.
I’m applying both the settings from this post and my previous one, as I feel like the settings in this post additionally help smooth out mouse wheel scrolling.
From this bug report you can also change the latency settings for your bluetooth (BT) mouse. I found it easiest to execute these commands as root so I could use tab completion to navigate the bluetooth mac addresses:
The BT device info file is at /var/lib/bluetooth/<BT adapter MAC>/<BT device MAC>/info.
So I type vi /var/lib/bluetooth/<TAB>EF<TAB>info to get to the right file.
vi /var/lib/bluetooth/90\:78\:41\:CA\:1E\:02/EF\:E5\:F1\:99\:EA\:24/info
My file started out with these default ConnectionParameters:
Configuring E911 support with Skyetel is simple on their side, as it should be. But because it’s an emergency service, I wanted to do a separate post to underscore the importance on making sure it works.
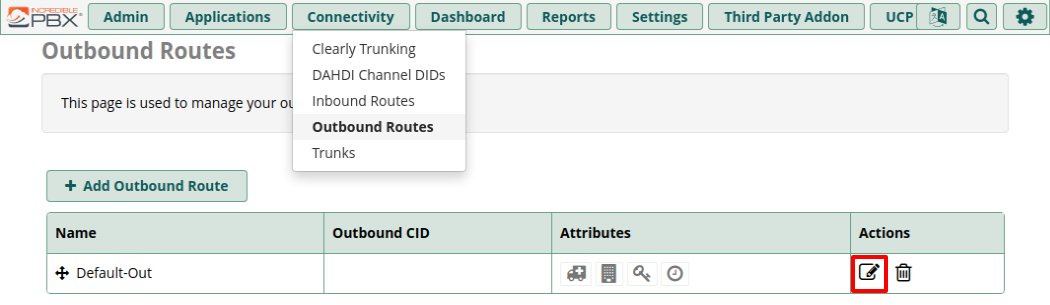
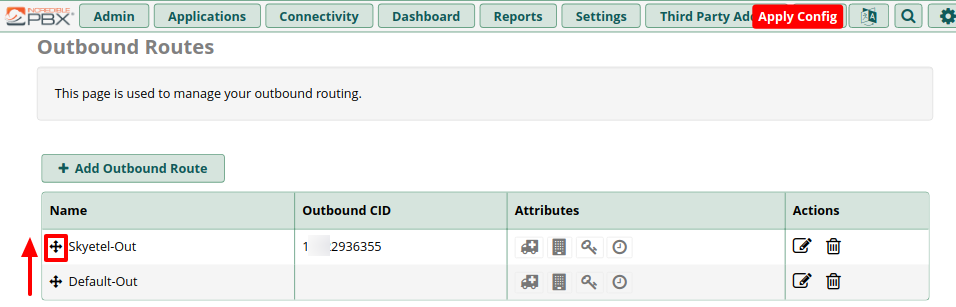
From your Incredible PBX Admin website control panel, navigate to Connectivity -> Outbound Routes.
Skyetel requires that your outbound caller ID is the 11-digit number of your phone. I updated my other Skyetel setup post to reflect this change – it was previously using a 10-digit number.
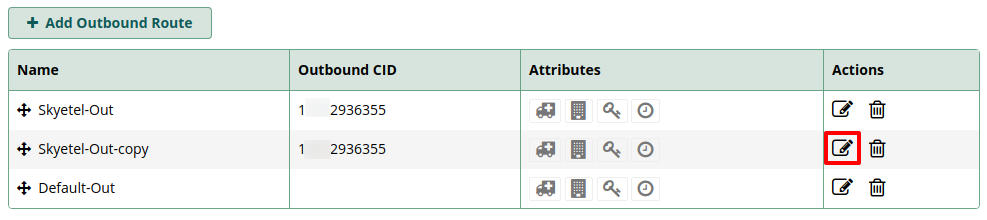
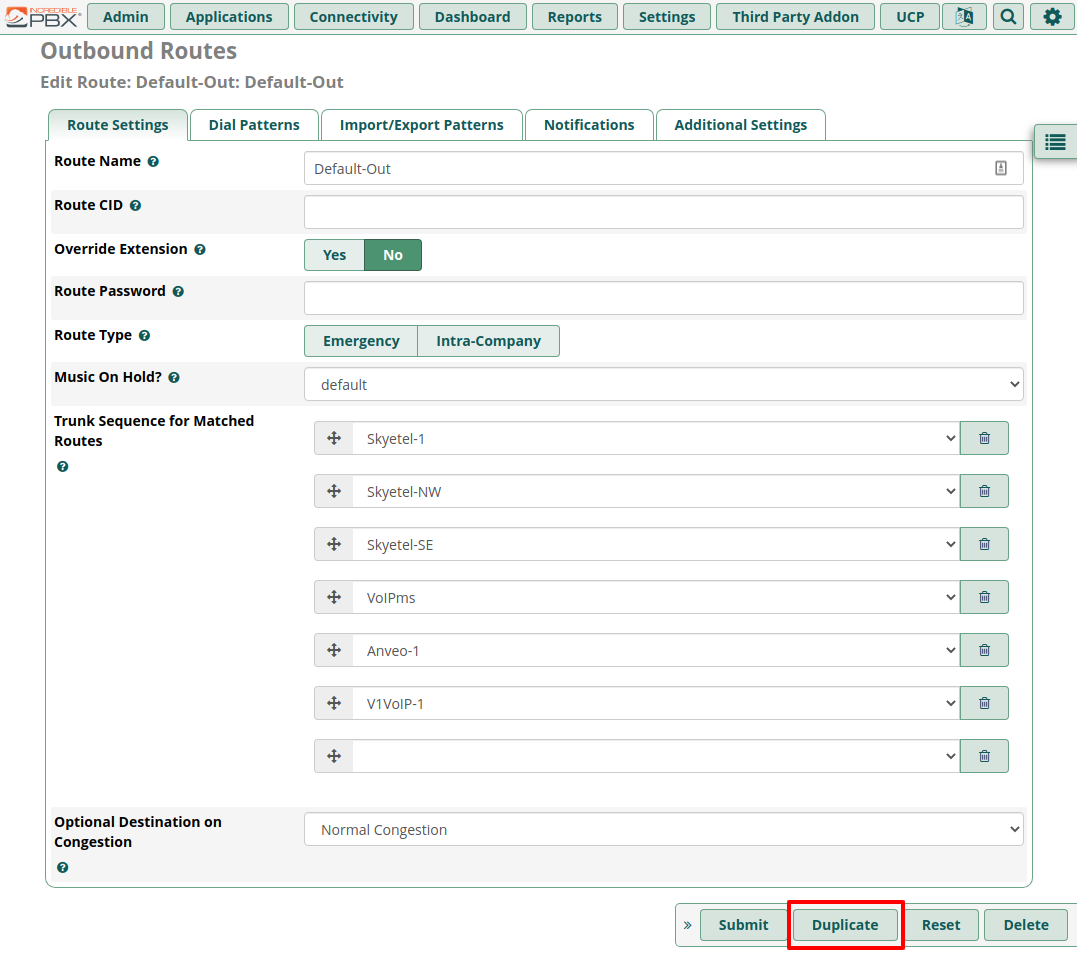
Edit your main Skyetel route and click Duplicate:
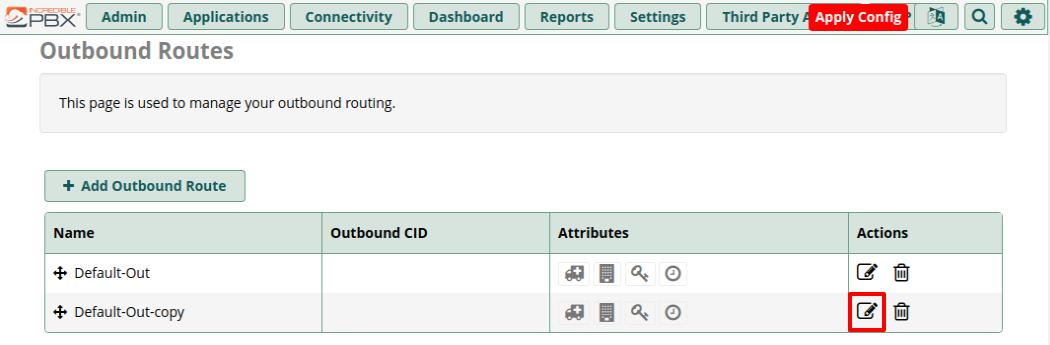
Then you’ll have a copy of your main route that you can edit:
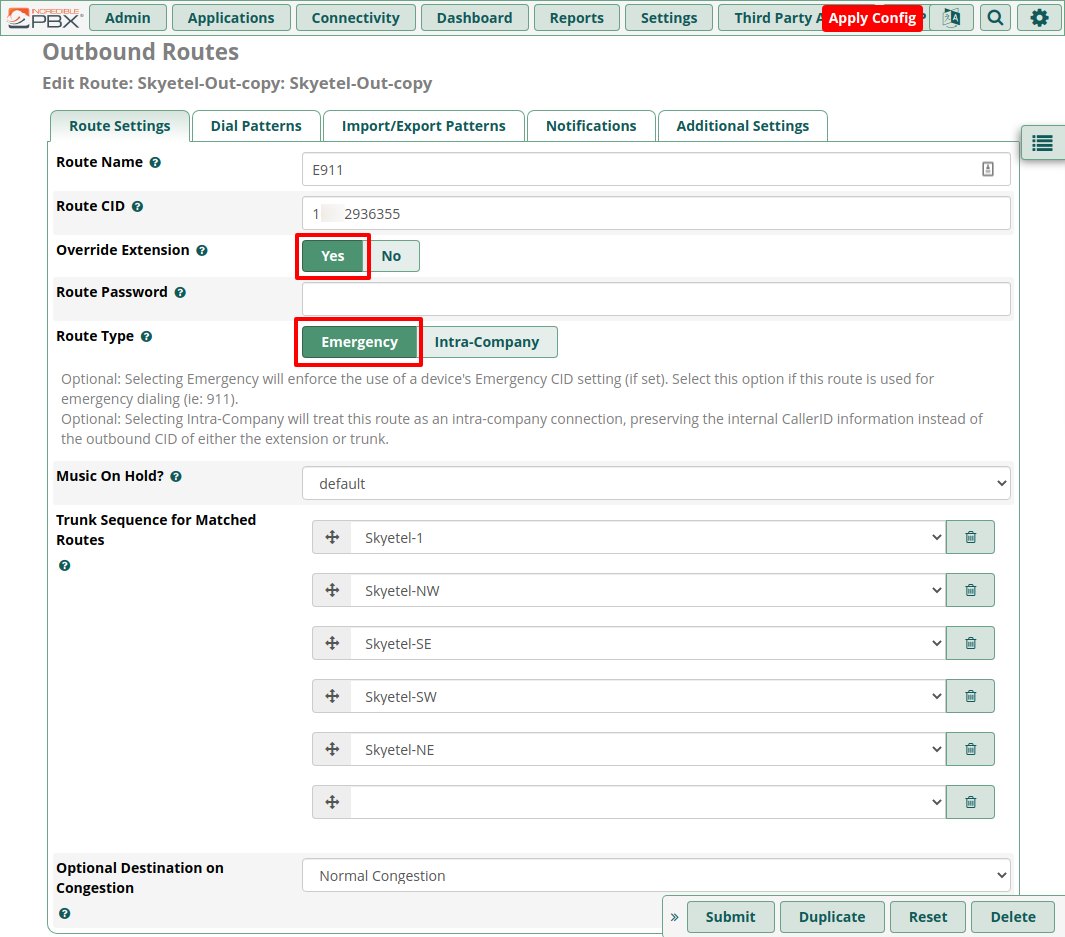
Per the IncrediblePBX E911 Wiki page, set the name to E911 and set Override Extension to Yes. The other change I made was to mark it as an emergency route:
You can see by the help text that it forces the caller ID (CID) to be a specific number (if set). I don’t have any other numbers besides the one I ported from Google Voice, but you’ll be able to see later how it clearly indicates this extension is set up for emergency calling.
Then go to the Dial Patterns tab and remove all of the pre-existing dialplans by clicking the trashcan icons:
Click the Dial patterns wizards button to generate new dialing plans:
Unselect all options except “US Emergency” and then click Generate Routes. You’ll have all of the appropriate 911 and 933 (testing) dialplans added, plus some extras to make sure all bases are covered. There’s a sad story behind Kari’s Law and why these extra dialplans are ultimately unnecessary, but I’ll keep them just in case.
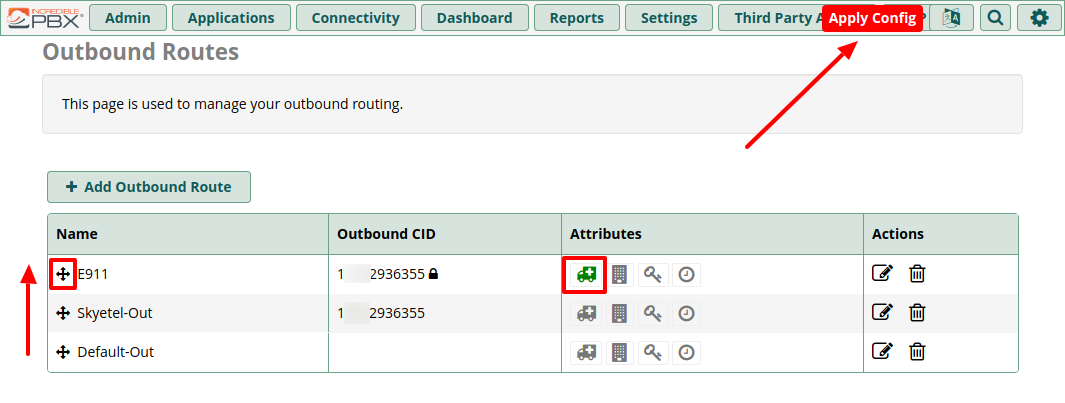
Once those are added click Submit at the bottom and you’ll be brought back to the Outbound Routes list where you can see the emergency icon lit up:
Move your E911 Route up to the top of the list by dragging it by the crosshair icon. Then click “Apply Config” to save all your changes and reload the dialplan.
Skyetel Settings
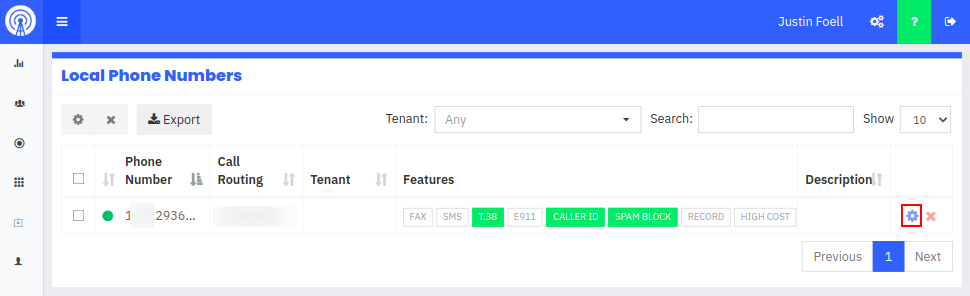
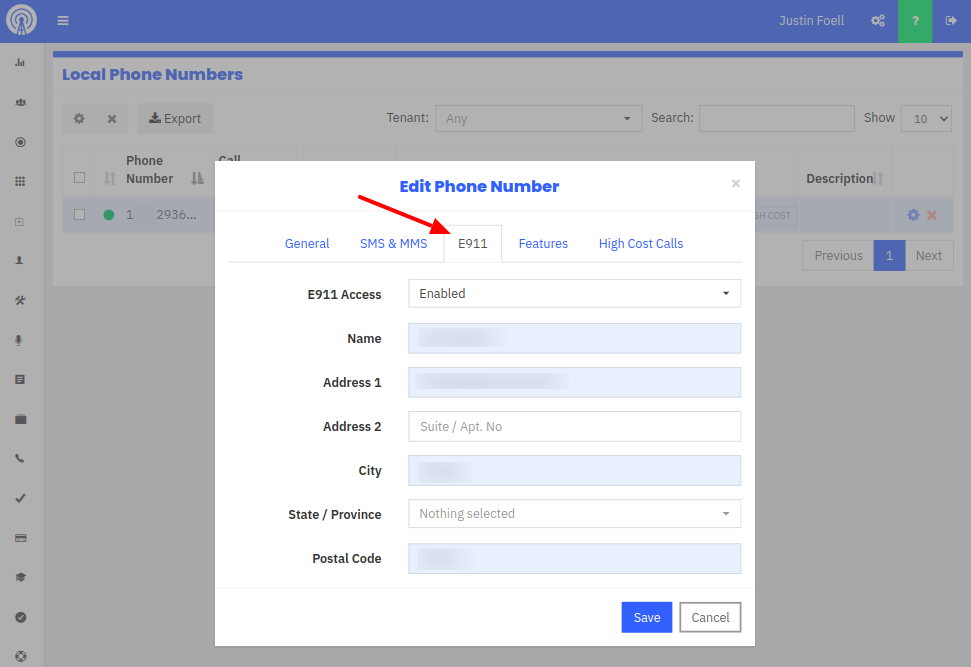
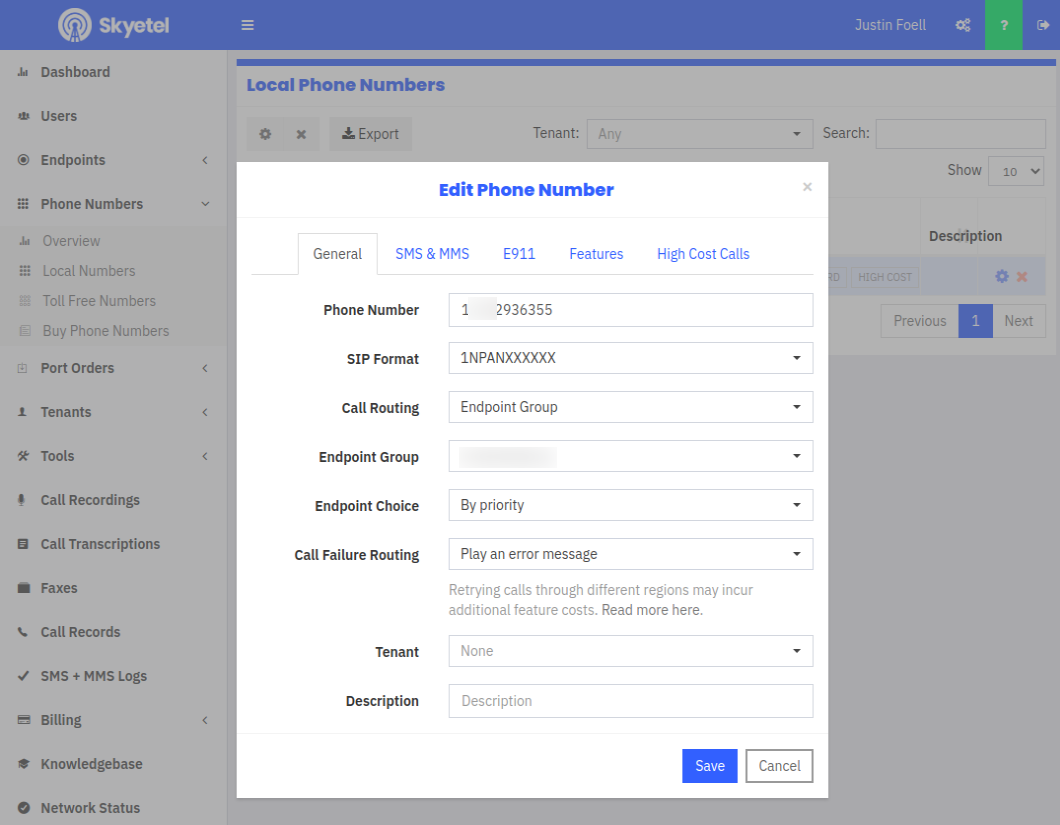
Over at the Skyetel dashboard, it’s as easy as following their support document. I’ve included screenshots here as additional examples. Head to Phone Numbers -> Local Numbers and click the gear icon on the number you want to edit.
Once editing your number, go to the E911 tab and set it to Enabled. Fill out your name and address so Skyetel can route you to the correct emergency service provider.
Once it’s enabled, the E911 indicator will be bright green:
Enabling E911 will add $1.50/mo to your bill. But for $2.50 per month ($1 for the local number, $1.50 for E911), it’s way cheaper than having a land line. I like that anyone in the house can dial 911, especially kids.
Testing
Testing 911 dialing seems like a nerve-wracking thing to do. Luckily Skyetel understands your anxiety and has set up a test number of 933 that you can dial to make sure everything is set up correctly.
When you dial 933, if everything is set up correctly an automated Skyetel message will tell you it’s working. It will also read back your configured caller ID and address to verify.
One minor hiccup I noticed is that my call didn’t go through until after a 15 second delay. If it were an actual emergency I would be panicking during this time.
The problem was at my RTP-300. You can dial a pound (#) to commit to the dialed number immediately – I like this for dialing my 702 extension. If I want to dial that extension, I dial 702# – because I might otherwise be trying to call a friend in the Las Vegas 702 area code.
I inspected the dialplan for the two lines of my RTP-300:
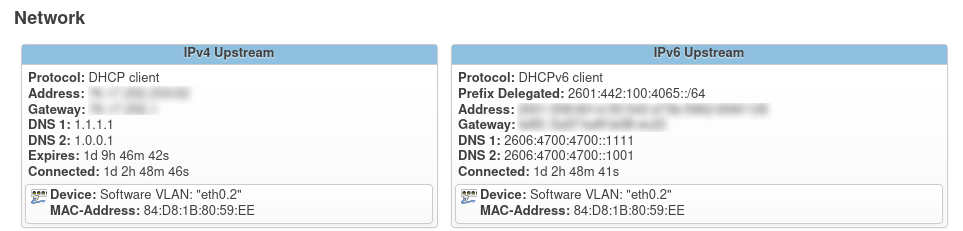
Pro-tip: Notice I’m using the cloudflare DNS servers rather than the ISP-provided ones. The Comcast DNS servers have gone down on me before and their performance is generally lacking.
My concern was if the bridged router can’t contact IPv6 addresses, the same is probably true for the devices that are connecting through it.
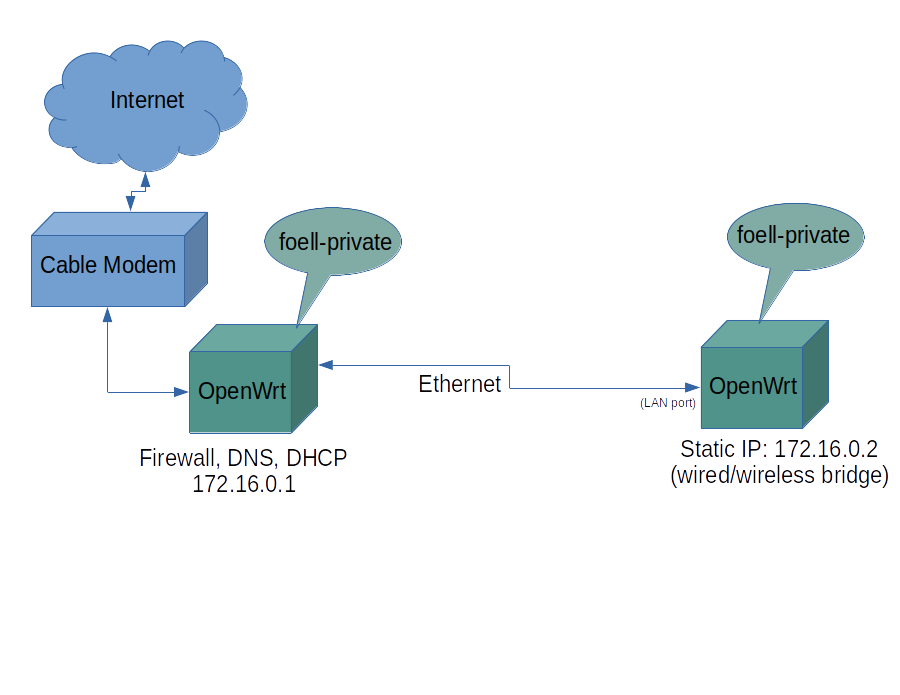
I found the solution in this thread on the OpenWrt forums. While it’s easy to statically assign an IPv4 address, along with a default gateway and DNS server – for IPv6 it’s easiest to set up another lan interface specifically for IPv6 that gets it’s IPv6 address (and routes) automatically from the upstream router – rather than assigning it statically.
The TL;DR version of this post is to add this to your network config:
Configuring IPv6 Bridging through the Web Interface
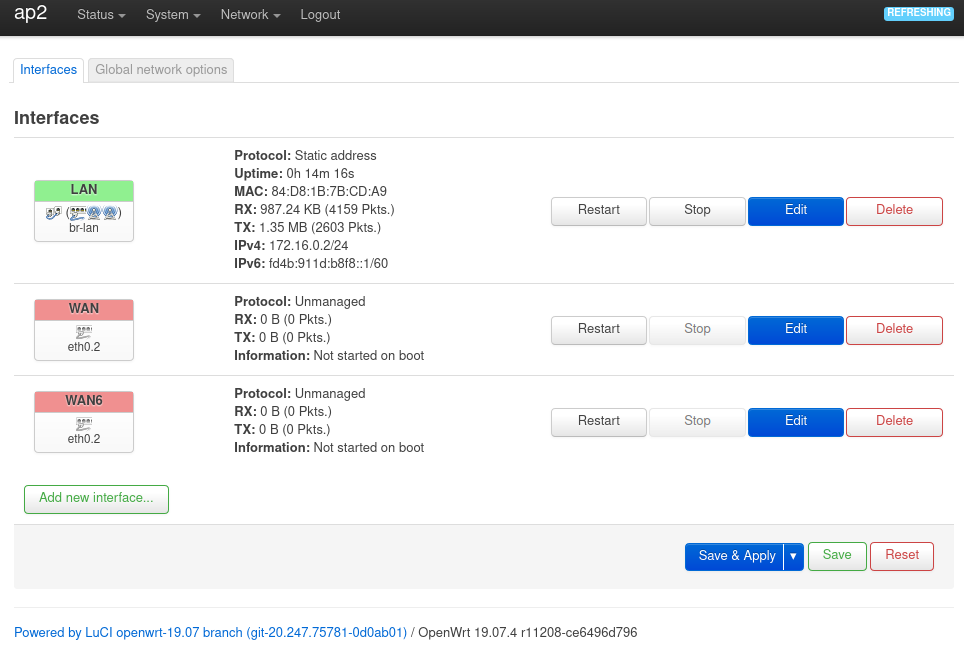
To do the same thing above via LuCI – the OpenWrt web interface, here’s how. Initially on the Network -> Interfaces page, ou can see my IPv4 lan with the wan ports disabled:
Click “Add new interface…”
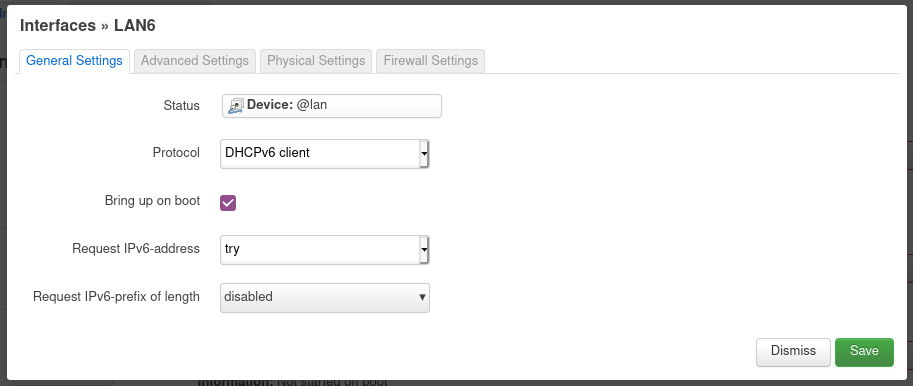
Name it “lan6” and choose the DHCPv6 client protocol. For the interface, select the @lan alias. Then click Create Interface. You’ll be brought to a second screen.
All I had to do on this page was change the “Request IPv6-prefix” value to disabled. No need to change anything on the other tabs – the defaults are fine.
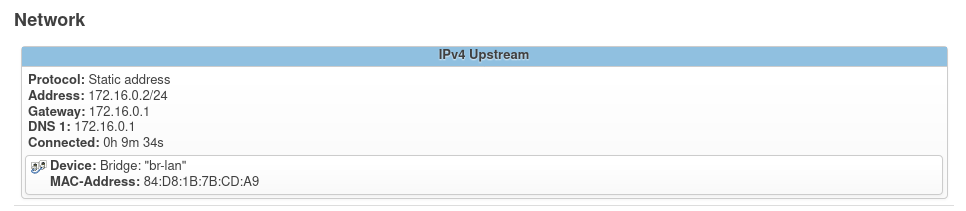
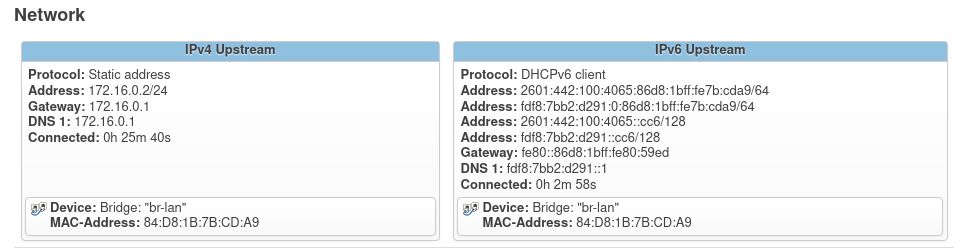
Now the Status -> Overview page on my bridged router looks like this:
Now I can ping IPv6 addresses from the command line on my bridged router:
root@ap2:~# ping -c 2 ipv6.google.com
PING ipv6.google.com (2607:f8b0:4009:807::200e): 56 data bytes
64 bytes from 2607:f8b0:4009:807::200e: seq=0 ttl=115 time=17.884 ms
64 bytes from 2607:f8b0:4009:807::200e: seq=1 ttl=115 time=17.351 ms

--- ipv6.google.com ping statistics ---
2 packets transmitted, 2 packets received, 0% packet loss
round-trip min/avg/max = 17.351/17.617/17.884 ms
One of my 2021 goals is to better understand IPv6 concepts (at least as well as I can understand IPv4). If there’s any *nix configurations I find helpful along the way, I’ll post ’em here.
Recently I noticed I would occasionally get the dreaded question-mark network icon: “?” I did some digging around and it was related to Ubuntu’s Network Connectivity check. Several posts out there simply say to disable the check by going to Settings -> Privacy and turning Connectivity Checking to “Off.”
But by disabling connectivity checking, I don’t get the automatic prompt to connect through a captive portal (like at my local library). I wanted to actually fix the problem, so I needed to understand what the problem was.
Ubuntu uses the URL http://connectivity-check.ubuntu.com/ by default for connectivity checking. I went to the command line to see if there were any problems using curl while on my wired network:
$ curl -v http://connectivity-check.ubuntu.com/
*   Trying 35.222.85.5...
* TCP_NODELAY set
* connect to 35.222.85.5 port 80 failed: Connection timed out
*   Trying 35.224.99.156...
* TCP_NODELAY set
* Connected to connectivity-check.ubuntu.com (35.224.99.156) port 80 (#0)
> GET / HTTP/1.1
> Host: connectivity-check.ubuntu.com
> User-Agent: curl/7.58.0
> Accept: */*
>
< HTTP/1.1 204 No Content
< Date: Wed, 09 Dec 2020 16:02:34 GMT
< Server: Apache/2.4.18 (Ubuntu)
< X-NetworkManager-Status: online
<
* Connection #0 to host connectivity-check.ubuntu.com left intact
Everything seemed to work out in the end, but you can see that the first request failed so it had to fall back to the secondary address. This whole request took 122 seconds.
The problem is, the default connectivity check interval is 120 seconds. So after the first one times out Network Manager flags the computer as offline. Apps like Spotify recognize the offline network status and stop working – despite being actually connected to the internet.
The Debian default URL is http://network-test.debian.org/nm which has 3 IPs listed (for fall back) and it is much faster. All I had to do was add this file:
sudo vi /etc/NetworkManager/conf.d/11-connectivity.conf
I gave it a little longer interval – 5 minutes instead of 2. It’s probably not necessary as their service responds much faster, but I want to avoid the question-mark-of-no-connectivity as much as possible but still retain features like captive portal detection.
Restart after you’ve saved that file and you should be good to go!
Most of the configuration follows this Nerdvittles Skyetel post, but I include some specifics and screenshots for my configuration using OpenWrt, IncrediblePBX on Raspberry Pi, and a Linksys RTP-300 analog telephone adapter.
On my OpenWrt router that acts as a gateway, I added a firewall port forward for UDP Port 5060 to my Asterisk server (Raspberry Pi).
I didn’t need to run any of the Skyetel add-ip customizations from the original article. On my Raspberry Pi those settings were already there. You can check to see if the firewall settings for the Skyetel IPs are already present by running:
If you see the ACCEPT all row, then you’re good to go. If you don’t get any output, you’ll need to run the commands from the Nerdvittles Skyetel post.
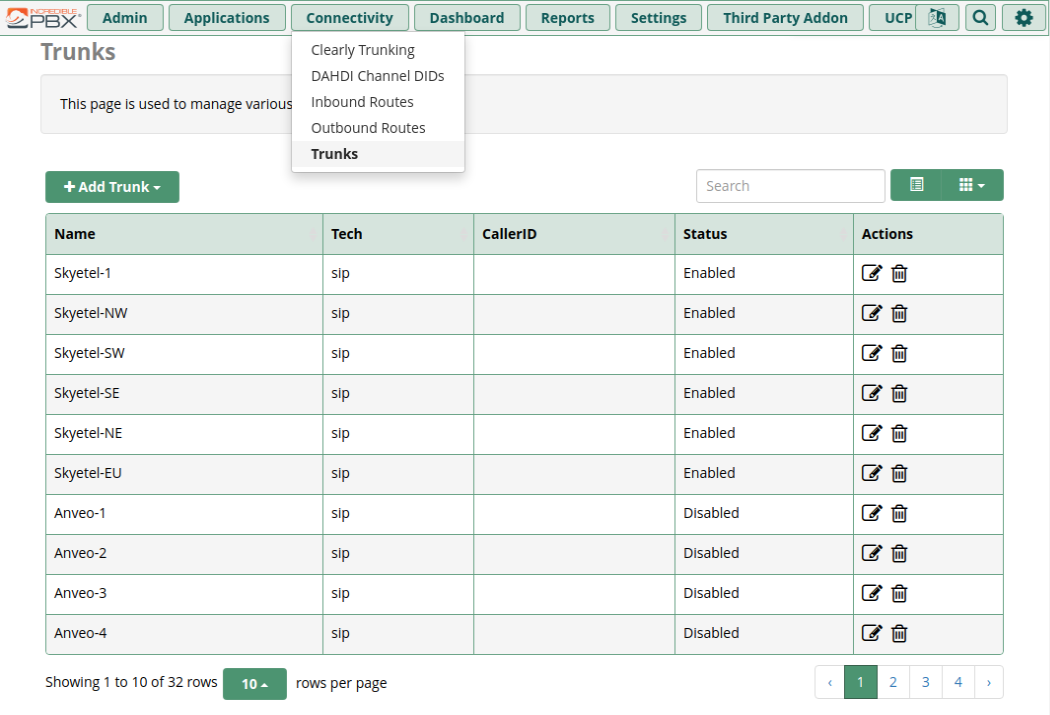
Trunk Setup
I also didn’t need to run any of the Skytel Trunk Setup scripts, as I already had the six Skyetel trunks configured and enabled.
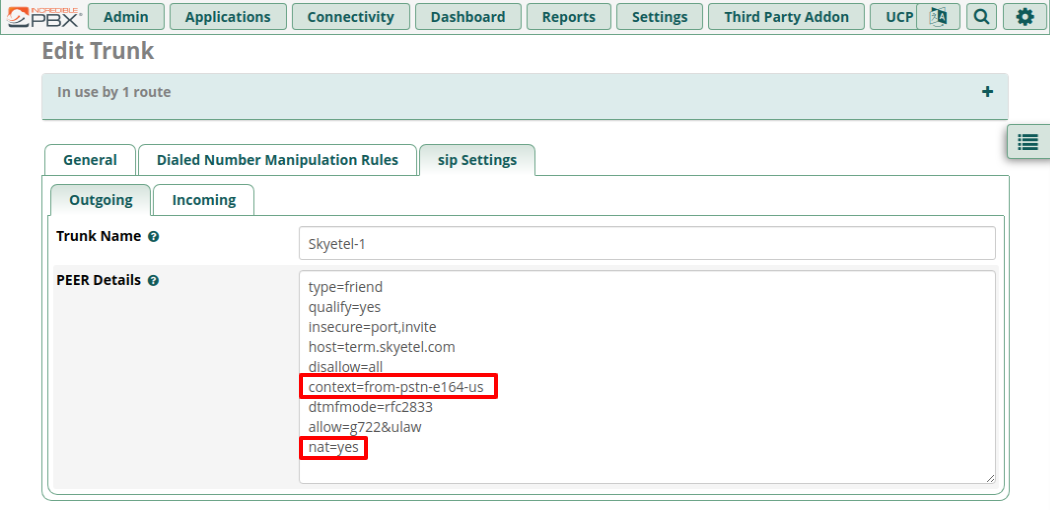
I also didn’t need to change the context configuration from from-trunk to from-pstn-e164-us (for a normal 10-digit US phone setup). It was already there 💪 Also, nat=yes was already set, so no need to add that either.
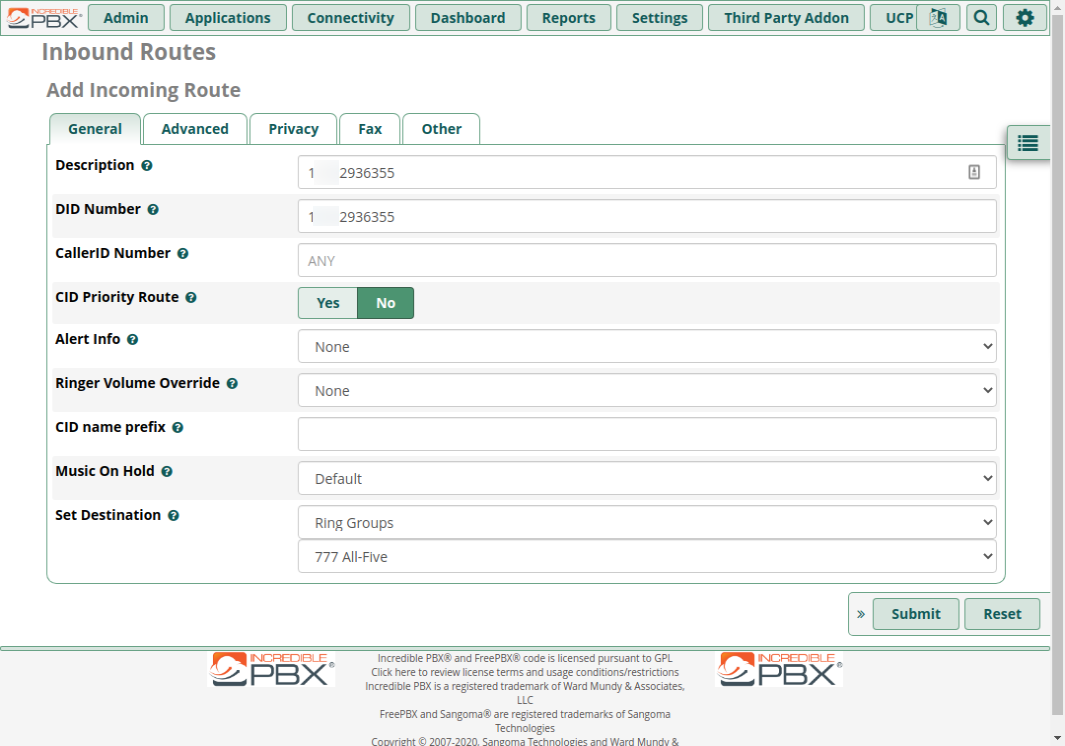
For the DID and Description I added my full 11-digit number: 1 and the other 10-digits. I also set the destination to the “777 All-Five” ring group. It’s a default ring group setup to ring all extensions (701 to 705) all at once.
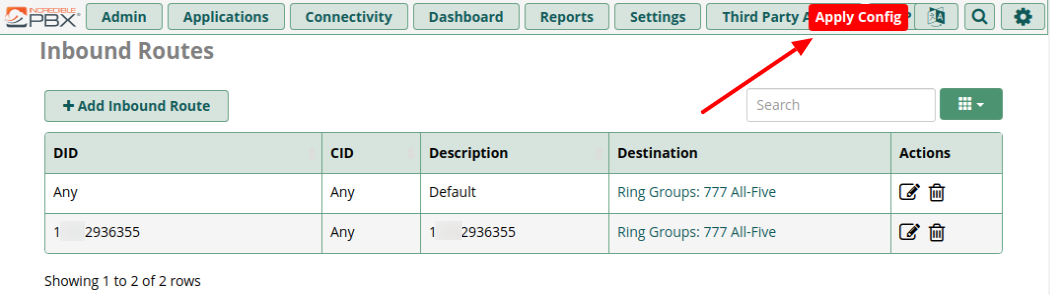
Once you click Submit there will be an “Apply Config” notification.
Click it to apply your new route and reload the dial plan.
Outbound Routes
The default Incredible PBX config already had default route. Click edit to view it:
As you can see it already has some Skyetel trunks pre-configured. Go ahead and click Duplicate to make a copy of this route we can change.
This will create a copy that we’ll edit.
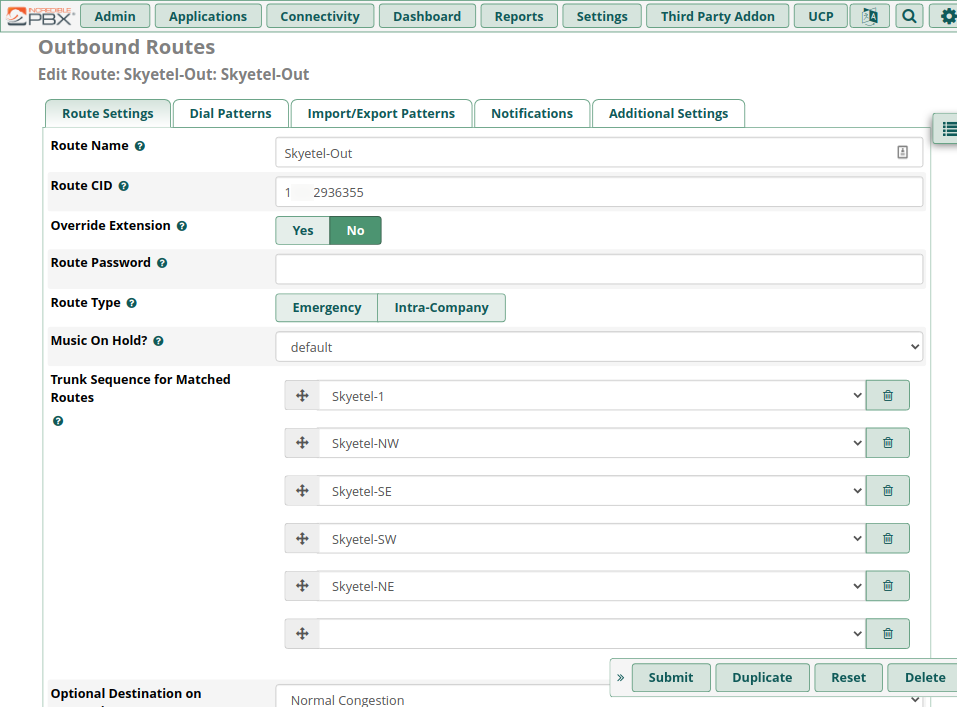
Rename the route, add your 11-digit phone number, and add the additional Skyetel trunks, removing any extras.
After submitting the new route, use the crosshair icon to move the Skyetel route to the top, then click Apply Config.
I didn’t need to do any configuration of SIP Settings in Asterisk, my defaults all looked good.
Skyetel Configuration
Skyetel configuration is normally pretty simple, but for my configuration I want to combine my Dynamic DNS setup with the inbound SIP IP. But it turns out that Skyetel doesn’t work that way. Instead they support a script that will periodically call out from your asterisk server and update the endpoint IP at Skyetel if it’s changed https://bitbucket.org/skyetel/ip-endpoint-group-update/
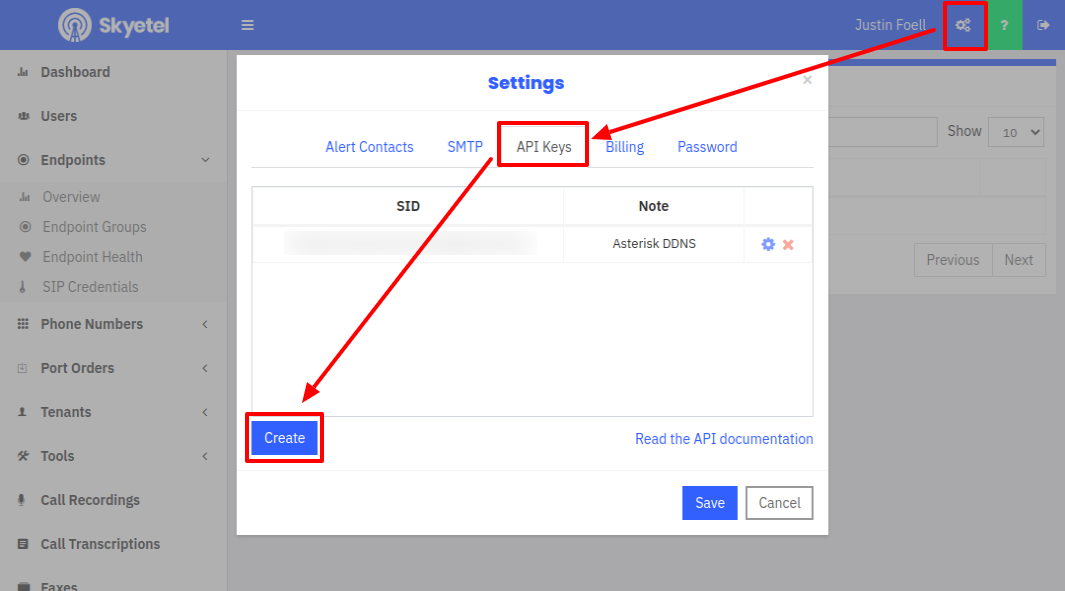
In order to use the script, you must first create a set of API keys on the Skyetel dashboard by clicking the gear icon by your login name.
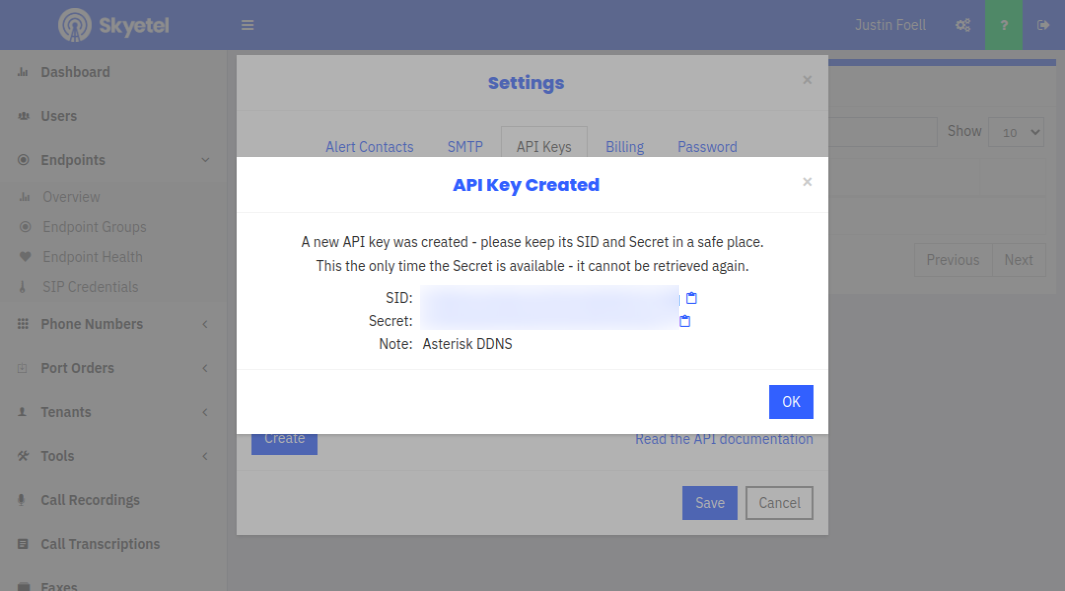
Go to the API keys tab and click Create. Save the keys somewhere safe, they won’t be displayed a second time.
Then head back to your Raspberry Pi to install the script. You’ll need git to install the script. Additionally, I also needed jq on my Raspberry Pi:
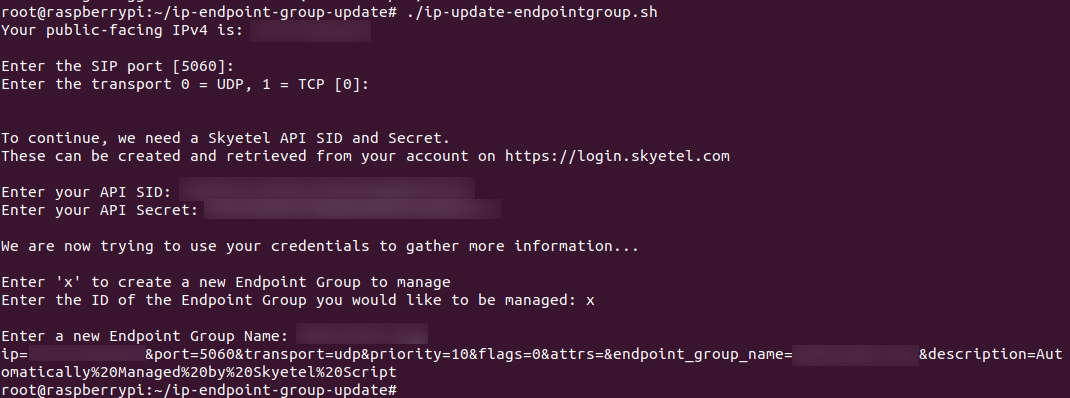
cd into the ip-endpoint-group-update directory, and then run the script. I used the defaults for port and transport by simply pressing <Enter>. Enter your API keys that you created on the Skyetel dashboard. I hadn’t yet set up an Endpoint Group in my Skyetel dash, so I entered “x” to do it from the script.
The script automatically installs itself into /usr/local/bin/ip-update-endpointgroup.sh and creates a cron to run it every twenty minutes at /etc/cron.d/ip-update-endpointgroup.cron
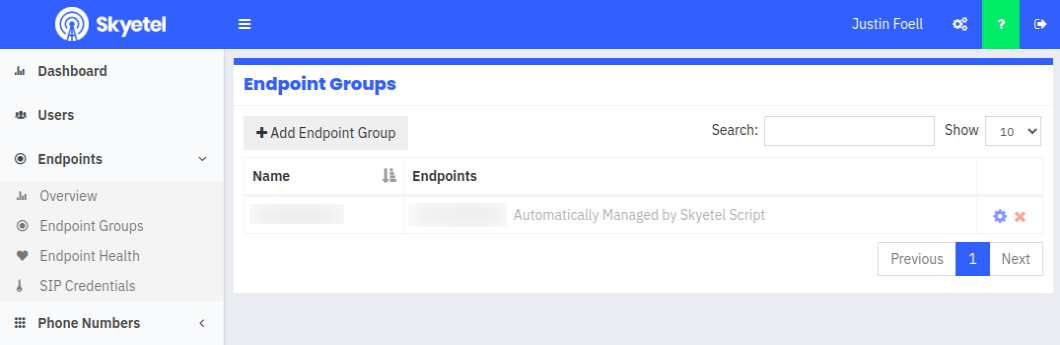
In the Skyetel dash I see there’s an endpoint group that was automatically created:
Click Save, then give it a few minutes and try calling your number from your cell phone – it should ring and connect. If audio is good, you’re good to go!