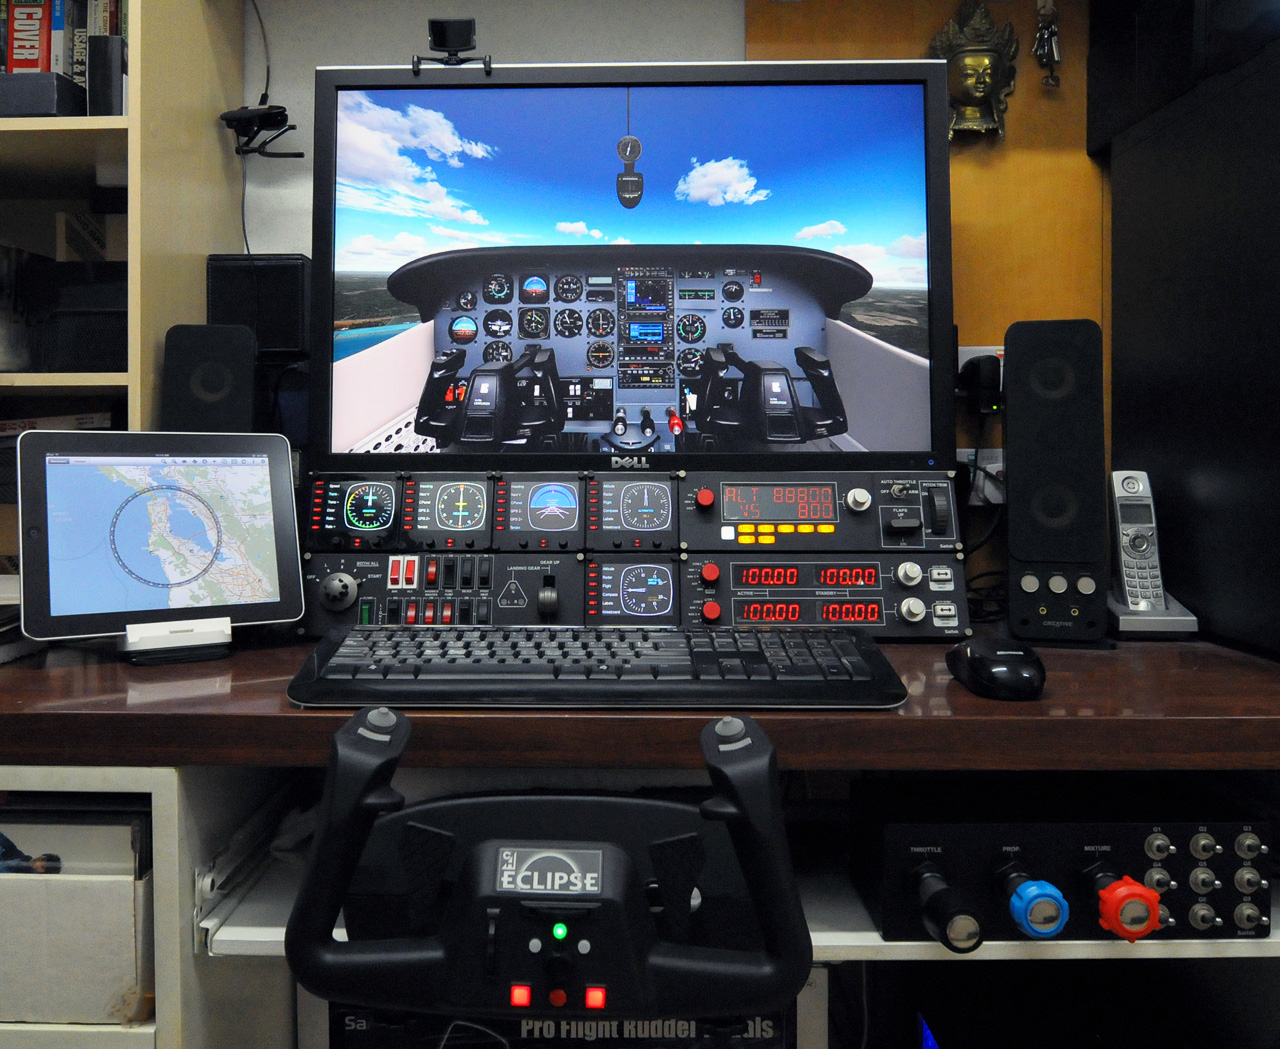
In 2018 I bought a gaming computer to replace my aging Dell 17″ laptop. The game I wanted to play was VRC – which didn’t require a lot of horsepower, but I wanted to potentially play other games. I found an Alienware Alpha with decent specs and bought it. One thing that interested me about all Alienware systems was the ability to connect them to the Alienware Graphics Amplifier (AGA).
Continue readingTag Archives: Windows


Get (your files) organized & have a (backup) plan!
Suddenly I find myself trapped in my own home due to COVID-19. It’s not really a big deal because I work from home normally. But it has changed my weekend plans drastically. So it’s time to start tackling one of my 2020 goals:
Continue reading →Organizing all of our digital files and having a consistent back-up strategy.
Organization
At our house important files mostly fall into two realms: Photos and Music. Many people have at one point decided to keep all of their photos or music with a 3rd party service like Flickr or iTunes. That’s fine, but you just have to be prepared to commit to them like a marriage – except they decide all of the terms – it’s not a mutual agreement. Personally, no matter if I upload my photos to a 3rd party service, I always keep the originals on a disk in my home so I can own my own content.
But this becomes an issue when everyone in your family isn’t on the same page. I have some photos on a USB drive and on my computer, and my wife has done the same on a different USB drive and computer. We need a way to have photos accessible in a consistent place, and make sure they’re getting backed-up.
When it comes to shopping for a big hard drive to store all of this stuff, I try to find whatever is the best space-per-cost within my budget. At one point I had devised a “2×100” rule: I get the biggest drive I can for $100 and consider buying two of them (for redundancy). As disk sizes increase, once a drive is available that is 2x the size of my current one for $100, I replace them. Currently you can get up to 4TB drives for $100.
I bought a 4TB drive to use as network attached storage to act as our central storage place. I attached it to a Raspberry Pi using a USB/SATA hard drive dock and share it read-only over the network using Samba. It shows up as a Windows-style network share on all computers and other devices like AppleTV & FireTV (using VLC). For read-write access, I use SSHFS so authenticated peeps can write to the disk and move files around.
We’re still working on how to consistently name our photo albums, but having them in one place that gets backed up off-site is a big win.
Backups
I used to be an amateur network administrator. In my back-office (laundry room) I had a tower server that had 6 disk drives. A 3-disk RAID5 for backups, a 2-disk RAID0 for temporary storage (for MythTV recordings), all in swappable drive trays. Then there was one more disk hard-mounted for operating system boot-up. It worked for a while, but when I was going to have to replace the 1000-Watt power supply for the second time, I thought maybe there’s a better way. One thing I hadn’t considered before is: the more disk drives you have, the higher chance of having a drive fail – an increased chance of the click of death was always in the back of my mind. Using one big disk with a Raspberry Pi is much simpler, smaller, and uses much less power.
With all disks on-site, there is still the chance of everything getting destroyed by fire. To handle off-site backup I had used CrashPlan, but that didn’t pan out – time to look for something different. Since we have quite the collection of different computers here – Linux, MacOS & Windows, I looked for a consistent backup solution that is operating system agnostic. I wound up going with Duplicati using Backblaze’s B2 for off-site storage.
All of our computers use Duplicati independently to backup to B2. The Raspberry Pi does as well to backup our photos and music.
The Setup
I’m still working out (and documenting) the details of our setup, but I’ll list the specifics of our setup here as I get to them:
If you have any tips or strategies you could offer, please let me know in the comments!
Trainz Simulator + Griffin Powermate
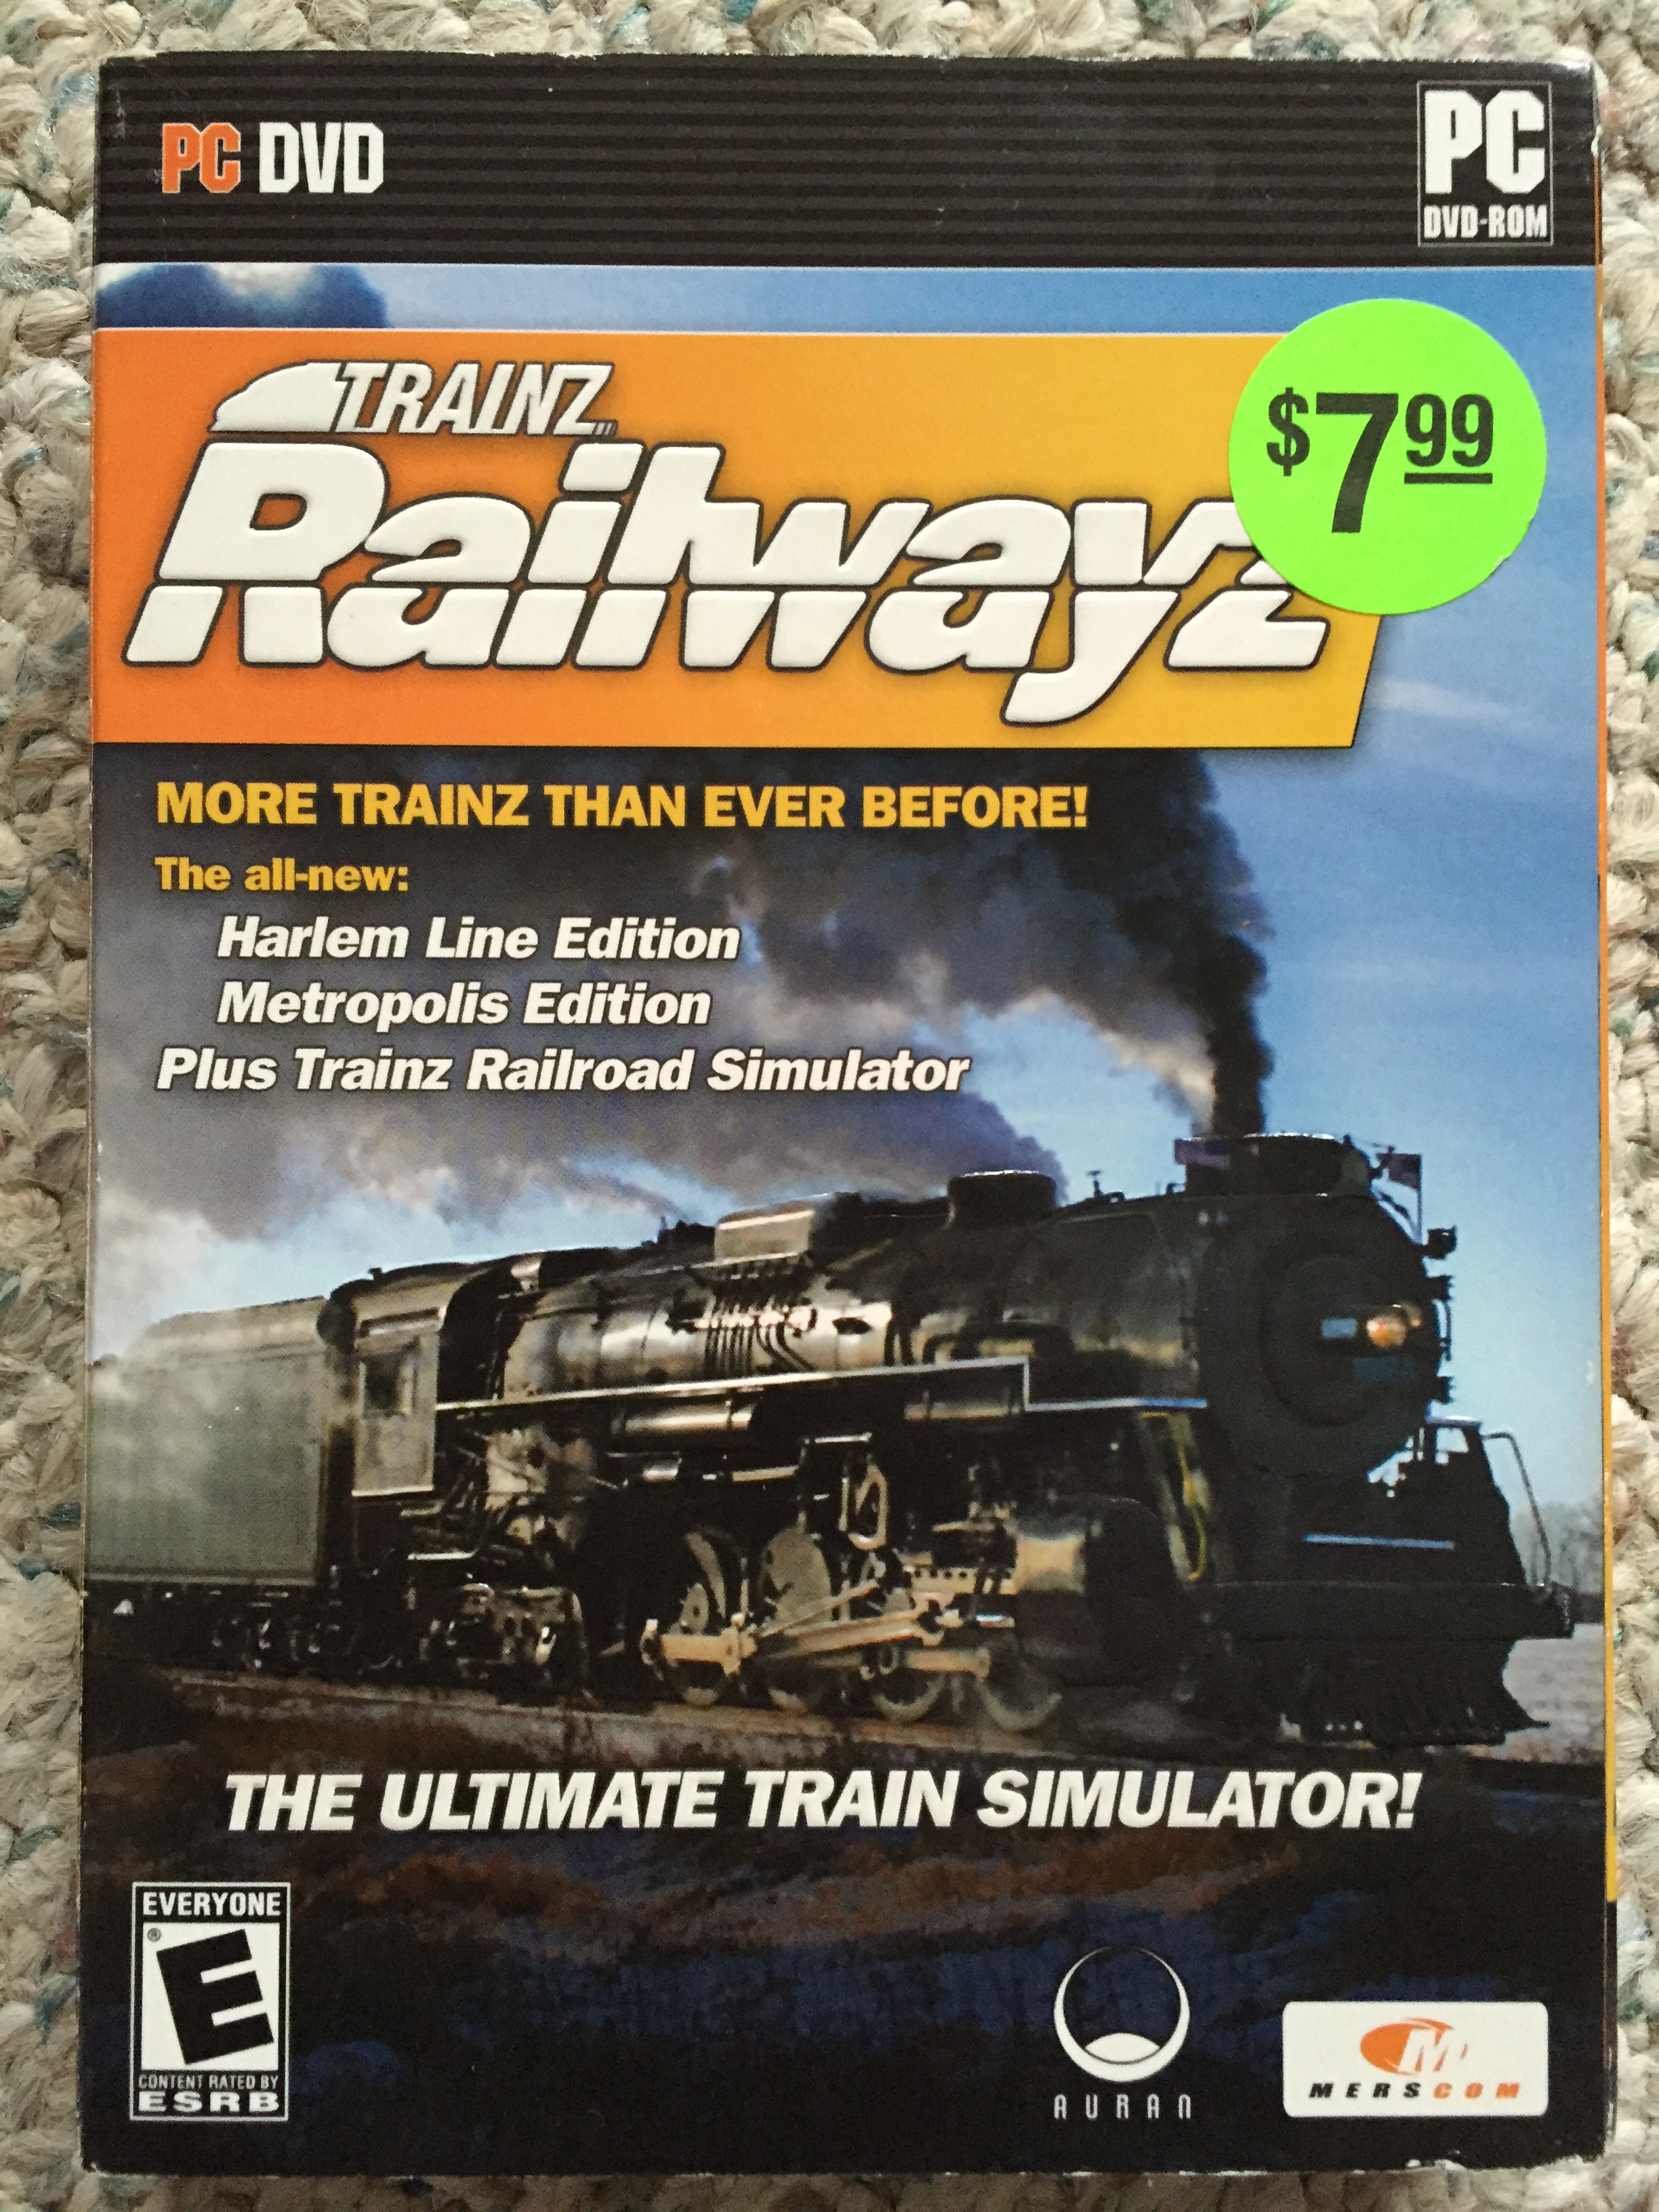
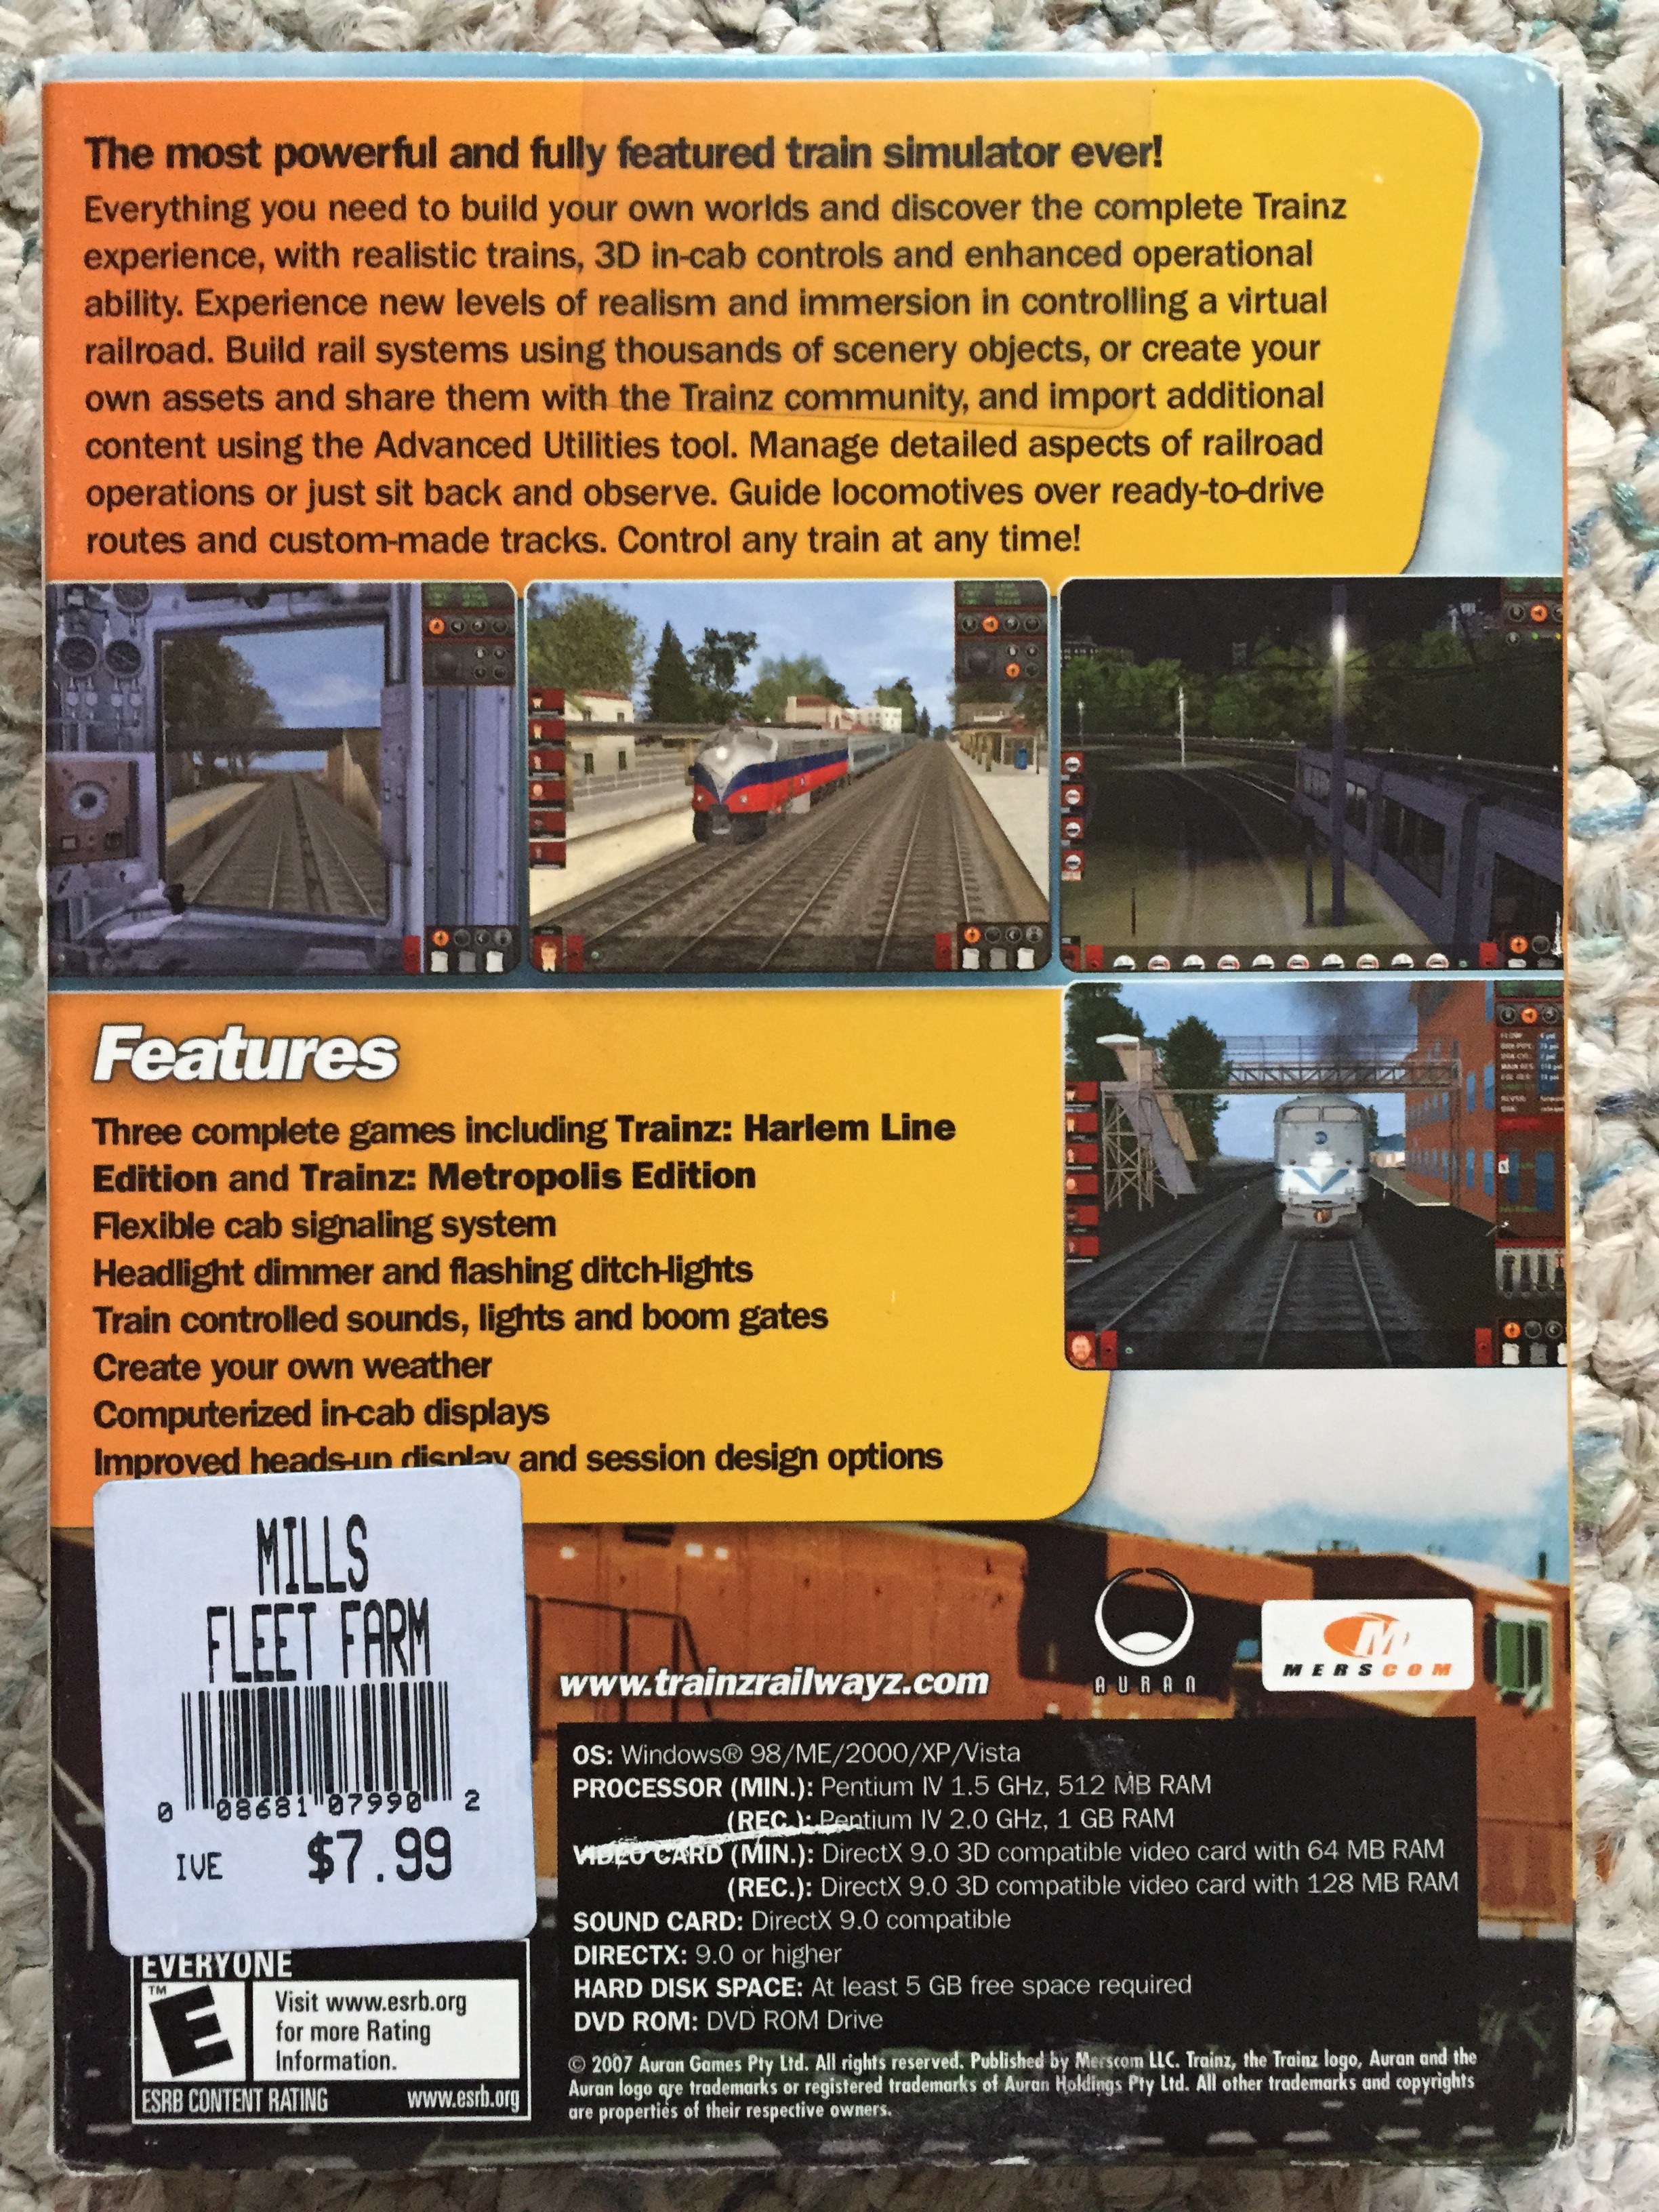
My son Jules loves trains. I like trains too and my enthusiasm was probably the seed that grew into his obsession. My good friend Joe bought Jules a copy of “Trainz Railroad Simulator” for Christmas a year ago. It was in the bargain bin at Mills Fleet Farm:
But rather than using the keyboard to play the game, I thought it would be easier to use some sort of joystick. A quick internet search yielded this:
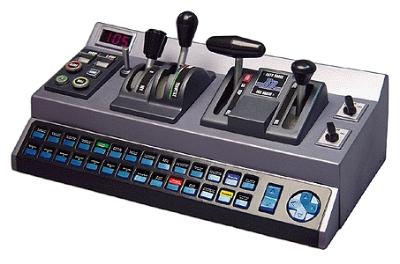
It looks huge and intimidating, but based on some of the flight simulator setups I’ve seen, the train cab controller is positively tame:
Still at $180, I wasn’t about to buy the Train Cab Controller, which would certainly make the game infinitely more complex for a 5 year old. Trainz has a “DCC mode” which allows you to control the trains very simply like they are model trains: with a dial.

I always wanted a Griffin Powermate – a superfluous USB volume knob you can add to any computer. But now I had an actual use. I got a USB Powermate for $30 shipped from Amazon.
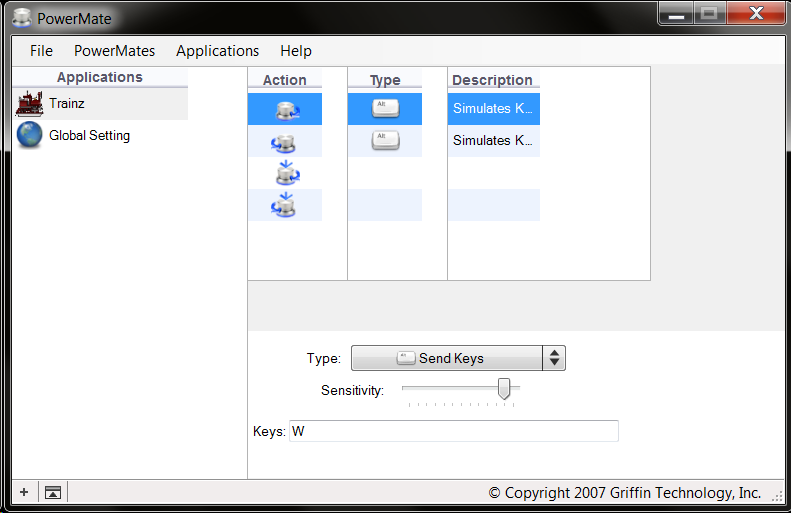
Powermate Setup for Trainz
When it arrived, I downloaded and installed their driver software. It renders terribly in Windows 7 (it was probably last updated for Windows XP):
The “click” and “long click” actions are hidden in the interface (you can only see 4 at a time). But they’re there, you just need to highlight an action, and arrow down until you get to others.
For the Trainz Simulator setup, I added the following settings:
Rotate Right: Send Key – W (forward)
Rotate Left: Send Key – X (reverse)
These keys control the forward/reverse dial in the game. I set the sensitivity fairly high (see screenshot) so a turn of the Powermate would closely match what you saw onscreen.
Click: Send Key – S (stop)
Long Click: Send Key – A (apply brake)
“S” stops the train by putting the dial immediately back to zero, so a quick click is an easy way to stop. Trains are heavy though and the “A” key normally applies the brake, so I added a long click action to apply the brake – I like to think of the long click like pressing the brake pedal in a car.
Enjoy
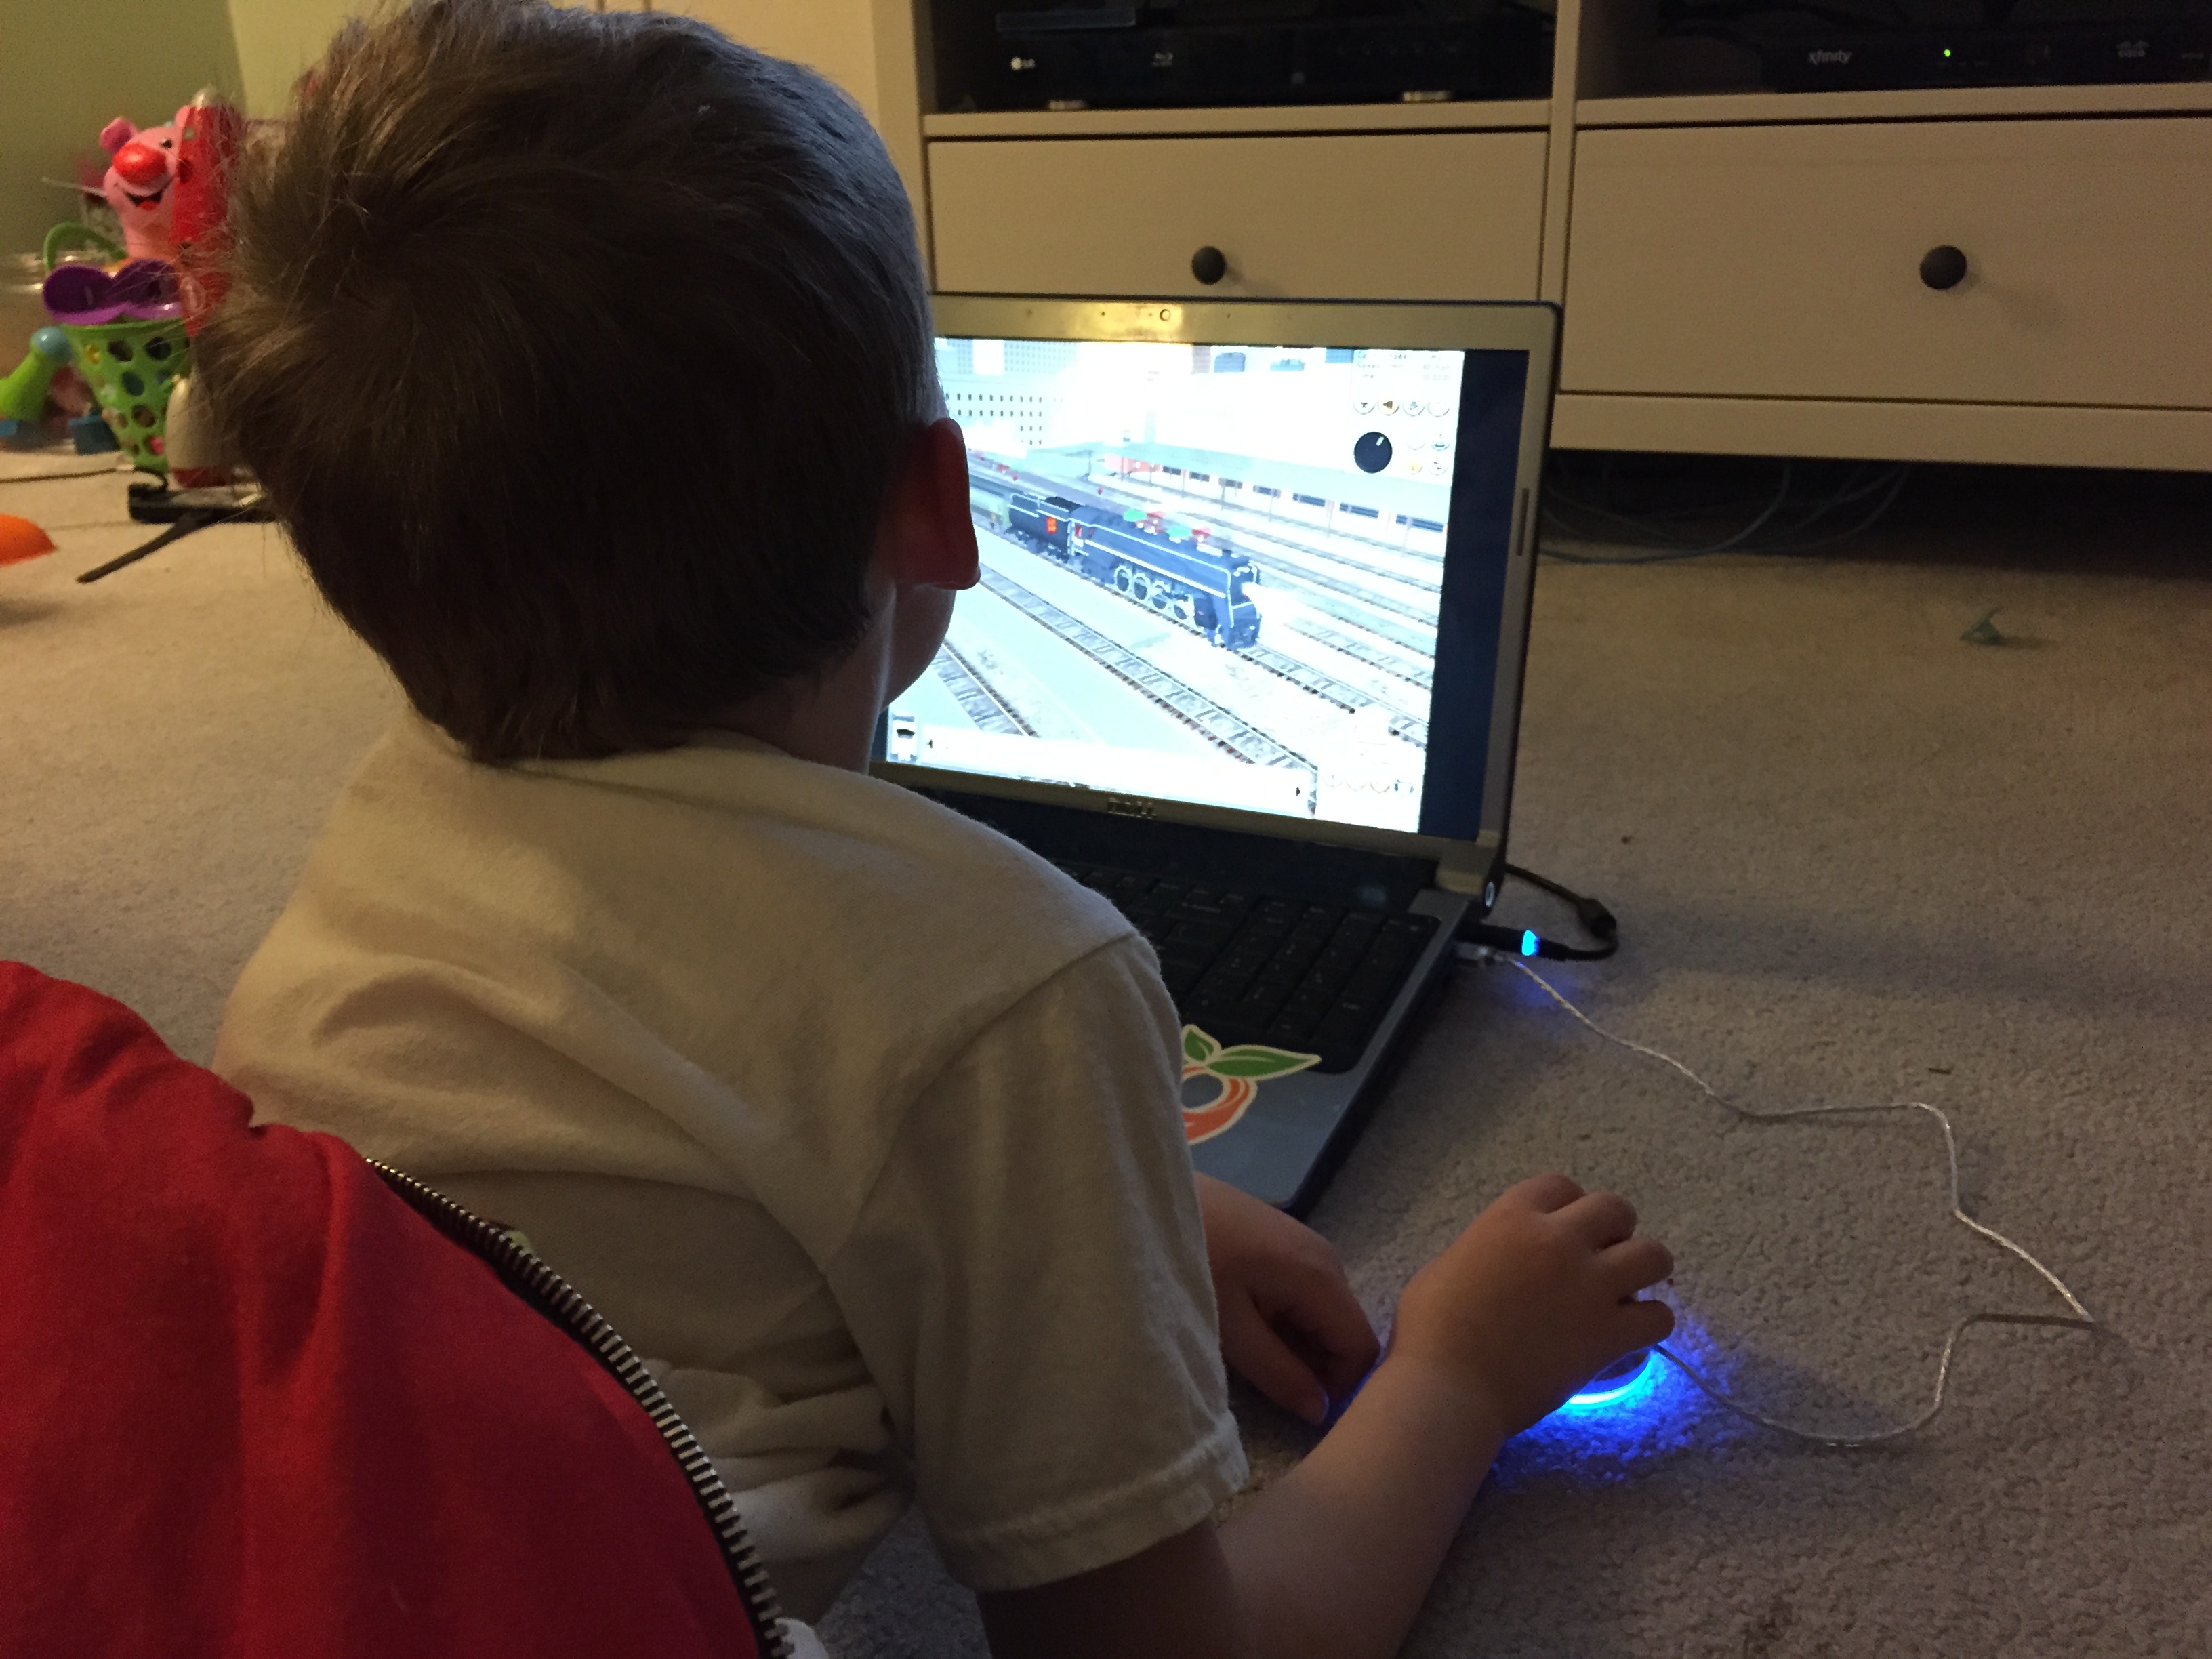
It works exactly as I imagined: simple! You can see the “dial” on the screen and the Powermate glowing under Jules’ hand that now controls it. Easy peasy.
Both the Griffin Powermate and Trainz Simulator (newer versions) are available for Mac OSX so Apple loving trainiacs won’t be left out.
Garmin MapSource in Linux (Wine)
Garmin is the Apple iPod of GPS products. So when it came time to purchase a new GPS, I grabbed a Garmin eTrex Vista HCx. It had a great feature set for a handheld unit: SD card expansion, turn-by-turn directions, etc. And because it’s a Garmin, it had the best “hacker” support, namely: free maps from Open Street Maps.
The one thing that I was dissatisfied with was the software support under Linux. Sure you could plug it in, and retrieve data, but simple editing of tracks (splitting, joining) was tedious. Garmin’s free MapSource software worked well, but I wanted to avoid booting into Windows just to use it. Luckily I found this thread on ubuntuforums.org. I rehash here much of the info provided there, and include some updates.
Continue reading →
An Aside about Strava
I use my GPS mostly while cycling. A while back a friend tipped me off to a site called Strava where you can track your rides and compete virtually with others.
I’m not a competitive cyclist. I ride more to shuttle kids to the library, or for picking up groceries. But I do like to use my GPS while riding and upload the data to Strava to track my miles, calories burned, etc. It’s also fun to see what sort of excruciating rides competitive cyclists are doing.
My beef with Strava is that they just recently shut down the version 1 & 2 API access to their site. They are launching a new V3 API, but your application must be approved to use the service. Unless a new version to any API is fully available, it’s customary to leave the old version(s) of the API accessible for a period of time so developers can update their software. Unless the old API is causing undue stress on server hardware and equipment, there should be no reason that an old API is turned off before the new one is available.
My guess is that they (like Twitter) want to control who can/can’t use their API. It could also be a stupid knee-jerk reaction, like I’ve seen many governments and businesses make. Recently there was a lawsuit brought against Strava. They may now want to control the exact wording of the competitive elements of the apps so Strava users aren’t feeling coerced into regaining their top time by riding dangerously. It all feels like a digital nanny-state to me. My guess is that no open-source projects will be able to use the V3 API because there’s probably some DRM key (or equivalent) required to connect.
Nevermind that I’m a contributor to the Strava plugin for WordPress (which no longer works thanks to Strava). WordPress only powers a billion websites and has the largest market share of any web publishing platform. Isn’t the point of having an API to promote the widest adoption possible?!? If Strava doesn’t change, maybe I can convince tons of WordPress cyclists to switch to Garmin Connect – they don’t seem to be ostracizing developers.
/end soapbox
Back to installing MapSource…
Installing Wine
The first order of business is installing Wine:
sudo apt-get install wine
Then run winecfg (as your normal user). This will create a ~/.wine directory:
winecfg
Just click OK when the dialog appears.
Installing MapSource
In order to install the latest MapSource, you actually have to install an older version of the software first because MapSource checks for the presence of an earlier version during installation. Fooling the earlier versions to the presence of MapSource is actually quite easy:
cd ~/.wine/drive_c
mkdir Garmin
touch Garmin/MapSource.exe
Get an older version, like MapSource_6153.exe from http://gawisp.com/perry/mapsource/
Then run the installer:
wine ~/Downloads/MapSource_6153.exe
Follow the on screen instructions. Accept the license and it will install. At the end of the install you can launch MapSource – don’t do this! Uncheck the check mark and just exit the installation.
Once you’ve installed MapSource the simple way, you can then update to a newer version of MapSource which looks for a “proper” MapSource installation. There may be some sort of secret sauce to having your upgraded MapSource fully functional. I initially had problems with the newest version crashing when saving a GPX file. But then it went away when I did a couple of incremental upgrades. If you have this problem, maybe try removing the latest version through the Wine uninstaller and installing a slightly earlier version. Please comment if you have any insight as to what works and what doesn’t.
Add Maps
Adding a drive
My maps exist on a Windows partition on my computer. Rather than reinstalling the (huge) files in Wine, I added a Wine system drive that linked to my Windows partition.
After mounting the Windows partition (simply by selecting it under devices in the nautilus file manager), I then made a symlink to my ~/.wine/dosdevices/ folder:
cd ~/.wine/dosdevices
ln -s /media/justin/OS "o:"
Replace /media/justin/OS with the correct path to your Windows partition, once it’s mounted in Linux. I chose “O” as my drive letter since I normally mount the disk as “OS” – you can choose whatever drive letter you’d like.
Add registry keys
This is most easily done by exporting registry keys from Windows and importing them into Wine’s registry. Here is a screenshot from my registry from Windows:
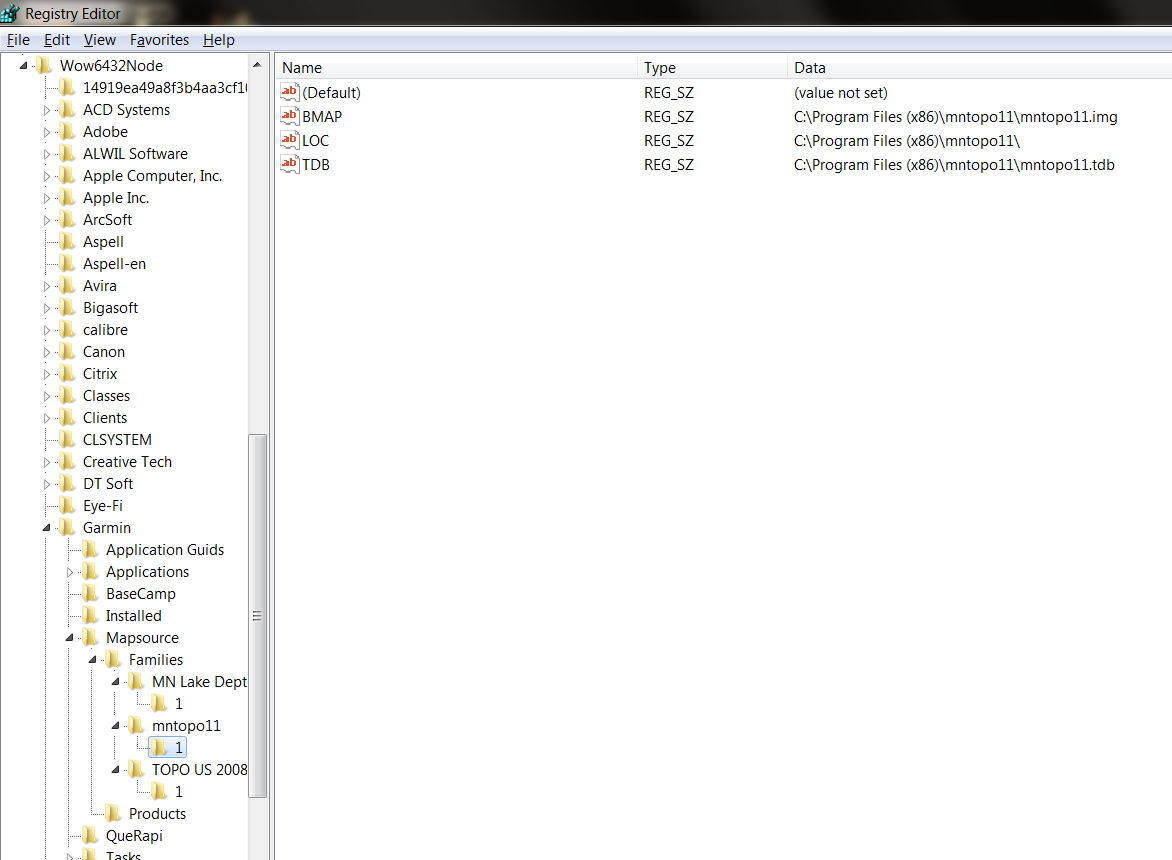
In the UbuntuForums post, the author notes that MapSource looks for maps under HKEY_LOCAL_MACHINE\Software\Garmin\MapSource\Families, where as my installation (Windows 7) had the maps installed under HKEY_LOCAL_MACHINE\Software\Wow6432Node\Garmin\MapSource\Families. So I exported the keys from Families in my Windows installation and then installed them in the same place in the Wine registry.
wine ~/.wine/drive_c/windows/regedit.exe
After installing the key(s) into the Wine registry, I updated the values and changed any references to C:\ to O:\ – my custom Wine device that links to my Windows partition.
Once this is done you can test that your maps are being read correctly.
cd ~/.wine/drive_c/Garmin/
wine ./MapSource.exe
If your maps are installed correctly, they’ll show up under View > Switch to Product. Even if you have no maps installed, MapSource may still be useful to you for downloading tracks from your Garmin and exporting to other formats such as GPX.
Set up a COM device
In order for MapSource to be able to upload/download anything from your GPS, we need to set up a COM device so they can communicate. First load the garmin_gps kernel module (which strangely didn’t autoload in Ubuntu):
sudo modprobe garmin_gps
lsmod | grep garmin
And you should see something like:
garmin_gps 18212 0
usbserial 36911 1 garmin_gps
Turn on the GPS and connect it to the USB port. Then do:
ls /dev/ttyUSB*
You should see a device called ttyUSB0
Now we have to make this device visible as com1 port under Wine:
cd ~/.wine/dosdevices
ln -s /dev/ttyUSB0 com1
When you want to transfer data from your GPS, plug in your Garmin, then run:
sudo modprobe garmin_gps
cd ~/.wine/drive_c/Garmin
wine ./MapSource.exe
In the Transfer menu, select Receive From Device. You should now see your device and can transfer tracks, waypoints from your GPS into MapSource.
Cross-platform file sharing with SSHFS
Update
I have a new post about SSHFS that highlights the latest operating systems, including MacOS. However, I’m leaving this post here for historical purposes.
Original
At home I have what some may call a “back-office” server. Technically it’s in the laundry room, but it does all sorts of home automation type stuff: record TV, download files, store and play music, distribute files, run backups, etc. I may do a post on it later, but the gist is that it’s running Ubuntu Server with a bunch of disk drives.
Far and above, it’s main purpose in life is being a file server. There are several ways to connect to it: Samba (Windows file sharing), NFS (Unix Network File System). The server also runs SSH (Secure Shell) for terminal access – which can also be used a pass-through for secure local and remote file sharing.
The Advantage of SSHFS
Windows shares don’t have options to change ports, SSH does – and internet service providers often block Windows file sharing ports both for their own customers safety and to CYOA (cover your [their] own a$$) regarding file sharing. SSH, however, can be run on any port and it’s secure. I simply set up a firewall rule on my router (OpenWrt) to pass SSH traffic to my file server.
Why not use “the cloud?”
I firmly believe that by putting your files in “the cloud” (whether it be with Google, Apple, Amazon, Dropbox, etc.) you lose a little freedom. That doesn’t mean I don’t use any of those services, I just use them selectively. For the record Dropbox is a great service that works cross-platform and you’ll get some extra space if you sign up using this link.
Connecting with SSHFS in Linux
The simplest way to connect to another computers file-system using SSHFS is to do it through the UI using the Nautilus file manager. This is default file manager for several Linux distributions. In Ubuntu with Unity, click the folder icon in the launcher to bring a Nautilus window showing your home folder. From Nautilus you can click the file menu and choose Connect to Server…

Which will bring up a dialog where you can input the info for your SSH server. Change the Type drop-down to “SSH” and you’ll see all of these options:

Once you’ve connected, you’ll have a folder on the left side of Nautilus (under Network) that you can click on to browse files on the file server. You can right click the folder and choose Add Bookmark which will make it a breeze to connect to again and again:

You’ll notice I have two folders under “Bookmarks”: sshfs-Local and sshfs-Remote. I set up an additional connection for when I’m away from home which uses my outside IP and port I set up on my firewall/router.
Nautilus uses the GVFS FUSE (filesystem in userspace) module to mount the remote drive. To make it easy to access from the command line I created a symbolic link from ~/Documents/sshfs-Local-Documents to my SSHFS directory. All of the GVFS mounts (on Ubuntu 12.04 and earlier) can be found in your ~/.gvfs folder. Mine is linked as such:
justin@lappy64:~$ ls -l ~/Documents/sshfs-Local-Documents
lrwxrwxrwx 1 justin justin 72 Oct 17  2011 /home/justin/Documents/sshfs-Local-Documents -> /home/justin/.gvfs/SFTP for justin on ghettivo/srv/home/justin/Documents
Starting with Ubuntu 12.10, the GVFS mounts are in /var/run/user. So my symlink in 12.10 looks like:
justin@lappy64:~$ ls -l ~/Documents/sshfs-Local-Documents
lrwxrwxrwx 1 justin justin 82 Nov  1 09:44 /home/justin/Documents/sshfs-Local-Documents -> /var/run/user/justin/gvfs/sftp:host=ghettivo,user=justin/srv/home/justin/Documents
Connection with SSHFS in Windows
To connect to the same files using Windows, there’s Dokan SSHFS. I will say that at the moment this library is a little buggy, but it will work in a pinch. I get the feeling that it probably works better in 32-bit windows, but I don’t have any claims to back that up – I just know it’s a bit unstable in 64-bit windows.
Since Dokan is a .NET application, you’ll need to install a couple of things (maybe 3), slightly better than installing a Java application 😉
There’s a small chance that you have the latest “Redistributable Package” already on your Windows computer, so you can maybe skip it, but honestly it doesn’t hurt to install.
Once you’ve got everything installed you can run DokanSSHFS.exe to connect to your SSHFS drive:

Happy (secure) file sharing!