I recently saw this picture on Facebook – amazing 3D printing results from the Creality Ender 3 using the Ultimaker Cura slicer with the “Creawesome Mod”:
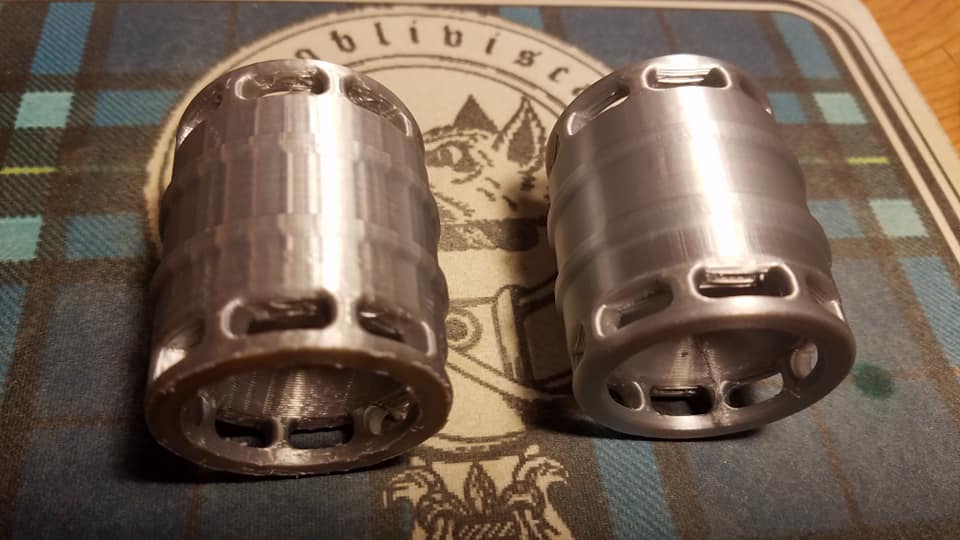
This photo shows a “regular” Cura 4.0 print on the left and a Creawesome one on the right. Image courtesy of Thirl Thompson from the Creality Ender-3 3d printer user group on Facebook. Awesome indeed. Naturally I’d like to see the same results from my prints, but there were no Linux instructions yet, so I set out to figure out how to do this.Continue reading →
AppImages and mods, wut?
The Cura downloads you can get for Linux right from Ultimaker are AppImages. Basically bundles of software that can run on their own without having to install anything else. Super easy, just download the file, set it to executable, and run it. But how does the Creawesome mod install?
The Creawesome mod is a zip file with a folder in it called “resources.” I just needed to figure out where to put it. I tried putting it in ~/.config/cura/4.0 on my Ubuntu system but that didn’t do anything. The clue that it is working, according to this video, is that I should see a Creawesome mod splash screen.
But I wasn’t having any luck.
Deconstructing the AppImage
Since the AppImage is a bundle, I thought that maybe they need to go inside of it. The AppImages delivered from Ultimaker are “version 1” app images. Those types of AppImages can be mounted like a filesystem for further inspection. I used these commands:
$ mkdir /tmp/cura_mnt
$ sudo mount path/to/Ultimaker_Cura-4.0.0.AppImage /tmp/cura_mnt
mount: /tmp/cura_mnt: WARNING: device write-protected, mounted read-only.
The Cura 4.0 AppImage is now mounted at /tmp/cura_mnt and we can look at the contents. It has a “resources” directory! (bottom)
$ ls /tmp/cura_mnt/usr/bin
cura                libgfortran.so.3              libQt5Qml.so.5              libQt5Xml.so.5
CuraEngine          libgomp.so.1                  libQt5QuickControls2.so.5   libselinux.so.1
cura.sh             libopenblas.so.0              libQt5QuickParticles.so.5   libssl.so
lib                 libpng12.so.0                 libQt5Quick.so.5            libssl.so.10
libcrypto.so        libpython3.5.so.1.0           libQt5QuickTemplates2.so.5  libxcb-xfixes.so.0
libcrypto.so.10     libQt5Charts.so.5             libQt5QuickTest.so.5        libXi.so.6
libfontconfig.so.1  libQt5Core.so.5               libQt5RemoteObjects.so.5    openssl.cnf
libfreetype.so.6    libQt5DataVisualization.so.5  libQt5Sql.so.5              plugins
libgeos_c.so        libQt5DBus.so.5               libQt5Svg.so.5              qml
libgeos_c.so.1      libQt5Gui.so.5                libQt5Test.so.5             qt
libgeos.so          libQt5Network.so.5            libQt5Widgets.so.5          resources
libgeos.so.3.6.2    libQt5OpenGL.so.5             libQt5XcbQpa.so.5
But, we can’t just overwrite that folder and unmount the image. The image itself is mounted read-only. So I made a full copy of the directory and then unmounted the original AppImage.
$ cd /tmp
$ cp -a cura_mnt cura_image
$ sudo umount cura_mnt
Repackaging the AppImage with the Creawesome mod
I removed the resources directory so I could copy in the Creawesome mod resources directory.
$ rm -rf cura_image/usr/bin/resources
$ mv ~/Downloads/CreawsomeMod-0.2/resources cura_image/usr/bin/
After some research I found there’s an easy way to package this directory back up into a new AppImage. There’s a program called appimagetool that can help. I downloaded the appimagetool-x86_64.AppImage file from their github release page. Fittingly, it’s also an AppImage, and will need to be set to executable.
Then use appimagetool to package it back up:
$ appimagetool-x86_64.AppImage -v /tmp/cura_image
This should create an updated AppImage with the Creawesome mod called Cura-x86_64.AppImage. I renamed mine to Ultimaker_Cura-Creawesome-4.0-x86_64.AppImage and put it right next to my original Ultimaker_Cura-4.0.0.AppImage file in case I need to fall back to the “vanilla” version.
And here is the x86_64 AppImage for Cura 4.0 with the Creawesome mod pre-installed. I hope this helps – let me know in the comments if you have any issues or had to do things differently.
Update
Upon publishing this I was notified that there’s already this fork of Creawesome which has automated this process, so you can just download those releases there!
