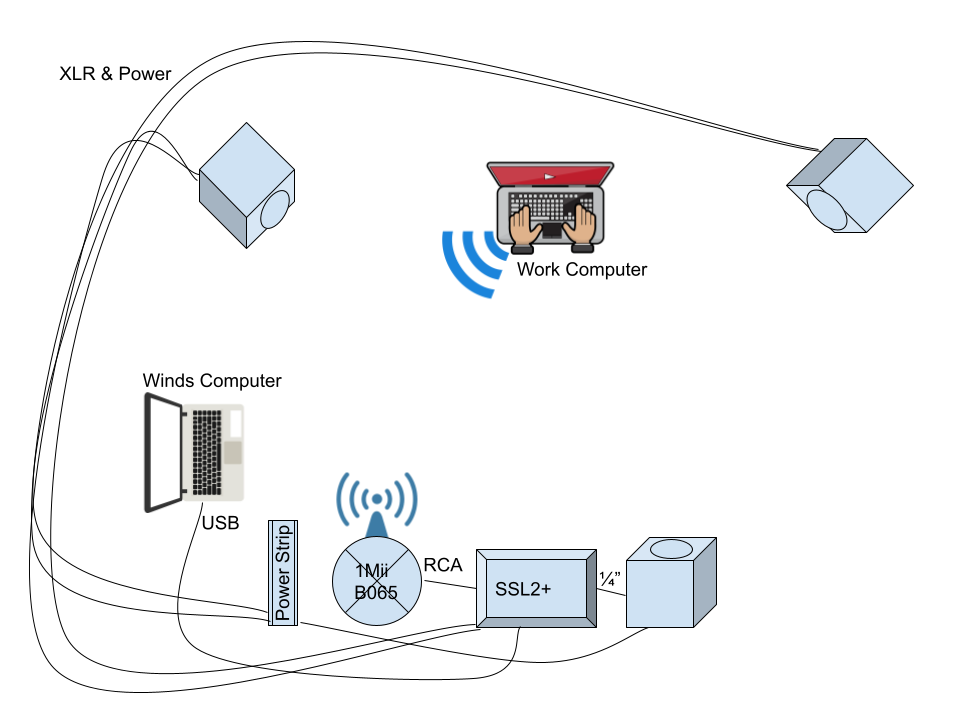
I set out to create a setup similar to MBI Winds’ first season at home in miniature. I knew I needed at last a 4-channel USB-audio interface. I needed at least 3 powered speakers, which can oddly be difficult as many studio monitors are only sold in pairs.
Another quick call to my sales rep at Sweetwater got me to the answer. The JBL 308s are a very popular and highly recommended 8″ powered monitor. They’re sold individually and my rep even let me know when they were going to go on sale.
Then wrapped the cables with some white cable wrap so it doesn’t look terrible in the background when I’m on zoom calls for work.
For Work
It works well because I can use the mains for listening to music while working. How I get the signal from my work computer is via bluetooth to a new bluetooth receiver. That receiver has two RCA to 1/4″ TS cables going to analog input channels 1 & 2 on my audio interface.
For Winds
When I’m doing music stuff it’s sort of backwards as I’m facing the 3rd aux channel, but it’s the same experience the members would have on the floor, facing the audience. I plug my macbook into the USB audio interface for a multi-channel digital audio connection.
Setup
The JBL speakers’ 1/4″ input supports both TRS (balanced) signals and TS (unbalanced) signals. Because I’m coming off the “Phones B” output for channels 3 & 4, I use the stereo TRS to mono TS cable and connect to the 1/4″ input on my 3rd speaker. It’s not a balanced connection but it’s only traveling 3 feet, so induced noise & signal loss should be minimal.
For the mains I use regular XLR cables which connect to the SSL audio interface with a short XLR to TRS adapter cable. I got enough extension cord to run them along with the XLR cables so everything plugs in around the same area, and I use a power strip to turn it all on/off in tandem.
Future
For version 1.1 I’ll probably upgrade my power strip to something that has USB-A ports and USB-C power delivery for the macbook.
I was previously using a Sony HWS-BTA2W bluetooth adapter from 2007 to get sound wirelessly from my computer or phone to a set of non-bluetooth speakers. It had a problem that only happened with my linux computer. I was annoyed with this device because as the workload would increase/decrease on my computer, the audio would speed up and slow down. You could hear the pitch rise and fall if you were listening to music. This is probably by design – as part of the base level Bluetooth SBC codec that everything supports. It makes sense that if you’re talking on the phone you’d want to hear everything someone said, even if it had to be sped up or slowed down for continuity.
The pitch bend happened on all of my linux laptops: 2008 Dell Studio 17 and my 2014 ThinkPad T440s, and my 2019 Developer Edition XPS 13. I wasn’t sure about the problem being in the linux bluetooth stack or the Sony device itself. I knew there was a better solution available – and it happened to be a combination of hardware and software.
Interestingly, aptX originated as a PhD thesis, then later became incarnate in a DSP chip. Then the tech changed hands though several companies (including Solid State Logic which makes my audio interface). Before finally becoming part of Qualcomm. AptX was first used in the Bluetooth stack with some Sennheiser headphones from 2009. My 2007 Sony hardware was definitely not using this tech.
AptX on Ubuntu 22.04
To make sure my computer supported these extra codecs, I had to install some extras. Partly because aptX has some patent issues (although it’s been reverse engineered), and partly because I upgraded my system to use pipewire. The best source I found was this gist:
Enable PipeWire on Ubuntu 22.04
This guide is only for original Ubuntu out-of-the-box packages. If you have added a custom PPA like pipewire-debian, you might get into conflicts.
Ubuntu 22.04 has PipeWire partially installed and enabled as it’s used by browsers (WebRTC) for recoding the screeen under Wayland. We can enable remaining parts and use PipeWire for audio and Bluetooth instead of PulseAudio.
Starting from WirePlumber version 0.4.8 automatic Bluetooth profile switching (e.g. switching from A2DP to HSP/HFP when an application needs microphone access) is supported. Jammy (22.04) repos provide exactly version 0.4.8. So, we’re good.
Based on Debian Wiki, but simplified for Ubuntu 22.04.
Check if you have other (like Pulse) configs in the /etc/alsa/conf.d/ installed by something else. You might want to remove them.
PulseAudio
Everything was done automatically by pipewire-pulse package, which should have been installed by wireplumber package as recommended. If not, install it yourself.
Bluetooth
Install the codecs and remove Bluetooth from PulseAudio, so it would be handled directly by PipeWire:
Unfortunately, aptX and AAC are not supported because of patents and other technical reasons. aptX is available starting from 22.10 via libfreeaptx0 installed by default there (22.10 uses PipeWire by default as well). If you really need these codecs in 22.04 you may use this PPA from @aglasgall which is based on universe, but rebuilds pipewire with additional packages for aptX and AAC from multiverse. Read the discussion here.
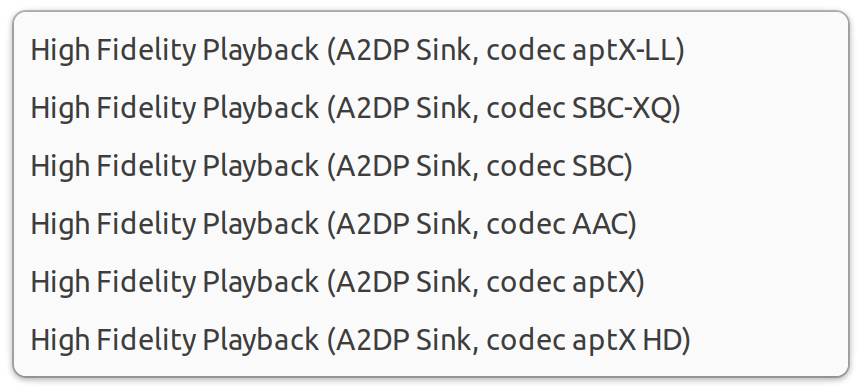
The important part in there is actually the link to the pipewire-extra-bt-codecs PPA for Ubuntu 22.04. I installed/removed the packages as expected and when I connected to the 1Mii B06S I can choose from all of the supported codecs in my sound settings:
I’m going to keep it on aptX HD for now and see how it sounds, but so far I’ve experienced zero pitch changes while listening to music.
Coming soon..
Next I’ll go through how I have everything hooked up in my home audio studio.
In 2018 I bought a gaming computer to replace my aging Dell 17″ laptop. The game I wanted to play was VRC – which didn’t require a lot of horsepower, but I wanted to potentially play other games. I found an Alienware Alpha with decent specs and bought it. One thing that interested me about all Alienware systems was the ability to connect them to the Alienware Graphics Amplifier (AGA).
Not really knowing what works and what doesn’t with the graphics amplifier in 2023, I just went ahead an ordered whatever RTX video card seemed like the best bang for the buck. I dropped $600 on an 4070 by ASUS. But when it arrived, I found the fans on the card were so huge that once installed into the graphics amplifier, the lid wouldn’t close 😩
So it was clearly time for me to do the research that I should have done earlier (besides determining what is the best bang/buck).
3000-series RTX
I found a few articles on reddit that indicated the 3000 series is the easiest road to plug-and-play with the AGA. The drivers work, the cards fit with the lid closed, and the power requirements don’t require an upgrade of the AGA’s power supply unit.
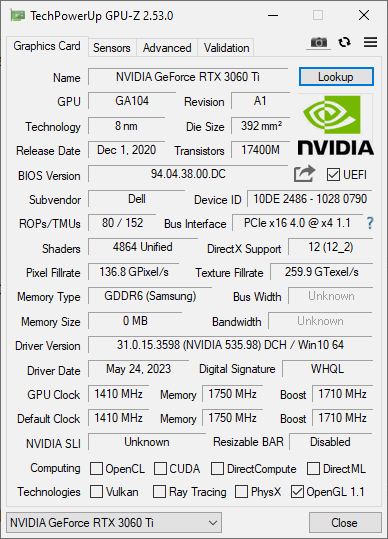
I ordered a used EVGA card from Amazon thinking I could save some $$$. At $300, the 3060 Ti was half the cost of the 4070. It fit nicely inside the graphics amplifier, but wouldn’t actually work – Windows always reported the dreaded “Error code 43.” Running several scripts didn’t alleviate the “Error code 43” problem, but led me towards some other troubleshooting tips. I used GPU-Z, which detected the video card but listed 0MB of VRAM 😥
I had ordered from Amazon on purpose because of their return policy, so back it went. This pursuit was getting old, but I soldiered on. Next I ordered a brand new 3060 Ti manufactured by ASUS. I didn’t have hard evidence that it would fit, just a hunch.
It fits with the lid closed, and it shows up in GPU-Z as expected, and it works just fine with the Alienware Alpha. 3rd time’s the charm!
Last year I officially gave up on my Fitbit Charge 4. It was great until it wasn’t. Since I’m a glutton for punishment, I got yet another fitness watch. This time, the Amazfit GTR-3 on a recommendation from a co-worker.
The pros and cons? Pros: great battery life, customizable color screen, built-in GPS. My only real complaint is around the face automatically turning on/off. When I look at the face it won’t always automatically turn on, so I’ll go to press the button on the side and a split second before I press the button, the face will self-activate.
What happens is similar to “Layout Shift” on websites. Your finger or cursor is over a button, then bam! Something else loads and moves something (that you didn’t intent to tap) right where you were.
What happens with the watch is it displays the face for a split second, then goes into the menu system because I technically pressed the button while the screen was active 😖
The workaround for me has been to enable the always-on screen functionality, which lessens the battery life from 21-days to 7, but I’m OK with that because it beats charging every day.
GPS
What I really got it for was the GPS. I’ve only used for fitness tracking twice, but I can already tell it’s going to be a better experience. My first ride was on a company retreat in Mexico. There was a resort “Bike Tour” which I use in quotes because we rode bikes from the resort up the road to the adjacent marina town, and then went to the grocery store 🏪
Elapsed Time
Moving Time
Distance
Average Speed
Max Speed
Elevation Gain
Calories Burned
01:04:42
hours
00:19:50
hours
2.32
mi.
7.01
mph
11.24
mph
7.55
ft.
145
kcal
While I was in the grocery store, after a certain amount of time, it warned me about turning the GPS off to save battery while my activity was paused. Then when I unpaused it there were no issues 💪 (unlike my Fitbit). The only real issue was I forgot to press start until halfway to Puerto Morelos 😓
Take 2
Now that I’m home and winter seems to have actually gone away, I tried it with a bike ride here and everything went as planned.
Elapsed Time
Moving Time
Distance
Average Speed
Max Speed
Elevation Gain
Calories Burned
00:30:31
hours
00:23:56
hours
3.40
mi.
8.51
mph
18.82
mph
121.39
ft.
171
kcal
I’m looking forward to seeing how it does out on the water. That was the death-blow for my fitbit. When I’m in the water I don’t want to be fiddling with my phone. So far, so good 🤞
I never like the idea of getting a kid summer stuff (bikes, skateboards, etc) for Christmas because in Minnesota you have to wait another 4 months before you can even think about using it. Getting her a stand-up paddle-board (SUP) for her birthday in May would be a better idea.
I didn’t actually make it 6 months, only three. In that time, the price on this thing didn’t budge. As much it looks like a top-quality boat, I was reluctant to drop $500 on something that might not be a hit. So I kept looking 👀
What I found in November is the Retrospec brand, an LA-based outdoor recreation and fitness company. They also have an eight-foot paddle board for kids for $250. I subscribed to their notifications and waited, but I didn’t have to wait long, and was able to snag the board on sale for $200.
It sat in the box for a couple of months waiting for my daughter’s birthday to roll around. She opened it earlier this month, and finally over Memorial day weekend, we were able to take it out.
The board itself is great, it comes with everything all nicely packed in a backpack to carry it around. Inflation was easy and honestly I’ll probably keep it inflated for the summer. We just take the fins off while moving it, and they’re easy to snap on and off.
She did great on it, even on a windy day 🌬️ The only time she had a problem was near the shore when the wake board boat wake came in, creating some big waves! 🌊
My only regret is that we didn’t get a photo of her on the maiden voyage 😓