This is part two of a three part series covering Dnsmasq’s uses regarding:
- Local Development DNS
- Local Area Network (LAN) DNS
- Virtual Private Network (VPN) routing
In my previous post I covered using Dnsmasq locally to bring some organization to local web development. Now I’d like to cover Dnsmasq’s use on a Local Area Network (LAN), you don’t need to be a developer to appreciate Dnsmasq as we kick it up a notch and spread the love across the network.
Using Dnsmasq locally is nice and all, but what if you have a home network with multiple computers, each serving different purposes? You probably want them to inter-operate smoothly, and it’s nice to reference things by name rather than having to remember IP addresses.
OpenWrt & Dnsmasq
If you have a computer/server on your network that is on most of the time, this would be an appropriate candidate to run Dnsmasq on. Or, you can do it my preferred way, which is to buy a wireless router that supports OpenWrt (an open-source router firmware) – it includes Dnsmasq. If you decide to use an existing Mac or Unix box on your network to run Dnsmasq, see my first post regarding Dnsmasq installation and configuration, and read the documentation on Dnsmasq’s DHCP options.
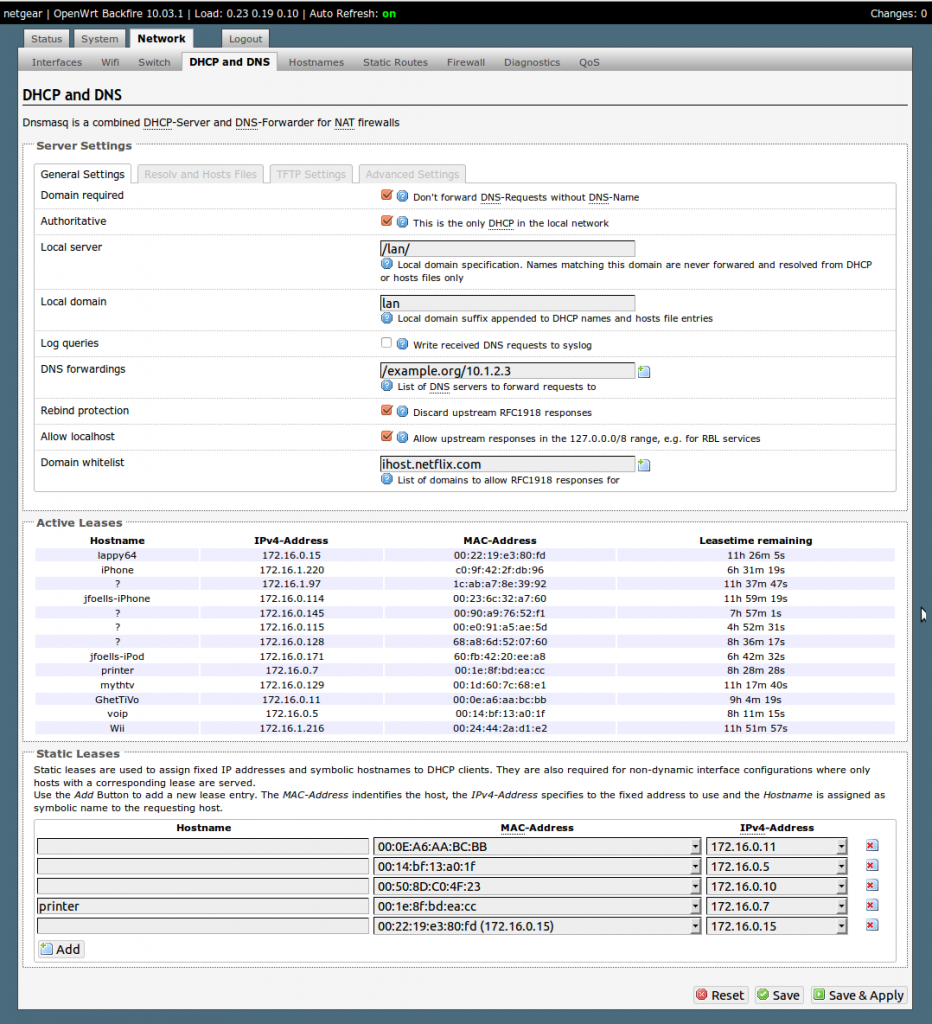
For those that go the OpenWrt route, here are some tips on configuring Dnsmasq on OpenWrt Backfire (10.03.1 – latest stable as of 2012). Once your router has the OpenWrt firmware installed and you’ve logged into the web interface, navigate to the DHCP and DNS tab under Network:
The premise behind Dnsmasq is that it not only includes a DNS Server, it also includes a DHCP server. When DCHP is enabled, Dnsmasq will automagically create a DNS name for each computer that connects to the network, based on it’s hostname.
The Server Settings that determine the Top Level Domain (TLD) are Local server and Local domain, set to “lan” in my case. Every host that connects will get a “.lan” domain name. If you look at the list of Active Leases you can imagine each one getting a domain name like lappy64.lan (a play on Strongbad’s Lappy 486), printer.lan, mythtv.lan, etc. In fact, the “.lan” extension is not even needed, hosts can be address simply by their hostname – how easy is that?
For some stubborn devices, which do not report a hostname when asking for an IP address (see those with hostname of “?” in the Active Leases box), the Static Leases section can help out. Once the device is connected, click Add in the Static Leases box, then select the device’s MAC-Address from the list. Under Hostname, type in the name you’d like it to be referenced as, such as “printer.” Give the device a static IP address (something that’s not in the DHCP range specified on the Network > Interfaces > Lan tab – below .50 is probably safe). Save & Apply your changes – you might have to force the device to reconnect in order for it to get the new address.
If you’ve got computers/devices that report a hostname just fine but you’d still like to assign a static IP to, use the Static Leases section in the same way, but leave the hostname field blank.
